background image

31

Editing (For DVD Disc Only)

Before starting to edit

This section explains the basic editing functions on the unit.
Please finish all the editing before finalizing the disc. You cannot
edit a finalized disc. This function is only applicable to recorded
video titles on a DVD+R or a DVD+RW disc that has not been
finalized.

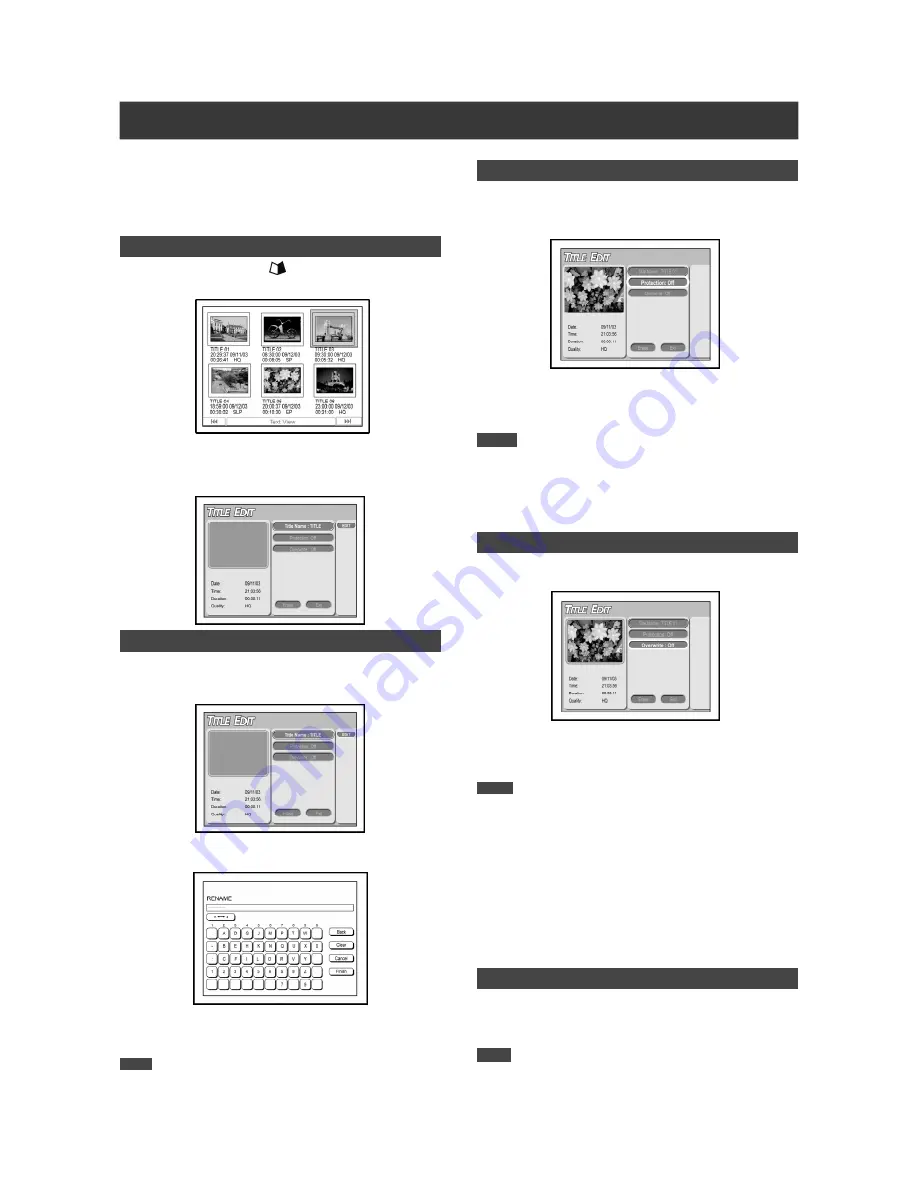
DVD menu and Edit menu

1. Press [ 

PLAY] or [ 

 GUIDER] to display the

“DVD Menu.”

2. Select the session you like to edit.

3. Press [EDIT] to display the “Title Edit” menu.

Naming a title

1. AT the edit menu, press [

] [

] to select the

“Edit” icon and then press [ENTER].

The display for entering a title name appears.

2. Select the desired characters from the keypad,

and press [ENTER] after each entry.

3. When you finish entering the title name, and

press [

] [

] [

] [

] to select “Finish.”

Press [ENTER] to exit the title edit menu.

Protecting a title

1. At the edit menu, press [

] [

] to select

“Protection” and then press [ENTER].

2. Press [

] [

] to select the “On” icon and

then press [ENTER].

 Notes:

1.When a title is protected, it cannot be erased or overwritten.
2.When a disc is being erased to create a new format, the
  protected contents will be deleted permanently.
3.This function is not applicable to a DVD+R disc that has been
  finalized.

Overwriting a title

1. At the edit menu, press [

]  [

] to select

“Overwrite” and then press [ENTER].

2. Press [

] [

] to select “On” and then press

[ENTER].

The “Overwrite” mode is set.

Note:

1.For DVD+R discs, each new recording session is always placed
right after the previous recording. The original recording sessions
cannot be overwritten.
2.For DVD+RW discs, each new recording session can either be
placed right after the previous recording or directly overwrite the
selected recording title.
3. When the overwrite function is turned on, the recording can be
overwritten. When the function is turned off, the subject cannot be
overwritten. The overwrite function is turned off as the default
setting.
4. This function is not applicable to a DVD+R disc that has been
finalized.

Erasing a title

1. At the edit menu, press [

] [

] to select

“Erase” and then press [ENTER].

The title is thus erased.

Note:

1. After erasing the titles on the DVD+R discs, the erased space
could not be utilized or re-allocated.
2. This function is not applicable to a DVD+R disc that has been
finalized.

Note:

1.You only can enter up to 25 characters for a name.
2. This function is not applicable to a DVD+R disc that has been
finalized.

Summary of Contents for LVC-9015G

Page 1: ...SIMPLY AMAZING VCR DVD Recorder LVC 9015G...

Page 2: ...Recording 17 Playback with the DVD menu 17 Playback the recorded contents on a VHS tape 17 Recording from a VCR or Camcorder 18 The front panel and rear panel connection 18 Recording from a DV Camcor...

Page 3: ...tion to cords at plugs convenience receptacles and the point where they exit from the product 16 Outdoor Antenna Grounding If an outside antenna or cable system is connected to the product be sure the...

Page 4: ...thin the product s enclosure that may be of sufficient magnitude to constitute a risk of electric shock to humans The exclamation point within an equilat eral triangle is intended to alert the user to...

Page 5: ...n Aspect Ratio for DVD Discs 4 3 Letter Box Standard 4 3 Pan Scan 16 9 Wide Screen n Others for DVD discs Audio Appears at the beginning of a scene record with multiple audio languages Subtitle Appear...

Page 6: ...top button STOP 20 Play button PLAY 21 Pause button PAUSE 22 Previous button PREVIOUS 23 Next button NEXT 24 REW button REW 25 FF button FF 26 Cursor Enter button ENTER Remote Control To install batte...

Page 7: ...ding 12 INPUT Press to select signal input 13 FRONT PANEL DISPLAY Operation indicators are displayed here 14 DVD VCRSELECTBUTTON Selects DVD VCR control 15 DV LINK IEEE 1394 Jack Connects digital vide...

Page 8: ...ing this DVD Recorder 2 LINE IN S VIDEO Jack S Video signal input 3 AV2 Rear VIDEO AUDIO L R Jacks Composite signal input 4 COMPONENT VIDEO OUTPUT Y Pb Pr Jacks Component signal output 5 LINE OUT VIDE...

Page 9: ...on top of other equipment that may generate heat Excessive heat may cause this unit to malfunction 2 For Digital Cable and Satellite TV users please connect the unit s output to this unit s input Basi...

Page 10: ...ptions on page 10 If your TV has S Video or Component Video inputs you can enjoy superior picture quality 2 Connecting to a TV via COMPONENT out Connecting to a TV with component jacks Connect a set o...

Page 11: ...ur stereo system as shown If you have a stereo system or digital audio receiver you can enjoy superior sound quality Connecting to a digital audio device Connect an amplifier with Dolby Digital and DT...

Page 12: ...e antenna outlet Use a RF cable same as supplied to connect the RF OUT on the cable box satellite receiver to the RF input on the DVD Recorder Use a RF cable same as supplied to connect the RF OUT on...

Page 13: ...is presented 4 3 Letter Box select when you connect the unit to a normal 4 3 TV When playing back a DVD VIDEO disc recorded in wide picture format the picture is shown with black bars at the top and b...

Page 14: ...P to exit Adding or deleting TV channels manually After you have performed channel scan you may like to add or delete some of the TV channels This function allows adding or deleting channel manually 1...

Page 15: ...n and press ENTER The channel moves up or down the list Each time you press and the item changes as follows 3 Repeat as necessary 4 When finished press to select EXIT Press ENTER to save the setting a...

Page 16: ...e control to switch to TV Press EDIT to bring up the Channel Editor menu press to select one of the TV channels and press 3 Press to select the VCR Plus icon and press ENTER The Guide Channel Number G...

Page 17: ...it may take the unit a few seconds to initialize Recording continues until it s manually stopped or when disc or the VHS tape is full To stop recording When you press STOP it may take a few moments fo...

Page 18: ...re it was left You must select the desired recording location on the tape 3 Before you start please ensure that the disc or the VHS tape has enough available space for the recording Changing Chapter I...

Page 19: ...select RECORD to set the desired recording mode DVD Quality Tape Quality 2 Make sure that a recordable disc or a VHS tape is inserted or loaded for recording When you insert a new recordable disc for...

Page 20: ...ice connected to the rear Audio Video Input S Video For a device connected to the rear S Video Input DV For a device such as a digital camcorder connected to the front DV Input with a DV cable 6 Press...

Page 21: ...rder and cue at the point where you want to start recording from 5 Press GUIDER to display the Easy Guider menu 6 Press to select RECORD and press ENTER 7 Press to select Record Disc or Record Tape an...

Page 22: ...s to select the Record and then press ENTER 3 Press to select the signal input and press ENTER 4 Press STOP to stop recording To pause recording Press PAUSE to pause recording If you want to restart r...

Page 23: ...and press ENTER Press to make your selection and ENTER for confirmation To enter the number use the numbered buttons 0 1 9 Once DATE MM DD Weekly DATE SUN MON TUE WED THU FRI SAT Daily DATE when the...

Page 24: ...fect Disc Full and etc Timer Record Recording TV programs using the VCR Plus system 1 Press POWER to turn the unit on 2 Make sure that a recordable disc or a VHS tape is inserted or loaded for recordi...

Page 25: ...to select the icon and then press ENTER to exit the Timer Record menu If you wish to delete a timer record item press to move to the icon and press ENTER The item is deleted 11 Press POWER to turn off...

Page 26: ...will pause at the starting point 6 Press COPY on the remote control again to start copying Or press COPY to DVD on the front panel again to start copying Press STOP to cancel the recording session 7 W...

Page 27: ...cassette playback Before you can start to enjoy the digital audio and video on DVDs or video cassettes make sure that you have made the necessary settings in the Setup screen menus outlined in the pr...

Page 28: ...cord mode Pressing STOP stops the tape recording Press EJECT to eject the cassette from the cassette loading slot Press PLAY to start playback Press F F to perform fast forward scanning Press repeated...

Page 29: ...ck from the specified location time Select CM Skip and press ENTER to fast forward the playback by 30 seconds A B Starting to repeat a desired part REPEAT Select Point A as the beginning of the part y...

Page 30: ...ion makes use of these index signals to let you find the beginning of a desired program quickly and easily When Index Search is selected the unit will start searching for the next index mark When Inde...

Page 31: ...2 The unit cannot support ID3 tag 3 The unit does not support MP3 Pro or WMA files 4 The unit supports discs recorded with multiple sessions 5 The unit only can playback picture or tracks with the fol...

Page 32: ...contents will be deleted permanently 3 This function is not applicable to a DVD R disc that has been finalized Overwriting a title 1 At the edit menu press to select Overwrite and then press ENTER 2...

Page 33: ...stop Record 1 Press GUIDER to display the Easy Guider menu Select Record and press ENTER 2 Press to select Record Disc or Record Tape and press ENTER When you select Record Disc and insert a non reco...

Page 34: ...ve which obtained permission to copy from the copyright owner or for you other wise have a legal right to reproduce or copy Unless you own the Erase The erase function is only applicable to discs Befo...

Page 35: ...menu Notes When finished you can select EXIT and press ENTER or press the GUIDER button again to exit the Easy Guider menu during the finalization process 3 When done select EXIT and press ENTER to ex...

Page 36: ...ets the time 00 00 00 AM Time Zone Sets the time zone Auto Eastern Central Mountain Pacific Alaska Hawaii Daylight sav Sets on or off to tune to daylight saving time Auto On Off Language OSD Select a...

Page 37: ...r stability and compatibility of the player user may chose to update the latest firmware form http www liteonit com DC english download htm All operations are written in PDF file Please follow the ins...

Page 38: ...discs created in VR Video Recording mode allow the contents to be programmed or edited DVD R DVD R is a recordable disc that is the same size as a DVD Video Contents can be recorded only once to a DV...

Page 39: ...esolution 352 pixels 352 pixels Vertical Resolution 240 lines 288 lines VIDEOPERFORMANCE DAConverter 10 bit 54MHz Composite Output 1 Vp p 75 Ohm S Video Output Y 1 Vp p 75 Ohm C 0 286 Vp p 75 Ohm AUDI...

Page 40: ...finalized Some players will not play recordable DVD discs when recorded in video mode and finalized Discs recorded with copy once material cannot be played on non CPRM compatible players The recorder...

Page 41: ...nology Europe B V Meerenakkerplein 16 5652 BJ EINDHOVEN The Netherlands Tel 31 40 2508000 Fax 31 40 2508092 Service e mail dceu_support liteonit com USA LITE ON USA International Inc 42000 Christy Str...

Reviews: