


15
© LITEGEAR INC. 2015
www.litegear.com
Troubleshooting
My LiteMat is plugged into a LiteDimmer that is being supplied with 12V DC power, but it is not turning on. What should I do?
If you have multiple LiteMat setups
, try swapping power supplies, LiteDimmers, and cables one at a time until operation is restored.
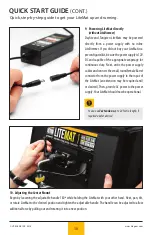
1. Verify that your LiteDimmer is working properly
. Using the sample LiteRibbon provided with your LiteMat or other LiteRibbon that
is known to be working, plug the LiteRibbon into your LiteDimmer along with 12V DC power, and turn the LiteDimmer on.
a. The LiteDimmer works! Proceed to Step #3.
b. The indicator light on my LiteDimmer is not turning on even though I turned the LiteDimmer on. (Proceed to Step #2.)
c. The indicator light on my LiteDimmer is on but is not a steady color. (Proceed to Step #4.)
2. Verify that your power supply is working properly.
Using the sample LiteRibbon provided with your LiteMat or other LiteRibbon
that is known to be working, plug the LiteRibbon directly into your power supply, using the power adapter provided with your LiteDimmer
if applicable.
a. The power supply works! Proceed to Step #4.
b. The power supply does not work. Replace the power supply, and repeat Step #1.
3. Your LiteDimmer and power supply are working.
Checking the colored tags on your LiteMat (see “Labeling” on page 5 for more
information on the colored tags), verify that you are using the appropriate LiteDimmer and power supply.
a. I am using the correct LiteDimmer and power supply. Check the input connector on the LiteMat to ensure that there is no damage. If it
appears to be acceptable, contact the LiteGear Repair Department.
b. I am not using the correct LiteDimmer and/or power supply. One component at a time, replace the LiteDimmer and/or the power supply,
depending on which one did not meet minimum operational requirements. Repeat Step #1 if you replaced the LiteDimmer or Step #2 if you
replace the power supply.
4. Your LiteDimmer is not working properly
. Please refer to the “Troubleshooting” section of the LiteDimmer User’s Guide provided
with your LiteDimmer, or visit http://www.litegear.com/support/document/, and find the appropriate LiteDimmer User’s Guide online.
5. Still not working?
Contact the LiteGear Customer Service Department to provide a detailed explanation of the problem(s) with your LiteMat
and to obtain a Return Materials Authorization (RMA) number.
Maintenance
As you use your LiteMat, you should keep a few things in mind to help maintain the quality of your LiteMat.
1. Keep your LiteMat clean!
Be sure to unplug all components before cleaning. Using glass or plastic cleaner, or simply a damp cloth, maintain the cleanliness of the
surfaces of your LiteMat, paying particular attention to the protective clear plastic covering. Dirt and debris could impair light output and
light quality.
2. Check the wire and connectors!
Especially after repeated use, the integrity of the wire and connectors could become compromised. Check the wire to ensure there are no
cuts in the insulation and that there is no exposed copper wire. If there is any exposed copper, insulate the affected area with electrical tape
or heat shrink, or contact the LiteGear Repair Department for other suggestions. Also, inspect the connector on your LiteMat’s input lead for
any physical damage. If a connector needs to be replaced, contact the LiteGear Repair Department.
3. Be careful with Velcro®!
The Velcro® fastener used to make your LiteMat so versatile and lightweight may lose some of its strength over time with repeated use. To
minimize this wear, try to keep dirt and debris from being caught in the hook or loop fastener of the Velcro®. Also, be mindful of the force
applied to the Velcro® when adding or removing various accessories. Too much force could compromise the integrity of the adhesive that
keeps the Velcro® cleanly attached to your LiteMat or other accessories.
4. Make sure to properly store your LiteMat!
We have designed the LiteMat KitBag to be the perfect vessel for your LiteMat when it is not lighting your next commercial, television
show, or feature film. Be sure to keep the LiteMat from being crushed, stepped on, or otherwise damaged, as the LEDs themselves are very
sensitive electronic components.
TROUBLESHOOTING AND MAINTENANCE
Tips to get you back to work.


