background image

Chapter 3: Edit a message

Linx 5900 & 7900 Quick Start Guide

34

FA69315–3 English

3.3 Overlapping fields

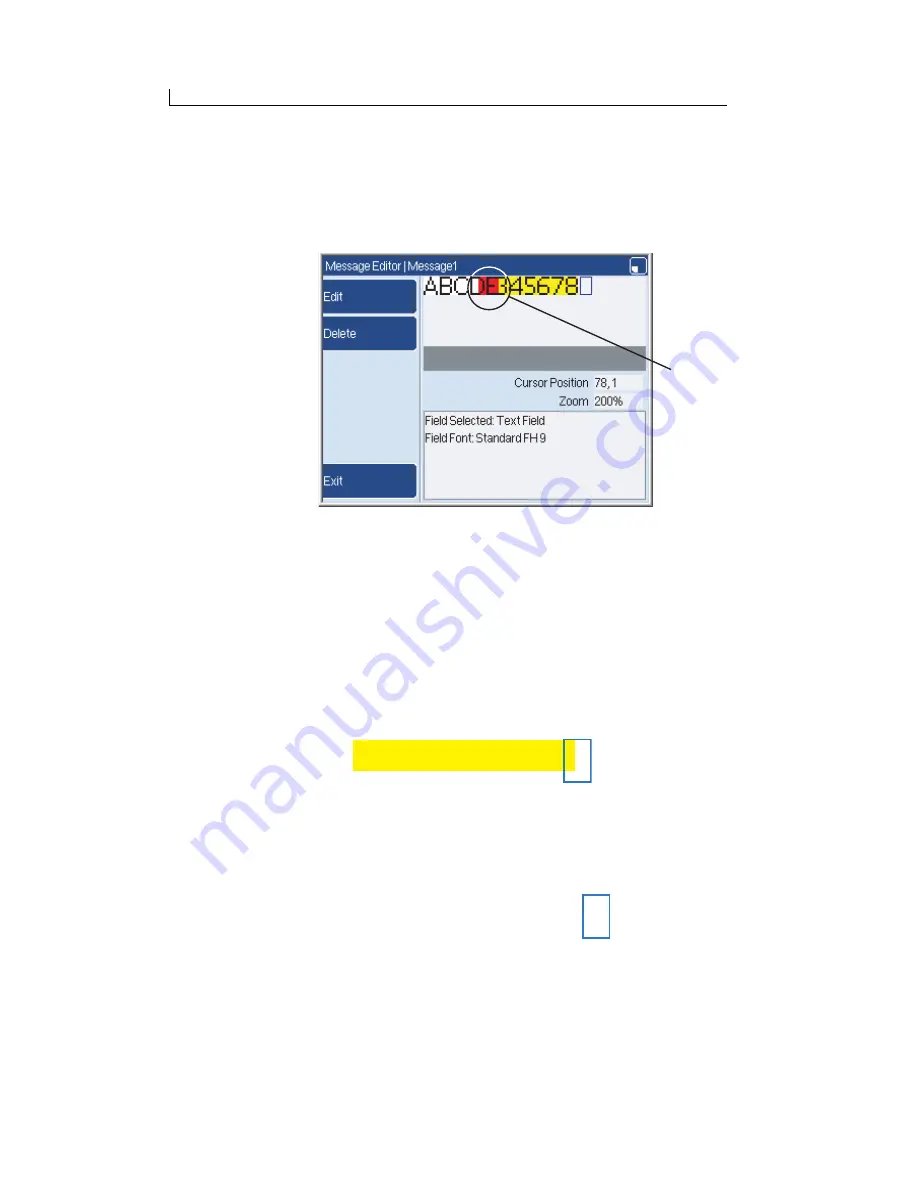
Sometimes when you create or change a message, a part of the message is 
shown in red (like the area ‘A’ in Figure 3-9). The red area indicates that 
one field overlaps another field:

Figure 3-9. Field overlap

Overlapped fields are caused when you insert a field within the boundary 
of another field. If fields overlap, the overlapped areas do not print 
correctly so you must move one of the fields (see ‘Move a field’ on 
page 35).
To prevent overlapped fields, you must move the cursor outside the 
boundary of the existing field before you insert the new field.
To make sure that the cursor is in an empty area, press the [enter] key. If 
the printer highlights a field, the cursor is within that field. The yellow 
highlight shows you the field boundaries:

Figure 3-10. Cursor in a field

Press the [enter] key again so that the field is not selected. Then move the 
cursor outside the field boundaries. When you press the [enter] key, the 
field is not highlighted:

Figure 3-11. Cursor outside a field

69018

A

1111111111

1111111111

Summary of Contents for 7900

Page 1: ...Quick Start Guide ...

Page 2: ...l or other commitment on the part of Linx Printing Technologies Ltd Linx products are subject to continual development and improvement and updates to the content of this guide will be made accordingly in subsequent editions Linx reserves the right to make changes without notice to both this publication and to the products described herein All possible care has been taken in the preparation of this...

Page 3: ...Copyright and Disclaimer Linx 5900 7900 Quick Start Guide ii FA69315 3 English This page left blank intentionally ...

Page 4: ... 1 2 User levels 3 1 3 User interface 4 1 3 1 Printer display 6 1 3 2 Stores 11 2 Get started 13 2 1 Turn on 13 2 2 Create a message 15 2 2 1 Message fields 15 2 2 2 Create your message 16 2 2 3 Save your message 17 2 3 Print a message 19 2 3 1 Print trigger 19 2 3 2 Pause the print 21 2 3 3 Adjust the print position 21 2 3 4 Print Count 23 2 4 Stop and turn off the printer 24 2 4 1 Power Down con...

Page 5: ...Set the Print Style of the field 40 4 1 7 Save or discard your message 40 5 Manage your messages 41 5 1 Copy a message or change the name 41 5 2 Delete a message 42 6 Look after your printer 43 6 1 Clean the printer 44 6 1 1 Printer cover 44 6 1 2 Printhead 45 6 2 Refill the ink or solvent 47 6 3 Clean or replace the air filter 52 6 4 Flush the nozzle 54 6 5 Clear the nozzle 56 Appendix A If the p...

Page 6: ...e printer unsafe to use Warnings and cautions Warning and Caution statements are given at relevant points in the text of this guide These draw your attention to information about how to avoid hazards and how to safely use a product Symbols accompany Warning statements The different types of safety statements and associated symbols are described below along with the conventions used in this guide W...

Page 7: ...THAL VOLTAGE HAZARD DANGEROUS VOLTAGES EXIST IN THIS EQUIPMENT WHEN IT IS CONNECTED TO THE ELECTRICITY SUPPLY NEVER TRY TO OPEN THE PRINTER COVER OR TRY TO REMOVE OR ADJUST ANY COMPONENTS FITTED INSIDE THE PRINTER THERE IS A DANGER OF INJURY OR DEATH FROM ELECTRIC SHOCK IF YOU IGNORE THIS SAFETY WARNING The printer has a lock fitted to the printer cover This stops operators from opening the cover ...

Page 8: ... precautions are essential Take great care when you unpack or move the printer as it is very heavy ALWAYS follow the standard guidelines for the safe manual handling of heavy objects when lifting the printer Always place the printer on its feet and on a level surface Do not turn the printer onto its side at any time Make sure that the electricity supply cable for the printer is correctly connected...

Page 9: ...plied or are not available please contact your local Linx distributor ALWAYS refer to the Material Safety Data Sheets before working with inks and solvents DO NOT smoke or use naked flames near the printer as it contains flammable inks and solvents Make sure that the printing area is adequately ventilated when the printer is in operation and when you work on the printer or use inks or solvents Wea...

Page 10: ...owing paragraphs are the First Aid procedures for inks and solvents taken from the Material Safety Data Sheets For more detailed information you should refer to the Material Safety Data Sheet for the relevant ink or solvent Eye contact with inks or solvents Remove contact lenses if necessary before flushing the eyes Flush the eyes with clean running water and continue to do so for at least 10 minu...

Page 11: ...on Figure 1 Mains Power On Off Switch on the rear panel If there is a hazard that prevents safe access to the Mains Power Supply Switch operate the local electrical isolator switch for the printer Noise emissions The noise emission level from this printer does not exceed 70 dBA This means that there is no hazard to hearing from long term exposure to noise from the printer and therefore no requirem...

Page 12: ...5900 7900 Quick Start Guide is applicable to Version 1 0 System Software or later 5900 printer or Version 5 0 System Software or later 7900 printer until it is superseded by a new edition of the guide Linx will be pleased to receive any correspondence relating to this guide and the information contained herein please write to us at the address below For further information or help with Linx produc...

Page 13: ...About This Guide Linx 5900 7900 Quick Start Guide xii FA69315 3 English This page left blank intentionally ...

Page 14: ...rview This document helps you do the most common jobs on the Printer It describes the layout of the printer the controls and the displays It shows you how to do the following tasks Switch on the printer Create a message to print Select a font style and a font size for your message Create a Date field or a Time field and edit the field Edit a message Print a message on a product Pause printing Chan...

Page 15: ...eate more field types For example Shift Codes Remote fields Prompted fields Logos 7900 only Text sequences 7900 only Orientation sequences 7900 only Production Schedules 7900 only Bar Codes 7900 only Create a Date format or a Time format 7900 only Use the Food Grade printer 7900 only ...

Page 16: ...t pause and stop the printer There is no password for Level A Level B This level provides access to a number of additional printer functions For example you can create and edit a message but you cannot delete a message Level C This level provides access to more printer functions For example you can delete a message or change the Line setup To perform some of the activities described in this guide ...

Page 17: ...n to use the printer look at the keyboard and learn where to find all these special keys Special keyboards are available for some countries that do not use the standard European keyboard A display with six soft keys on the left side Figure 1 2 Printer Soft keys and display The soft keys are keys that perform more than one function The printer provides a label on the display next to each soft key t...

Page 18: ...erious printer failure The Printer Status area of the Print Monitor page tells you what caused the failure You may need to contact your local Linx distributor Warning Red Printer warning The Printer Status area of the Print Monitor page tells you what caused the warning Ready Green The jet runs and the printer is ready to print The LED is turned off when printing stops but the jet may continue to ...

Page 19: ...1678 or v5 1 0 1469 The number changes if new software is installed When the power up is complete the printer displays the Print Monitor page Figure 1 4 Print Monitor NOTE The printer is simple to use and most of the instructions in this guide start and finish at the Print Monitor page When you finish each task you finish in the right area to start your next task The display shown on your printer ...

Page 20: ...ut the instructions that it has been given For example in the Print Settings page in Figure 1 5 you can see information about the current message Figure 1 5 Print Settings page To select an option in a page 1 Press the Up arrow key or the Down arrow key until the item is highlighted the text is white and the background is blue For example in Figure 1 5 the Print Delay option is highlighted 69042 ...

Page 21: ...r change information for the printer you use the operator entry pages For example the Print Delay page shown in Figure 1 6 To provide information in an operator entry page you perform one of the following actions You enter the information into a box Figure 1 7 Text and cursor To change the information that is highlighted in black use the keyboard keys to enter the new information The highlighted t...

Page 22: ...me characters or use the backspace key to delete a single character You can also use the Up and Down arrow keys to increase or decrease the value in some text boxes The arrow indicators at the far right of the box identifies this type of box see Figure 1 8 If the printer knows that the information that you entered is incorrect for example an invalid number the information is shown in red Some soft...

Page 23: ...he Message Editor page to edit the message Figure 1 10 Message Editor Information pages If the printer needs attention for example because the ink or solvent levels are too low it displays an information page Figure 1 11 An information page The information page contains a message about a system event A system event can be a Warning or a System Failure or a Print Failure or an Information event The...

Page 24: ... to your supervisor or contact your local distributor If the event is a Print Failure you must correct the problem immediately you cannot continue to use the printer You can check the Printer Status area on the Print Monitor page to make sure that there are no problems The Printer Status area labelled A in Figure 1 12 tells you about any events that need your attention Figure 1 12 Printer Status a...

Page 25: ...tores are like cupboards When the printer is first installed the stores are empty You can create items to put into the stores For example you can create a message and then put the message into the Message Store You can take the message from the store later then print or edit or copy the message and even change its name When you do not need the message you can delete the message from the store if y...

Page 26: ...nd set up by a Linx approved Service Engineer The mains power supply should already be connected WARNING IF THE PRINTER IS NOT ALREADY CONNECTED AND YOU ARE IN ANY DOUBT AS TO YOUR ABILITY TO CONNECT POWER TO THE PRINTER CONTACT YOUR SUPERVISOR FOR GUIDANCE 2 1 Turn on To turn on the printer 1 Set the mains power supply switch at the rear of the printer to the on I position as shown in Figure 2 1 ...

Page 27: ...k The Printer Status area on the Print Monitor page shows the message MIX When the sequence is complete the message changes to IDLE Figure 2 2 Print Monitor page The soft key names on the Print Monitor page are dimmed for options that are not available For example you cannot use the Print Settings key if there is no Current Message as shown in Figure 2 2 Most of the instructions in this guide begi...

Page 28: ...ferent periods of the day or the week Prompted a field that requires the user to enter or select message text before a message is printed Logo used to print an image or pattern NOTE 5900 only You cannot create logo images on the printer but you can copy logo images in bitmap bmp file format to the printer from a USB memory stick see How To Use the USB Connection for more information Text Sequence ...

Page 29: ...wo methods that you can use to insert a text field You can enter the characters straight into the message This method is the easiest method to create a text field You can use the Text key to set the parameters of the text for example the font size when you create the field This method is described in Chapter 3 Edit a message This section describes how to enter the characters directly 1 Use the arr...

Page 30: ...ssage press the Exit key The printer asks you if you want to save or discard the message and asks you for a name for the message Figure 2 5 Save or discard the message Do one of the following To overwrite the old message make sure that the correct name is displayed in the yellow box Then press the Save Changes key to return to the Message Store page To keep the old message and save the edited mess...

Page 31: ...n this example that it is easy to make a new message Now that your message is in the Message Store you can leave the message there to use at some future date However now you probably want to print it To print your message see Print a message on page 19 If you want to change your message first follow the instructions in Chapter 3 Edit a message ...

Page 32: ...appear on the Message Store page preview as shown in Figure 2 6 Figure 2 6 Message Store invalid message 5900 only 2 3 1 Print trigger You can use a product sensor or other device to trigger a print or you can set the printer to print continuously The Trigger option in the Line Setup menu controls the action of the printer The Line Setup menu is described in the How To guides for the printers In i...

Page 33: ...is not displayed press the Message Store key to go to the Message Store page Figure 2 8 Message store page Use the Up and Down arrow keys to highlight the required message in the list Then press the Select key to return to the Print Monitor page 2 Press the Start Printing key to start the jet The Printer Status area displays the message JET STARTING The jet does not start immediately When the jet ...

Page 34: ...he sequence The sequential field types are described in the How To guides for the printers 2 3 3 Adjust the print position This section shows you how to make sure that the printed message appears in the right position on the product Figure 2 9 helps you understand the print position The large arrow shows the direction of the movement of the product In this example there is a fixed distance C betwe...

Page 35: ...s key to display the Print Settings page Figure 2 10 Print Settings page NOTE The Lock Aspect Ratio option is not displayed for all messages 2 Select the Print Delay option Figure 2 11 Print Delay 3 Use the keyboard or the arrow keys to enter a new value then press the OK key 4 At the Print Settings page press the Exit key to return to the Print Monitor page 69042 69044 ...

Page 36: ...rrent Message do the following 1 At the Print Monitor page press the Pause Printing key to pause the print then press the Print Settings key NOTE The Pause Printing key is not available unless a Current Message is selected The Print Monitor page shows the name of the Current Message 2 Select Print Count to display the Print Count page To change the count use the keyboard to enter a new value or pr...

Page 37: ... correct procedure to make sure that any changes are saved and the printhead is cleaned If you use the mains power supply switch to stop the printer you can lose any changes and cause printhead problems Thorough cleaning of the printhead will be necessary 2 4 1 Power Down configuration The printer can turn off automatically when the jet is stopped or if the printer is idle for some time The superv...

Page 38: ...are not enabled The printer remains in the IDLE state To turn off the printer press the red stop key The printer displays a prompt message see Figure 2 13 Press the Yes key to turn off the printer If the power down function is enabled The printer displays the message You have 10 secs to cancel the power down The displayed number changes every second 9 8 7 until it reaches 1 If you do not press a k...

Page 39: ...Chapter 2 Get started Linx 5900 7900 Quick Start Guide 26 FA69315 3 English This page left blank intentionally ...

Page 40: ...other types of field to your message refer to the How To guides for the printers 1 Go to the Print Monitor page and press the Message Store key 2 Highlight the name of the required message and press the Edit key The printer displays the Message Editor page which shows the content of your selected message Use the arrow keys to move the cursor the blue rectangle into position to insert the new field...

Page 41: ...he problem you must move the new field see Move a field on page 35 or delete the field see Delete a field on page 35 Make sure that the new field is within the message boundary In Figure 3 3 the arrows indicate the message boundary the white area The grey area A is outside the boundary Figure 3 3 Message boundary If a part of the field is outside the message boundary that part of the field is not ...

Page 42: ...5900 7900 Quick Start Guide 4 When your changes are completed press the Exit key at the Message Editor page 5 Now you can save your message or discard the changes see Save your message on page 17 6 To return to the Print Monitor page press the Exit key ...

Page 43: ...current position within the message 3 Use the arrow keys to move the cursor over the required field and then press the enter key The field that you selected becomes highlighted If the field is a Text field you can edit the Text field directly Figure 3 4 Edit a Text field To change the text use the Left arrow key or the Right arrow key to move the cursor Use the keyboard to insert a character or pr...

Page 44: ...r key to select the field Figure 3 5 Select a Date Time field Press the Edit key to edit the field The printer displays the correct page that you need when you edit this type of field For example if the field is a Date field or a Time field the printer displays the Edit Date Time page Figure 3 6 Edit Date Time page To learn about the Edit Date Time page see Chapter 4 Insert a Date or Time 69043 69...

Page 45: ...rom a list The available font sizes depend on the font style that you use Bold select a Bold value from x1 to x10 Negative Image select Yes to print the field as a negative image Figure 3 8 shows how a negative image is printed The first field a is printed normally the second field b is a negative image Figure 3 8 Negative image Orientation you can set the orientation for each field in a message R...

Page 46: ...r information about this option Save the Options When your changes to the Options page are complete press the Exit key 3 2 2 Save or discard your changes 1 When your changes to the message are completed press the Exit key until the printer displays the Message Editor page The display shows you the updated message 2 Press the Exit key Now you can save your message or discard the changes see Save yo...

Page 47: ...rectly so you must move one of the fields see Move a field on page 35 To prevent overlapped fields you must move the cursor outside the boundary of the existing field before you insert the new field To make sure that the cursor is in an empty area press the enter key If the printer highlights a field the cursor is within that field The yellow highlight shows you the field boundaries Figure 3 10 Cu...

Page 48: ... width of one ink drop press and hold both the ctrl key and the shift key Then press an arrow key 5 When your changes are complete press the Exit key 6 Save your message or discard the changes see Save your message on page 17 NOTE You can move several fields in one action The method is described in the How To guides for the printers 3 5 Delete a field This section tells you how to delete a field f...

Page 49: ...Chapter 3 Edit a message Linx 5900 7900 Quick Start Guide 36 FA69315 3 English This page left blank intentionally ...

Page 50: ...eld in a message perform the following steps 4 1 1 Edit the message 1 At the Print Monitor page press the Message Store key 2 At the Message Store page use the arrow keys to highlight the required message then press the Edit key The Message Editor page is displayed and shows the content of the message that you selected The cursor see Figure 2 3 on page 16 shows your current position within that me...

Page 51: ...of formats that you can use to create the field The list that is displayed depends on the language that is selected for this field see Change Language below The language is displayed at the top of the page If you use the Down arrow key to scroll through the list you can see that the list contains both Date formats and Time formats Figure 4 3 Date and Time formats Use the arrow keys to highlight th...

Page 52: ... days the date that is printed in the message is December 31 To set the date difference select Date Offset then press the Select key to display the Date Offset page Enter the required value from the keyboard or use the arrow keys Then press the OK key to return to the Insert Date Time page 4 1 4 Set the Date Offset Units If you use a Date Offset you can use any of the following units Days Weeks Mo...

Page 53: ... the Select key to display the Options page Figure 4 4 Options page The options on this page are described in Options page on page 32 4 1 7 Save or discard your message At the Insert Date Time page press the Exit key to return to the Message Editor page To leave the Message Editor page press the Exit key to display the Save As page Then save your message or discard the changes see Save your messag...

Page 54: ...any of the following options are not available you do not have the necessary User Level Refer to your supervisor or line manager 5 1 Copy a message or change the name To copy an existing message or to change the name of an existing message do the following 1 At the Print Monitor page press the Message Store key 2 At the Message Store press the Manage Messages key 3 Highlight the name of the requir...

Page 55: ...r page press the Exit key twice 5 2 Delete a message To delete a message from the Message Store 1 At the Print Monitor page press the Message Store key 2 At the Message Store press the Manage Messages key 3 Highlight the name of the required message in the list then press the Delete key 4 The printer asks you to confirm that you want to delete the message To confirm and delete the message press th...

Page 56: ... OF THIS QUICK START GUIDE The printer needs minimal maintenance to operate without problems The maintenance requirement is shown in the table Part Examine Clean Replace or Refill Printer cover Daily or each time used for general cleanliness Weekly or as necessary Not applicable Printhead Daily or each time used for ink build up Weekly or as necessary Not applicable Ink and solvent At startup and ...

Page 57: ...HE EYES AND NON ALLERGIC CONTACT DERMATITIS WARNING FLAMMABLE LIQUIDS THE INKS AND SOLVENTS USED WITH THIS PRINTER ARE HIGHLY FLAMMABLE KEEP INKS AND SOLVENTS AWAY FROM SOURCES OF IGNITION DO NOT SMOKE OR USE OPEN FLAMES NEAR THE PRINTER OR INK AND SOLVENT STORAGE CONTAINERS USE INKS AND SOLVENTS AND OPERATE THE PRINTER IN AN AREA WITH GOOD VENTILATION THERE IS A RISK OF FIRE OR EXPLOSION IF THIS ...

Page 58: ...Figure 6 2 or attach it to a wash station if you have one Make sure that the cleaning solvent is the same type that is used in the printer Figure 6 2 Wash the printhead with the solvent 4 Put a container under the printhead and gently wash only the circled area with the solvent as shown in Figure 6 2 Pause after every rinse to allow the ink to dissolve Collect the solvent in the container Dispose ...

Page 59: ...efully Do not use the brush to clean the nozzle CAUTION Use ONLY the non abrasive solvent resistant brush supplied with the printer part number FA940053 to clean the printhead Figure 6 3 Clean the printhead with the brush 6 Allow the printhead to dry completely Do not use a cloth to dry the printhead You must make sure that the space between the nozzle and the charge electrode is free of solvent 7...

Page 60: ...HE PRINTER IN AN AREA WITH GOOD VENTILATION THERE IS A RISK OF FIRE OR EXPLOSION IF THIS SAFETY WARNING IS IGNORED CAUTION Use only Linx ink and solvent Do not add ink or solvent until indicated by the printer Every bottle of Linx ink or solvent has a nine character SureFill code printed on the label You must enter this SureFill code before you refill the ink and solvent The SureFill code helps yo...

Page 61: ...bel of the ink or solvent bottle Figure 6 4 SureFill page Ink Refill Requested To cancel the ink or solvent refill press the Exit key to return the Print Monitor page The Printer Status area shows any ink or solvent low or refill event messages for example REFILL REQUIRED The SureFill soft key on the left of the screen is enabled Figure 6 5 Print Monitor page Ink Low To now refill the ink or solve...

Page 62: ...r and refers to an ink or solvent with a shelf life that has not expired If you enter a valid code the Ink Refill page is displayed Follow the instructions on the screen or in steps 4 to 7 below to refill the ink or solvent 4 Remove the solvent or ink filler cap as required The white filler cap marked S for solvent The black filler cap marked with an ink drop icon for ink 5 Remove the cap from the...

Page 63: ...mixing sequence can start when the ink is refilled Wait until the mixing sequence has finished and the status changes to IDLE before you try to print 8 When the ink or solvent tank is full the printer displays a confirmation message Figure 6 8 Refill complete confirmation message See SureFill code messages on page 51 for more information about SureFill code messages Press the OK key to return to t...

Page 64: ...reFill page see Figure 6 4 on page 48 and press the Enter SureFill Code key Follow steps 2 to 9 above SureFill code messages The printer displays an information message If you enter an incorrect SureFill code If you enter a SureFill code that refers to an ink or solvent that is out of date that is the ink or solvent shelf life has expired If you enter a SureFill code that is not correct for the in...

Page 65: ...er every day To clean or replace the filter 1 Use the nylon tab to remove the filter element Pressure can be necessary to release the filter from the housing Refer to the illustration below Figure 6 10 Remove the air filter 5900 and 7900 2 Gently hit the filter to remove dirt or use an air line to blow air through the filter in the opposite direction to the normal flow 3 Check that the filter is c...

Page 66: ...he screw and release the filter access panel 2 Pull the filter handle until the filter is removed from the filter housing The filter fits tightly into the housing Refer to the illustration below Figure 6 11 Remove the air filter 7900 IP65 version 3 Make sure that the new filter is clean and the type of filter is correct Make sure that there is no dirt in the filter housing 4 Fit the new Linx appro...

Page 67: ...a flow of solvent through the nozzle The solvent returns to the ink system through the gutter To flush the nozzle 1 Make sure that the printer status is IDLE 2 Put a container under the printhead to collect solvent 3 At the Print Monitor page press the Menu key 4 Select Nozzle Flush to display the Nozzle Flush page Figure 6 12 Nozzle Flush page NOTE The Nozzle Flush option is not available unless ...

Page 68: ...ble Figure 6 13 Nozzle Flush sequence When the sequence stops the printer displays the information page shown in Figure 6 12 6 You can perform more flush sequences or return to the Print Monitor page To perform more flush sequences repeat step 5 To return to the Print Monitor page press the Exit key twice NOTE The Nozzle Flush sequence can correct an incorrect nozzle alignment If the procedure is ...

Page 69: ...e Nozzle Clear sequence uses the pump to create a vacuum in the nozzle while you apply solvent to the nozzle see Figure 6 16 The vacuum pulls the solvent into the nozzle The reversed solvent flow can clear a blockage behind the nozzle The Nozzle Clear sequence takes approximately 20 seconds The printer can perform a series of eight Nozzle Clear sequences automatically You can stop the Nozzle Clear...

Page 70: ...he upper bar shows the progress of each sequence The lower bar shows the number of Nozzle Clear sequences that have completed 6 When the first sequence starts turn the printhead upside down and apply the solvent to the nozzle face see Figure 6 16 The solvent enters the nozzle Figure 6 16 Apply the solvent to the nozzle 69021 68056 MIDI MIDI Take care to build up a good coating of solvent on the no...

Page 71: ...vent until both the progress bars are complete To stop the sequence press the Stop Sequence key 8 To return to the Print Monitor page press the Exit key twice NOTE To make sure that the nozzle is clear start the jet Make sure that the jet flows from the nozzle into the gutter If the jet is not aligned correctly contact your local Linx distributor ...

Page 72: ... printer displays a Warning or a Print Failure message The printer displays these messages in the Printer Status area of the Print Monitor page if a problem occurs Refer to the How To guides for the printers for more information on System Event messages If the printer displays an event message that is not described in this appendix you should inform your supervisor or contact your local Linx distr...

Page 73: ...HE HANDS IF THE PRINTHEAD COVER TUBE IS REMOVED BEFORE IT HAS BECOME SUFFICIENTLY COOL THERE IS ALSO AN INCREASED RISK OF FIRE CAUSED BY THE SUDDEN INCREASE OF AIR AROUND THE PRINTHEAD Do not touch the printhead If it is safe to do so power down the printer or switch off the printer at the mains supply Without touching the printhead itself move the printhead assembly away from any source of heat C...

Page 74: ...ower down the printer 5 Power up the printer 3 01 Shutdown Incomplete Failure 1 Clean the printhead 2 Press the green start key to start the jet 3 Press the red stop key to stop the jet 4 Power down the printer 5 Power up the printer 3 02 Memory Corrupt Contact your local Linx distributor 3 03 Ink Low Follow the SureFill instructions 3 04 Solvent Low Follow the SureFill instructions 3 05 Over Spee...

Page 75: ...stributor 3 23 Power Off Occurred During Mix 7900 Spectrum printers only Wait until the printer finishes the mix sequence before you power off the printer During a mix sequence the printer status is shown as MIX 3 24 Restart In Progress Press the OK key to acknowledge the event message The printer should operate normally 3 25 Ink Unmixed for 4 Weeks 7900 Spectrum printers only Wait until the print...

Page 76: ...es hazard prevention and accident management for Ink and solvent flammability Eye and skin contact Inhalation Ingestion Importance of keeping the printer cover fitted Use the emergency stop Getting started Switch on and start up The keyboard and display Use of soft keys Use of passwords Navigate the user interface Printing Printer Status area and event messages Select a message Print a message Pau...

Page 77: ...termediate operations Depending upon the tasks that operators may be asked to perform they may need additional training in the following areas Create a message Find the parameters Use the Message Editor Use the arrow keys to put the fields in the correct position Save and print a new message Print position Routine maintenance How and when to clean the printhead How and when to clean or replace the...

Page 78: ...a message The field types include Text counters and Date and Time fields Message The information that is printed Print Count The number of times that a message was printed after the Print Count was reset Print Delay The distance between the product sensor and the position at which the printer starts printing the message Print Height The height of the characters that are printed You can adjust the ...

Page 79: ...Appendix C Glossary Linx 5900 7900 Quick Start Guide 66 FA69315 3 English This page left blank intentionally ...

Page 80: ...Electromagnetic compatibility vi EMC vi Encoding 32 External alarm vii Eye contact ix Eye protection v Eyeglasses v F Fail LED 5 Field 15 Field boundary 34 Field type 32 Filter air 52 Font size 32 Font style 32 G Gutter 54 58 I Information page 6 Ingestion ix Inhalation ix Ink 47 level 10 Insert a field 27 Insert Date Time page 39 40 L Language 39 LED indicators 5 Line Setup menu 19 Linx Ink Shake...

Page 81: ... Ready LED 5 Remote field 15 Rename 41 S Save a message 17 Save Changes 17 Select key 8 Sell by date 39 Sensor 19 21 65 Sequential field 21 Sequential Number field 15 Shift Code field 15 Shift Code store 11 Shift key 35 Shutdown x Skin contact ix Soft key 4 Software version xi 6 Solvent 45 47 54 57 level 10 Spectrum printer 14 19 50 52 Splash screen 6 13 Start Printing key 21 Start Sequence key 57...

Reviews: