


Internet-Konfigurationstyp
Automatic Configuration - DHCP
(Automatische Konfiguration - DHCP):
Behalten Sie diese Standardeinstellung
bei, wenn Sie Verbindungen über DHCP
bzw. über eine dynamische IP-Adresse
Ihres ISPs herstellen. (D1)
Static IP
: (Statische IP-Adresse): Wählen
Sie aus dem Dropdown-Menü die
Option
Static IP
(Statische IP-Adresse),
wenn Ihnen vom ISP eine statische IP-
Adresse zugewiesen wurde. Füllen Sie
die Felder
Internet IP Address
(Internet-
IP-Adresse),
Subnet Mask
(Subnetz-
maske),
Default Gateway
(Standard-
Gateway) und
DNS
aus. Sie müssen
mindestens eine DNS-Adresse einge-
ben. (D2)
PPPoE
: Wenn Sie Verbindungen über
PPPoE herstellen, wählen Sie im Drop-
down-Menü die Option
PPPoE
aus.
Füllen Sie die Felder
User Name
(Benutzername) und
Password
(Ken-
nwort) aus. (D3)
PPTP
: Wenn Sie Verbindungen über
PPPTP herstellen, wählen Sie im Drop-
down-Menü die Option PPTP aus. Füllen
Sie die Felder
Internet IP Address
(Inter-
net-IP-Adresse),
Subnet Mask
(Subnetz-
maske) und
Default Gateway
(Standard-Gateway) aus. Füllen Sie die
Felder
User Name
(Benutzername) und
Password
(Kennwort) aus. (D4)
E
Wenn Sie alle Internetverbindung-
seinstellungen eingegeben haben,
klicken Sie zum Speichern der
Änderungen auf
Save Settings
(Ein-
stellungen sichern).
In diesen Anweisungen wird erklärt, wie Sie
den Router konfigurieren. Sie müssen den
Router nur ein Mal auf einem der einger-
ichteten Computer konfigurieren.
A
Öffnen Sie den Web-Browser.
Geben Sie
http://192.168.1.1
in das
Feld
Adresse
ein. Drücken Sie die
Eingabe-Taste.
B
Das Dialogfeld Netzwerkkennwort
eingeben wird angezeigt. Lassen Sie
das Feld Benutzername leer, und
geben Sie dann das Standardken-
nwort
admin
in Kleinschreibung in
das Feld Kennwort ein. (Um die
Sicherheit später zu erhöhen, sollten
Sie von der Standardeinstellung zu
Ihrer eigenen wechseln. Ver-
wenden Sie dazu die Registerkarte
Administration des webbasierten
Dienstprogramms.) Klicken Sie dann
auf
OK
.
C
Das webbasierte Router-Dienstpro-
gramm wird mit ausgewählter Reg-
isterkarte Setup angezeigt. Sofern
diese Angaben von Ihrem ISP (in der
Regel Kabel-ISPs) angefordert wer-
den, geben Sie die relevanten Infor-
mationen in die Felder
Host Name
(Hostname) und
Domain Name
(Domänenname) ein. Andernfalls
lassen Sie diese Felder leer.
D
Für die Einstellung Configuration
Type (Konfigurationstyp) werden im
Dropdown-Menü vier Verbindung-
stypen angezeigt. Die Setup-Fen-
ster und verfügbaren Funktionen
unterscheiden sich je nach aus-
gewähltem Verbindungstyp.
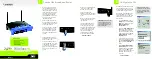
G
4
Konfigurieren des Wireless-G
J
Starten Sie Ihre Computer neu, so
dass diese die neuen Einstellungen
des Routers abrufen können.
K
Überprüfen Sie die Installation,
indem Sie den Web-Browser auf
einem der Computer öffnen und
http://www.linksys.com/registration
eingeben.
Herzlichen Glückwunsch! Sie haben den
Router erfolgreich konfiguriert.
F
Um den Router für Ihr drahtloses
Netzwerk zu konfigurieren, klicken Sie
auf die Registerkarte
Wireless
.
G
Wählen Sie den entsprechenden
Netzwerkmodus aus.
Mixed
(Gemischt): Behalten Sie die
Standardeinstellung
Mixed
bei, wenn Ihr
Netzwerk sowohl Wireless-G- als auch
802.11b-Geräte enthält.
G-Only
(Nur G): Wenn ausschließlich
Wireless-G-Geräte vorhanden sind,
wählen Sie
G-Only
.
B-Only
(Nur B): Wenn ausschließlich
Wireless-B-Geräte vorhanden sind,
wählen Sie
B-Only
.
Disable (Deaktivieren): Um das drahtlose
Netzwerk zu deaktivieren, wählen Sie
Disable
.
H
Geben Sie die SS-ID Ihres drahtlosen
Netzwerks ein, und wählen Sie den
Kanal aus, über den das Netzwerk
das drahtlose Signal sendet.
I
Klicken Sie auf
Save Settings
(Ein-
stellungen sichern), um die Einstel-
lungen zu speichern.
WRT54G-DE_V1.1-QI-30820NC JL
Weitere Informationen und Anweisungen zur
Fehlerbehebung finden Sie im Benutzerhand-
buch auf der Installations-CD-ROM. Sie kön-
nen auch per E-Mail weitere Unterstützung
anfordern.
Unterstützung per E-Mail
Website
http://www.linksys.com/international
oder http://www.linksys.com/de
Linksys ist eine eingetragene Marke bzw. eine
Marke von Cisco Systems, Inc. und/oder deren
Zweigorganisationen in den USA und anderen
Ländern. Copyright © 2003 Cisco Systems, Inc.
Alle Rechte vorbehalten.
Model No.
Quick Installation
3
HINWEIS:
Weitere Informationen,
Hinweise zu komplexen Konfigurationen
und Anleitungen zur Fehlerbehebung
finden Sie im Benutzerhandbuch (nur
Englisch) auf der Installations-CD-ROM.
C
A
D
1
D
2
D
3
D
4
K
B
Broadband-Routers


