


A Division of Cisco Systems, Inc.
®
Model No.
Installation rapide
Modèle
Sans fil
WRT54G-FR
Routeur à haut débit
Sans fil-
G
Contenu de l’emballage
• Un routeur à haut débit sans fil G
• Un adaptateur électrique
• Un câble de catégorie 5 pour réseau Ethernet
• Le CD-ROM d’installation contenant le guide
de l’utilisateur et Norton Internet Security
• Un guide d’installation rapide
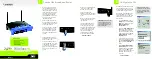
1
A
Avant de commencer, vérifiez que
vous disposez des paramètres de
configuration propres à votre type
de connexion Internet. Le technicien
de votre fournisseur d’accès Internet
doit vous avoir communiqué ces
données après avoir installé votre
connexion haut débit. Dans le cas
contraire, appelez votre fournisseur
d’accès Internet pour les lui
demander.
B
Vérifiez que tous les périphériques
de votre réseau sont hors tension, y
compris le routeur, les PC et le
modem câble ou DSL.
C
Reliez une extrémité d’un câble
réseau Ethernet à l’un des ports LAN
(numérotés de 1 à 4) situés sur le
panneau arrière du routeur et l’autre
extrémité au port Ethernet d’un PC.
D
Procédez de même pour relier
d’autres PC ou périphériques réseau
au routeur.
E
Reliez votre modem câble ou DSL
au port Internet situé sur le panneau
arrière du routeur au moyen d’un
autre câble réseau Ethernet. Il s’agit
du seul port compatible avec votre
connexion modem.
2
Connexion du routeur à haut débit
Si l’interface par défaut est utilisée sous
Windows 98, Millennium et XP, reportez-vous
au Guide de l’utilisateur figurant sur le CD-
ROM d’installation ou à la documentation
de Windows.
Les consignes suivantes s’appliquent
uniquement sous Windows 2000 ou XP en
mode classique (c’est-à-dire lorsque les
icônes et menus de l’interface ressemblent
aux versions précédentes de Windows).
A
Cliquez sur le bouton
Démarrer
.
Sélectionnez
Paramètres
, puis
cliquez sur l’icône
Panneau de con-
figuration
. Cliquez deux fois sur
l’icône
Connexions réseau et accès
à distance
.
B
Sélectionnez l’icône
Connexion au
réseau local
pour l’adaptateur
Ethernet utilisé (il s’agit généralement
de la première connexion au réseau
local répertoriée). Cliquez deux fois
sur
Connexion au réseau local
.
Cliquez sur le bouton
Propriétés
.
C
Vérifiez que la case en regard de
Protocole Internet (TCP/IP)
est
cochée. Mettez Protocole Internet
(TCP/IP) en surbrillance, puis cliquez
sur le bouton
Propriétés
.
D
Sélectionnez
Obtenir une adresse
IP automatiquement
. Lorsque la
nouvelle fenêtre apparaît, cliquez
sur le bouton
OK
. Cliquez de nou-
veau sur le bouton
OK
pour terminer
la configuration du PC. Redémarrez
votre ordinateur.
Passez à l’étape 3.
E
C
Configuration des PC
B
F
Mettez sous tension les périph-
ériques ci-après dans l’ordre suivant :
modem câble ou DSL, routeur et
ordinateurs.
G
Connectez l’adaptateur de courant
au routeur, puis branchez-le sur une
prise de courant.
H
Vérifiez que les voyants Power et
Internet situés sur le panneau avant
s’illuminent en vert.
Passez à l’étape 2.
D
REMARQUE :
Avant de configurer le
routeur, vérifiez que vos PC sont con-
figurés pour que le routeur leur attri-
bue automatiquement une adresse IP
(ou TCP/IP).
REMARQUE :
Veillez à utiliser
l’adaptateur électrique fourni avec le
routeur. L’utilisation d’un autre
adaptateur électrique pourrait endom-
mager le routeur.
G
C
sans fil G
24
,
GHz
802.11g