AREA 25
CONFIGURE REMOTE DEVICES
Area 25 is used to set the seven remote device addresses to
the type of device connected to the AM/II. The remote
devices can be keypads, card readers, remote radio
receivers, control relays, and telephone entry modules. A
relay channel can be assigned to each device and four
options can be selected for each device.
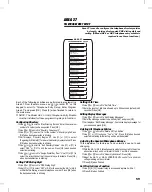
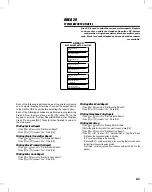
Each of the following activities are performed in programming
Area 25. From the main menu, use [
⇑
], [
⇓
] or enter “25” on the
keypad to scroll to “Configure Remote Devices, Enter Program
Area 25” and press [OK]. Press [
*
] when finished to return to
the main menu.
Remote Device Programming
➊
Use [
⇑
] or [
⇓
] to scroll to “Which Remote Device”.
➋
Use [
⇐
] or [
⇒
] to select [DV1] to [DV7]. Press [OK] when desired
device selection is blinking.
☞
NOTE: Device [DV7] is reserved for the Model AE-1 or AE-2 telephone
entry module.
➌
Unit displays: “Type of Device”. Use [
⇐
] or [
⇒
] to select “None Keypad
CardRdr Radio Relay Phone” for the selected device address. Press
[OK] when desired selection is blinking.
Use “Keypad” for Model AM-KP keypad.
Use “CardRdr” for Model AM-CRI card reader interface.
Use “Radio” for Models AM-RRR & AM-RPR radio receivers.
Use “Relay” for Model AM-RLY relay interface.
Use “Phone” for Model AE-1 or AE-2 telephone entry interface ([DV7]
only).
Use “SecuraKey31” for SecuraKey devices.
☞
NOTE: Relays “A” & “B” can only be programmed as control relays. The
CCTV option can only be used if the Model AE-1 or AE-2 Telephone Entry
module is installed.
➍
Unit displays: “Assign Control Channel”. Use [
⇐
] or [
⇒
] to select relay
channel A-D that the device will activate. Press [OK] when desired
selection is blinking.
➎
Unit displays: “Access Direction”. Select “None In Out Neutral” to match
the direction of access that the remote device permits. Press [OK] when
desired selection is blinking.
➏
Unit displays: “Enable Options ABCD”
Each remote device has selectors for four function options (A-D).
0 = NO (option disabled)
1 = YES (option enabled)
See the tables above. Use [
⇐
] or [
⇒
] to choose which selector to
change and enter a “0” or “1”. Press [OK] when finished.
➐
Unit displays: “Enter Name for Device”. Enter a name/location for the
remote device. Press [OK].
To configure additional remote devices, repeat Steps 1-7.
CONFIGURE REMOTE DEVICES
AREA 25
25.1
25.2
25.3
25.4
25.5
25.6
Which Remote Device
DV1 DV2 DV3 DV4 DV5 DV6 DV7
Assign Control Channel
CH-A CH-B CH-C CH-D Buttons
Access Direction
None In Out Neutral
Enable Options ABCD
0=No, 1=Yes: 1111
Enter Name for Device
Type of Device
None Keypad CardRdr Radio Relay Phone SecuraKey31
AM-KP OPTIONS
OPTION “A”
0 = KEYPAD BEEPS OFF
1 = KEYPAD BEEPS ON
OPTION “B”
0 = KEYPAD DOWNLIGHT TIMING OFF
1 = KEYPAD DOWNLIGHT TIMING ON
OPTION “C”
0 = KEYPAD DOWNLIGHT ALWAYS OFF
1 = KEYPAD DOWNLIGHT ALWAYS ON
OPTION “D”
0 = KEYPAD BEEPS OFF
1 = KEYPAD BEEPS ON
AM-CRI OPTIONS
OPTION “A”
0 = TBD
1 = TBD
OPTION “B”
0 = TBD
1 = TBD
OPTION “C”
0 = TBD
1 = TBD
OPTION “D”
0 = TBD
1 = TBD
AM-RRR OPTIONS
OPTION “A”
0 = TBD
1 = TBD
OPTION “B”
0 = TBD
1 = TBD
OPTION “C”
0 = TBD
1 = TBD
OPTION “D”
0 = TBD
1 = TBD
AM-RPR OPTIONS
OPTION “A”
0 = TBD
1 = TBD
OPTION “B”
0 = TBD
1 = TBD
OPTION “C”
0 = TBD
1 = TBD
OPTION “D”
0 = TBD
1 = TBD
57


