background image



























36

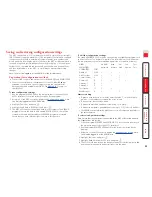
Initial IP configuration

IP models of the MC5 family possess a further collection of configuration 
options related specifically to IP networking. It is important that the options 
are correctly set up for your installation BEFORE being connected to an open IP 
network.

To configure IP-specific settings

1  From a local user port (for security reasons, the IP configuration option 

cannot be accessed from remote user ports), log on as ‘admin’ user.

2  Press 


   (hotkeys can be changed).

3  Press   to select ‘More menus’.
4  Select ‘Functions’ and then select ‘Configure IP port’.

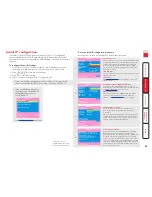
•  If the unit is being configured for the first time or following a reset, 

the unit will display the first of five screens, as shown opposite 

ð

•  If the unit has been previously 

IP-configured it will display the 

IP Configuration

 menu, as 

shown below 

ò

LINDY MC5

Unit Config

Hardware

Rev 1

Firmware

1.0b7

Keyboard

UK

Admin Pwd

Unit Name

Time

11 : 14 : 44

Date

27 Apr 2006

Encryption

Prefer Off

Screen 1 of 5

-Up

-Down

Next

Space-Toggle

LINDY MC5

Secure Keys

Random data is required to

generate encryption keys for

secure VNC access.

Please move the mouse or

press keys until the bar

becomes full.

– – – – – – – – – – – – –

Screen 4 of 5

LINDY MC5

Network Config

Mac Addr

00:0F:58:40:07:FE

Use DHCP

No

IP Address

192.168.1.22

Net Mask

255.255.255.0

Gateway

VNC Port

5900

HTTP Port

80

-Up

-Down

Enter-Edit

Space-Toggle

Screen 2 of 5

Next

LINDY MC5

Modem Config

Server IP

192.168.3.1

Client IP

192.168.3.2

Baud Rate

115200

InitString

ATZS0=1

Initialize Port

Restore Defaults

Enter-Select

-Up

-Down

Esc-Exit

Space-Toggle

Screen 3 of 5

Next

LINDY MC5

Configuration

Unit Configuration

Network Configuration

Modem Configuration

Reset Configuration

Back

Enter-Select

-Up

-Down

Esc-Exit

   See 

Configure IP port

 for details.

To use the initial IP-configuration sequence

Set the options in each screen and then select 

Next

 to proceed.

Admin password

Enter a password of at least six characters that has a mix 
of letters and numerals. The background colour provides 
an indication of password suitability and is initially red 
to indicate that the password is not sufficient. When a 
password with reasonable strength has been entered it 
will change to green. 

Time and Date

Set these correctly as all entries in the activity log are time 
stamped using them.

Encryption

See 

Encryption settings

 for a description of the issues 

and the settings.

Use DHCP/IP address/Net Mask/Gateway

You need to either set the DHCP option to ‘Yes’ or 
manually enter a valid IP address, Net mask and Gateway. 
See 

Networking issues

 for more details.

VNC and HTTP ports

These should remain set to 5900 and 80, respectively, 
unless they clash with an existing setup within the 
network. See 

Networking issues

 for more details.

Modem/ISDN port details

The default items here are perfectly adequate for 
the majority of modem and ISDN terminal adapter 
installations.
The Server IP and Client IP addresses are used to form an 
isolated two-device PPP network connection via the dial 
up link. Their settings are not related to any other ‘real’ 
network settings within the MC5-IP unit. 

Secure keys generation

With every mouse move and keypress, the single dash 
will move across the screen (unless the same key is 
pressed repeatedly). Periodically, a new star character will 
be added to the bar as the random data are accepted 
as part of the new encryption key. When the bar is full, 
the final encryption keys for your MC5-IP will be created 
– this process takes roughly 30 to 40 seconds. Once the 
secure keys have been calculated the MC5-IP will show 
the IP configuration menu.

1

2

3

4

Note: Screen 5 of 5 is 
displayed while the secure 
keys are being generated.

Summary of Contents for MC5-IP

Page 1: ...VNC 100 DA TLNK AUX 1 COMPUTER 2 3 4 PWR USER KVM Switch VNC 100 DA T LNK AUX 1 COMPUTER 2 3 4 PWR USER KVM Switch MC5 IP KVM Switch User Guide ...

Page 2: ...guration menus 23 Configuration menus layout 24 General security and configuration steps 24 Registering users edit user list 25 Registering computers edit computer list 26 Video compensation 27 Computer video compensation 28 Remote user video compensation 29 Remote user skew adjustment 30 Autoscanning 32 Saving and restoring configuration settings 33 What to do if the ADMIN password has been forgo...

Page 3: ...mode shared private 60 Power switching via viewer 60 Controls 61 Access via dial up modem or ISDN link 64 If you need to enter a port number 64 Viewer encryption settings 65 Supported web browsers 65 Further information Troubleshooting 66 Getting assistance 66 Appendix 1 Configuration menus 67 Functions 68 User Preferences 69 Global Preferences 70 Setup Options 72 Advanced Options 74 Configure IP ...

Page 4: ...alculating the mask for IP access control 98 Ports 99 Security issues with ports 99 Appendix 7 Cable and connector specifications 100 RS232 serial mouse to PS 2 converter cable 100 RS232 serial flash upgrade cable 100 MC5 to power switch cable 100 Power switch to power switch daisy chain cable 100 Multi head synchronisation cable 101 Appendix 8 Hotkey sequence codes 102 Permissible key presses 102...

Page 5: ...ard reset on any host system no matter how badly it has locked up Finally to ensure that only authorised operators are given such power the MC5 IP units feature enterprise grade security U S U S U S IP network Internet Power switch Modem or ISDN Modem or ISDN U S CAM CAM CAM CAM CAM CAM VNC 100 DA TLNK AUX 1 COMPUTER 2 3 4 PWR USER KVM Switch Many computers MC5 units can directly support 24 comput...

Page 6: ...rom the MC5 unit MC5 IP models provide two remote user ports IP network port MC5 IP only The port by which global users are linked to the MC5 unit This intelligent Ethernet port can automatically sense whether it is attached to a 10Mb or 100Mb network VNC 100 DA T LNK AUX 1 COMPUTER 2 3 4 PWR USER KVM Switch OPTIONS 1 20 12 4 19 11 3 18 10 2 17 9 1 3 2 24 16 8 23 15 7 22 14 6 21 13 5 4 5V 5V WARNI...

Page 7: ...t number 32359 User Station C5 Pro Connectors Analog video PS 2 style keyboard and PS 2 style mouse and 3 5mm audio jack Includes additional skew compensation features Part number 32358 Two 19 rack mount brackets and four screws Four self adhesive rubber feet User Station www lindy com KVM Switch MC5 Computer Access Modules One required per connected computer There are five different formats depen...

Page 8: ...ecured within a standard 1U rack slot Note Both the MC5 and its power supply generate heat when in operation and will become warm to the touch Do not enclose them or place them in locations where air cannot circulate to cool the equipment Do not operate the equipment in ambient temperatures exceeding 40 degrees Centigrade Do not place the products in contact with equipment whose surface temperatur...

Page 9: ...bal user IP network port page 11 Remote user via User Station page 10 Local user page 9 Modem ISDN port page 13 Power in page 14 Computer power control switching page 15 Computer system via CAM page 12 Connections do not need to be carried out in the order given within this guide however where possible connect the power in as a final step U S MODEM ISDN POWER IN IP CAM Cascading multiple units pag...

Page 10: ... and mouse To connect the local user port 1 Position a suitable video monitor keyboard mouse and speakers if required in the vicinity of the MC5 unit such that their cables will easily reach 2 Attach the video monitor keyboard mouse and speaker connectors to the sockets collectively labelled as USER PORT 1 at the rear of the MC5 unit MC5 rear panel Note The keyboard and mouse can be either PS 2 st...

Page 11: ... module 3 Lay a suitable length of category 5 5e or 6 cabling between the User Station module and the MC5 unit Please refer to the section Cable lengths for remote user locations opposite 4 Attach the connector of the cable run to the socket of the User Station 5 At the other end of the cable run attach the cable connector to one of the sockets labelled CATx USER PORTS on the rear panel of the MC5...

Page 12: ...ustment to allow correct operation Please refer to Networking issues within the Configuration chapter for more details IMPORTANT When an MC5 IP is accessible from the public Internet or dial up connection you must ensure that sufficient security measures are employed IP network link To connect the Global user IP network port 1 Depending upon where in the network the MC5 IP is being connected run a...

Page 13: ...ble can be up to 50 metres 160 feet however bear in mind that the overall distance between any remote user and any computer must not exceed 300 metres 980 feet 4 Attach the connector of the cable run to the socket of the CAM 5 At the other end of the cable run attach the cable connector to one of the sockets labelled COMPUTER CONNECTIONS on the rear panel of the MC5 unit Video PS 2 style mouse PS ...

Page 14: ...the MC5 IP and the modem or ISDN adapter 2 Connect a suitable serial modem non crossover cable to the serial port on the modem ISDN adapter 3 Connect the other end of the serial cable to the port labelled COM1 at the rear of the MC5 IP Note The default serial port speed is 115200 and a standard Hayes compatible auto answer string is sent during startup The default startup string is ATZHS0 1 Both t...

Page 15: ...nnect the power lead to a nearby main supply socket 4 Repeat steps 1 to 3 for the auxiliary power adapter using the AUX PWR IN socket if a backup supply is required Note Both the MC5 and its power supply generate heat when in operation and will become warm to the touch Do not enclose them or place them locations where air cannot circulate to cool the equipment Do not operate the equipment in ambie...

Page 16: ...o a mains power supply IMPORTANT Power switching devices have a maximum current rating It is essential to ensure that the total current drawn by the equipment connected to the power switching device does not exceed the current rating of the power switching device You must also ensure that the current drawn from any mains socket does not exceed the current rating of the mains socket Setting up conf...

Page 17: ...ems can be controlled However if the top level unit is an MC5 IP the maximum number of computers drops to 128 This is due to the extra burden placed on the unit s memory of administering global IP users U S MODEM ISDN POWER IN IP CAM CAM CAM CAM CAM CAM CAM CAM CAM CAM CAM CAM CAM CAM CAM CAM CAM CAM CAM CAM CAM LINDY MC5 or LINDY MC5 IP LINDY MC5 LINDY MC5 LINDY MC5 LINDY MC5 LINDY MC5 Cascade le...

Page 18: ...ding to their general availability in that group not as specific individual lines To do this each link group has an access number which is determined by the ports to which they are connected on the switch For instance a quad group connected to computer ports 1 2 3 and 4 of an MC5 unit would always be known as 41 the next quad group connected to ports 5 to 8 would always carry the number 42 and so ...

Page 19: ...ion of the previous cascade diagram indicates how the routes to particular computers are formed and addressed Each cascade level requires two digits hence the computer marked in red requires a unique address with six digits because it is at cascade level 3 compared to the blue computer at level 2 with its four digit unique address A computer connected directly to the MC5 at the top level would sim...

Page 20: ...e links lie within the appropriate port boundaries designated in the Group numbering diagram MC5 IP models can only be used at the top level of the cascade tree because they have only two CATx USER PORTS sockets and the minimum number of links required for a cascade group is three For each cascade link use a standard category 5 5e or 6 twisted pair cable terminated at each end with an RJ45 connect...

Page 21: ...outes through the link groups However during configuration or troubleshooting it may be useful to test specific routes to computers in order to verify the various strands of each link group By using specific port addresses for each unit rather than link group numbers you can precisely navigate a route through any part of the system To test a specific link 1 Simultaneously press and hold and Note a...

Page 22: ... require multiple video signals to be switched together This type of operation is usually required where each computer is fitted with multiple video cards or video cards with multiple video heads Whenever an MC5 channel is switched it sends an RS232 command out on its serial interface marked COM1 UPGRADE on the rear panel An MC5 will switch its channel if it receives the same command on its serial...

Page 23: ...e access rights Use the ADMIN account to add user profiles passwords and access rights for each of the system users 4 Provide names for computers When numerous computers are attached you are strongly advised to provide names for each to assist with recognition 5 Compensate video signals to account for link cable lengths The long cable links that are possible between the MC5 unit and the computers ...

Page 24: ...ress To display the Configuration Menu Hotkeys Note and are the standard hotkeys and can be altered to avoid clashes with other devices or software If you change the hotkeys remember to use the new ones in place of and when following the instructions in this guide Security Note If the security option has been enabled you will be asked for a valid user name and password before the main menu can be ...

Page 25: ...ions and press 3 Highlight Security and press to select ENABLED 4 Now create a new password for the ADMIN user account To set an ADMIN password 1 Display the Configuration menu 2 Highlight Edit User List and press 3 Highlight ADMIN and press Press again to accept the name ADMIN without change 4 Enter an appropriate password for the ADMIN user account with regard to the following The password can b...

Page 26: ...ters that show the marker to the right of the menu box will be accessible to the user account Note The Port Direct feature which allows interconnected switching units to talk to one another ensures that users without access rights to particular computers cannot move sideways to those computers via other computers Note Access rights for user accounts to particular computers can also be controlled f...

Page 27: ...ayed Here you can determine which users should have access to the created edited computer Only users that show a marker to the right of the menu box will be granted access to the computer Note The Port Direct feature which allows interconnected switching units to talk to one another ensures that users without access rights to particular computers cannot move sideways to those computers via other c...

Page 28: ...the MC5 unit and the computer s CAM CATx cables below 10m give very little loss and so it is not normally necessary to be concerned about setting any computer video compensation if short CATx cables are being used between the MC5 and the CAM for each computer Computer video compensation may be setup by typing in the cable distance in the OSD or if very fine video adjustment is desired by observing...

Page 29: ...resolution video mode at which it will be used 2 If possible use a monitor and keyboard connected to the MC5 local user port 3 Display the MC5 main menu and use it to select the appropriate computer Note You must highlight the computer name and press to select it 4 Press to access the compensation feature LINDY MC5 Computer Port Computer 1 01 Computer 2 02 Computer 3 03 Computer 4 04 Computer 5 05...

Page 30: ...ity Note Accurate remote user compensation relies upon visual feedback from the screen image It is therefore vital to ensure that the video images being sent out from the MC5 are as true as possible Ensure using the local user port that the video images received from the computers are correctly compensated BEFORE attempting to adjust the remote user s Video compensation is best carried out when vi...

Page 31: ...ltaneously press the hotkeys by default and along with to enter configuration mode The three keyboard indicators Num Lock Caps Lock and Scroll Lock will now begin to flash in sequence Remote user skew adjustment The category 5 5e and 6 cabling supported by the MC5 consists of four pairs of wires per cable Three of these pairs are used to convey red green and blue video signals to the remote video ...

Page 32: ...he selected colour channel respectively On screen you will see a change in the position of the selected colour crosses or colour bars in relation to the other two 5 When the selected colour crosses or colour bars are correctly positioned press to exit that colour channel The keyboard indicators will return to flashing in sequence 6 If required repeat steps 3 to 5 to select and adjust any colour ch...

Page 33: ...ted computers are active There are up to three steps that need to be configured to use autoscanning ð Select the autoscan mode Scan List Active PCs or All PCs Select the autoscan period This is the time that is spent viewing each computer This step also enables and disables the autoscan feature Define the autoscan list This step is only required when the Scan List option is selected and allows you...

Page 34: ...e same directory where the XPREAD program was started Ensure that you have sufficient rights to write to this directory To edit the configuration settings The saved XPRODATA CSV file can be opened using a spreadsheet program such as Microsoft Excel The format of a typical file is shown below You will see that the computer names rows are tabulated against the user profiles columns USERS ADMIN Alan ...

Page 35: ...e you re apply power On the local user port a screen menu will indicate that the unit has been reset and will prompt you to power down and return the switch to its normal position 4 As directed remove power and move switch 3 up to its OFF position 5 Power up and configure the unit in the normal manner To reset the MC5 IP models 1 Remove all power inputs from the MC5 IP unit 2 Move switch 2 on the ...

Page 36: ...duced to support among other features the scroll wheel function If the mouse has a scroll wheel then it is likely to support the IntelliMouse format If it is a Microsoft branded mouse then it will usually state that it is an IntelliMouse on its underside label Recognising an IntelliMouse driver Before hot plugging to the MC5 or afterwards using only keyboard control access the Windows Control Pane...

Page 37: ...figure IP port for details To use the initial IP configuration sequence Set the options in each screen and then select Next to proceed Admin password Enter a password of at least six characters that has a mix of letters and numerals The background colour provides an indication of password suitability and is initially red to indicate that the password is not sufficient When a password with reasonab...

Page 38: ... or networks Serial Port Configuration Lets you setup or alter the details concerning the modem and power control serial ports Host Configuration Allows you to configure user access hot key switching and power control codes for up to 128 host systems that may be connected to the MC5 IP via other cascaded units Logging and Status Provides various details about the user activity on the MC5 IP For mo...

Page 39: ... setting does not enforce encryption unless a viewer specifically requests it If a viewer has its Let server choose setting then an un encrypted link will be set up Prefer on This setting generally enforces encryption unless an earlier viewer version is unable to support it in which case the link will be un encrypted If a viewer has its Let server choose setting then the link will be encrypted Vie...

Page 40: ...gside the firewall Firewall router Local network connection Local network connection IMPORTANT When the MC5 IP is accessible from the public Internet or dial up connection you must ensure that sufficient security measures are employed Positioning the MC5 IP in the network Every network setup is different and great care needs to be taken when introducing a powerful device such as the MC5 IP into an...

Page 41: ...her than 80 then each remote browser user will need to specify the port address as well as the IP address For instance if you set the HTTP port to 8000 and the IP address is 192 168 47 10 then browser users will need to enter http 192 168 47 10 8000 Note the single colon that separates the IP address and the port number The firewall router would also need to be informed to transfer all traffic to ...

Page 42: ...twork configuration screen where the new IP address and network mask should be displayed DNS addressing As with any other network device you can arrange for your MC5 IP to be accessible using a name rather than an IP address This can be achieved in two main ways For small networks that do not have a DNS Domain Name System server edit the hosts files on the appropriate remote systems Using the host...

Page 43: ...ation page via viewer Reserve the admin password for administration use only and use a non admin user profile for day to day access Use the latest Secure VNC viewer this has more in built security than is available with the Java viewer To download the viewer Use non standard port numbers Restrict the range of IP addresses that are allowed to access the MC5 IP to only those that you will need to us...

Page 44: ...tings Please refer to your power switch documentation for details about codes required by other power switches The structure of each power sequence OFF and ON is as follows Pxy z 0D Where x is the switch box number y is the power port number z is 0 for OFF or 1 for ON and 0D represents Enter or Carriage return Example 1 To switch ON port 5 of switch box 2 the code would be as follows Power sequenc...

Page 45: ... security purposes it is not possible to retrieve user names or passwords from the MC5 To use KVMADMIN you require the IP address and admin password of the MC5 unit The command line is as follows kvmadmin command ip address parameters where command is one of the following setconfig config file getconfig config file setusers csv file getlog log file gethosts csv file sethosts csv file setmodes csv ...

Page 46: ...ith an appropriate tool such as WinZip www winzip com and copy all contained files to the same folder on the upgrade computer 2 Power off the MC5 and select flash upgrade mode Remove the power supply plug s from the rear panel of the MC5 and move option switch 1 on the back of the MC5 to the ON position down 3 Connect the upgrade computer to the MC5 Connect the upgrade computer to the COM1 UPGRADE...

Page 47: ...aded code may have unpredictable results and may damage your MC5 or computing equipment The results of the unit query will be displayed in the Device Dongle Selection dialog The type and firmware revision of each discovered CAM will be displayed alongside the port number to which it is connected 7 Select the items to be upgraded Using the Device Dongle Selection dialog you can determine which item...

Page 48: ...ogged in click the Configure button in the top right corner of the window 3 Click the Unit Configuration button 4 Click the Advanced Unit Configuration button 5 Click the Upgrade Firmware button The following dialog will be displayed 6 Click OK The MC5 IP is now ready to accept the upgrade files Open your browser and log into the MC5 IP using the IP address that was confirmed in the dialog Once co...

Page 49: ...ntly associated with that port will be indicated by the COMPUTER indicator Accessing the MC5 The MC5 and MC5 IP offer three main ways to gain access Local user access Remote user access via a User Station or Global user access via IP network link or direct dial up MC5 IP models COMPUTER USER PWR AUX 1 VNC 2 100 3 DAT 4 LNK Computer button and numeric indicator User button and numeric indicator Use...

Page 50: ...g the front panel controls Note It is possible for the front panel controls to be limited to selecting only the on screen menu or a blank screen If this is the case please use a different switching method or contact your system administrator for details 1 Press the USER button until the adjacent numeric indicator displays the port number to which you are connected 2 Press the COMPUTER button until...

Page 51: ...e If your user port does not have authorisation to view the selected port then an Insufficient user rights messages will be displayed Standard hotkeys The range of hotkey combinations are as follows Note If your hotkeys have been changed substitute them for and in the examples given here Selects port 1 Selects port 2 then Selects port 10 then Selects port 24 Note When entering multiple digit addre...

Page 52: ... another computer or log off This mode should be used with care it can also be blocked as an option by the administrator Video Only press This mode displays the video picture of the port but prevents keyboard or mouse activity from controlling the computer To select a computer using mouse buttons Note This procedure works only with three button or IntelliMouse devices and only if the Mouse Switchi...

Page 53: ...ts long which can be difficult to remember and laborious to type The confirmation box The MC5 provides the option of a confirmation box that is displayed on screen for three seconds after a computer is selected The confirmation box indicates the current user port and your user name the selected computer and the connection status You can enable or disable the confirmation box as required To enable ...

Page 54: ...To change colours highlight Reminder Colour and press until the desired colour combination is displayed 5 Press to save the settings Press twice more to return to the computer port and view your changes Routing status On occasions it may be useful to know which computers are being accessed in which modes and by whom The most common reason for this would be if you were denied access to a computer p...

Page 55: ...ds to be switched on or off Note If the computer is still responding try to shut it down normally before attempting a power switch operation 3 Display again the on screen menu and press to select More menus 4 The Functions option should be highlighted press 5 Highlight Power Control and press 6 Highlight either Switch Computer ON or Switch Computer OFF as necessary and press A warning message with...

Page 56: ...M CAM Global user access Global users access the MC5 IP using a viewer and a link There are two types of viewer and two types of link which can be used in any combination VNC viewer Network link Web browser viewer Dial up link ...

Page 57: ... computer Note If the Username entry is blanked out then only admin user account is currently defined and only a password is required Options button Provides a range of viewer and connection settings MORE Enter the MC5 address here and click OK If required select the encryption mode MORE Downloading VNC viewer from the MC5 IP The MC5 has the ability to distribute its own VNC viewer application To ...

Page 58: ... IP address will be shown here Options button Provides a range of viewer and connection settings MORE 5 Make any necessary option encryption changes and click the OK button to proceed Depending on the options selected you may need to confirm certain items 6 A second connection attempt will be made and if successful an authentication dialog will be displayed 7 Enter your username and password The v...

Page 59: ...vigate around a larger screen If the screen that you are viewing has a larger resolution than your viewing window you will need to scroll around to see all items The viewer window allows you to bump scroll only in full screen mode This means that when your mouse cursor bumps against the edge of the screen the screen image will scroll across automatically How do I escape from full screen mode Press...

Page 60: ...ogramming new hosts into the MC5 IP admin user status required Configure This option is displayed only when you are logged on as the admin user When selected it provides access to a wide range of MC5 IP settings See Appendix 2 Configuration pages via viewer for more details Mouse pointers Both viewers provide a double mouse cursor to help overcome any delays caused by slow connections When you mov...

Page 61: ...help to decrease unnecessary video information being sent across the link thus improving overall performance Once this has been done providing you use the Hosts button to switch between host computers the video settings for each machine will be re used Note When performing an auto calibration ensure that the screen image is static no moving images and also try to remove any on screen displays gene...

Page 62: ...de press F8 and then P Alternatively enable and use the mouse button escape sequences see Advanced unit configuration for details The single mouse mode does not require calibration Resync Mouse This option has the same effect as the button on the menu bar and resynchronises the local and remote mouse pointers Refresh Screen This option refreshes the whole screen image to remove any artifacts from ...

Page 63: ...nd so there is need to specify Ctrl or Alt if these keys are to be released together See Appendix 8 for a list of key sequence codes that can be used Examples Ctrl Alt 12 would be expressed as Ctrl Alt 1 1 2 N means press the N key Scroll means press the Scroll lock key Space means press the space key Video Settings see next page Info When selected this option displays an information dialog showin...

Page 64: ... All button to automatically determine the optimum settings for all items Note Before using the Calibrate All option if possible remove on screen display OSD elements generated by the MC5 IP or any other connected KVM switches such as a host name label or menu These OSD elements use different video rates to those of the host system s and can affect the setting of the automatic threshold value MC5 ...

Page 65: ...andard VNC viewer instructions Access via dial up modem or ISDN link When you gain access via modem or ISDN link the MC5 IP uses standard network protocols to create a private two device network This approach ensures consistency and allows you to use exactly the same VNC viewer or browser to view the host computers This is achieved using PPP Point to Point Protocol and means that you need to use a...

Page 66: ...refer off This setting will configure an un encrypted link if the MC5 IP will allow it otherwise it will be encrypted Prefer on If the MC5 IP allows it this setting will configure an encrypted link otherwise it will be un encrypted Whenever encryption does take place the viewer will first need to create the necessary secure key before the connection process can continue Supported web browsers The ...

Page 67: ... to my mouse movements Recalibrate the mouse When doing so ensure that the host system does not have mouse cursor trails enabled and that the top left corner of the screen is clear of application windows When logging on using VNC viewer I cannot enter a username Either the VNC viewer is an old version download a new one or only the admin user has been configured on the MC5 IP Getting assistance If...

Page 68: ...e following keys and to highlight required options to change option values to quit and save the changes The full set of options are only available to the Admin user All other users will see a subset of these LINDY MC5 Configuration Menu Functions Routing status User Preferences Global Preferences Setup Options Edit Computer List Edit User List EditAutoscan List Enter Select F1 More menus Esc Quit ...

Page 69: ...cially useful in complex cascade arrangements where many computers are attached See Saving and restoring configuration settings for more details Read Data from RS232 port This option is used to reload configuration information into the MC5 from a specially connected computer See above for more details LINDY MC5 Functions Restore Standard Mouse Restore Intellimouse Power Control Configure IP port R...

Page 70: ...ace Toggle Up Down Esc Quit To get here 1 From a local remote or global keyboard log on as a standard or admin user 2 Press hotkeys can change 3 Press to select More menus 4 Select User Preferences OSD Colour Settings SCHEME 1 SCHEME 2 SCHEME 3 As you toggle between these options you will see the colour of the menu change to show the selected scheme The menu schemes have been specially chosen to p...

Page 71: ... press F1 To remove all named computers press F2 3 When all the computers that you wish to scan are affixed with a press RETURN or ENTER to save the selections The selected computers will be autoscanned in alphabetical order when you activate autoscan mode when the SCAN LIST option is selected Autoscan Period Settings DISABLED 2 5 7 15 30 SECONDS 1 5 MINUTES The autoscan time defines the length of...

Page 72: ...lessly interrupted by other users and sufficiently short to ensure good overall system efficiency The user timeout value also controls the timeout between the local port and remote extended user port 1 RS232 Mouse Type Settings INTELLIMOUSE 2 BUTTON 3 BUTTON This setting controls the type of RS232 mouse that the MC5 reports to computers All the necessary conversions are dealt with automatically by...

Page 73: ...ave selected exclusive access are never timed out by the MC5 and so all other users are effectively locked out until the exclusive user switches to another computer or logs out This could potentially be very irritating if a user has selected exclusive use and has then left their desk without logging out This would prevent other users from working on the computer until they came back Consequently t...

Page 74: ...console may unintentionally be left with full access to all the computers The MC5 can be set to automatically logout unattended user consoles when the screen saver kicks in This reduces the risk of security problems by preventing user consoles remaining in a permanent logged in state when there is no keyboard or mouse activity The automatic logout feature is only enabled when the screen saver feat...

Page 75: ... each data byte LINDY MC5 Advanced Options DDC Options Power Control Enter Select F1 More menus Esc Quit FirmwareVersion 1 02 DDC Options The options within this section are related to the Display Data Channel features supported by the MC5 DDC is an industry standard format that allows computer systems to be informed of the capabilities of the video monitor connected to them DDC Source Settings AU...

Page 76: ...enus and the remote VNC browser windows Time and Date Use the left and right arrow keys to select the correct time and date The time entry uses the 24 hour clock notation The internal real time clock will continue to run for roughly one week without power to the unit after that it will be lost and require resetting Use the up and down arrow keys to move between each of the sections within the time...

Page 77: ...ws certain network address ranges to be denied access to the MC5 IP If set incorrectly it is possible to exclude all network users and so this option provides an emergency recovery point Network Configuration This page allows you to configure the various aspects of the IP port and its relationship with the local network Mac Addr Media Access Control address this is the unique and unchangeable code...

Page 78: ...ayes compatible string to configure auto answer mode and would be understood by the vast majority of modem ISDN devices The code is sent when the MC5 IP is first switched on or whenever the Initialize button is clicked Initialize Port When selected this option sends the characters entered in the Init string field to the connected modem or ISDN terminal adapter Restore Defaults When selected this o...

Page 79: ...o this option provides an emergency recovery point To clear IP access control 1 From a local or remote not accessible from a global keyboard log on as the admin user 2 Press hotkeys can change 3 Press to select More menus 4 Select Functions 5 Select Configure IP port 6 Highlight the Clear IP access control option and press LINDY MC5 Network Config Mac Addr 00 0F 58 40 07 FE Use DHCP No IP Address ...

Page 80: ...on to the MC5 IP unit and login as the admin user 2 Once logged in click the Configure button in the top right corner of the window Logged on users Indicates the current users irrespective of whether they are connected locally remotely by modem ISDN or via a network Main configuration page Click the required option User Accounts Unit Configuration Time Date Configuration Network Configuration Seri...

Page 81: ...ensitive and can include certain keyboard symbols The password can be between 1 and 16 characters in length It is important to note however that the password background remains shaded in amber while the MC5 IP considers your entered password to be too easy to guess A suitable password is best constructed using a mixture of more than 6 letters numbers and punctuation characters Local When ticked th...

Page 82: ... is highly secure against third party intrusion Advanced Unit Configuration Hardware Version Indicates the version of the electronic circuitry within the MC5 IP unit Firmware Version Indicates the version of the hardwired software within the MC5 IP flash memory This may be updated using the flash upgrade procedure Host Keyboard Layout Use the arrow buttons to match the keyboard layout expected by ...

Page 83: ...he disabled option is selected the remote users will need to manually refresh the screen Note When a low connection speed is detected the background refresh is automatically disabled regardless of the settings of this option Single Mouse Mode Mouse Switch Allows you to select the mouse button combination that can be used to exit from single mouse mode when active Behaviour for admin connections wh...

Page 84: ...he week w must be between 1 and 5 week 1 is the first week in which day d occurs and week 5 specifies the last d day in the month The time fields specify when in the local time currently in effect the change to the other time occurs If omitted the default is 02 00 00 Typical examples are UK GMT0BST M3 5 0 1 M10 5 0 2 Central Europe CET 1CEST M3 5 0 2 M10 5 0 3 US Eastern 2006 EST5EDT M4 1 0 2 M10 ...

Page 85: ...sed alongside the IP address to help define a smaller collection or subnet of devices on a network In this way a distinction is made between locally connected devices and ones that are reachable elsewhere such as on the wider Internet This process helps to reduce overall traffic on the network and hence speed up connections in general IP Gateway This is the address of the device that links the loc...

Page 86: ... are listed higher in the list than any denied addresses Take care not to invoke any deny access settings that would exclude valid users 1 In the access control list click on the entry to be moved 2 Click the Up or Down buttons as appropriate To edit remove access control entries 1 In the access control list click on the appropriate entry 2 Click either the Edit or Remove button as appropriate Net...

Page 87: ...d 1 stop bit Initialization Sequence The codes entered here are used to prepare the connected modem or ISDN terminal adapter for use with the MC5 IP The default code is a Hayes compatible string to configure auto answer mode and would be understood by the vast majority of modem ISDN devices The code is sent when the MC5 IP is first switched on or whenever the Initialize button is clicked Initialis...

Page 88: ...ort Declare the Port Direct address that will link with the required host system See Port Direct for details A list of valid hotkey codes are given in Appendix 8 Power On Enter the code required to make an attached power control unit apply power to the selected host See Power switching configuration for details Power Off Enter the code required to make an attached power control unit remove power f...

Page 89: ...t users from accessing systems for which they do not access rights sideways movement because each unit is fully informed of each user s precise access rights Port host addressing using Port Direct When adding new computers to the Hosts list the option Add entry for unrecognised host is provided to automatically add new entries if a port is visited that does not already have a matching host entry T...

Page 90: ...board 2 In a text application i e Word WordPad Notepad press Ctrl and V or right mouse click and Paste Date and time the event occurred Type of event user name and access method or remote IP address Click to clear all log entries Click to refresh the list Click to return to the main menu Optionally enter an IP address to which the status log should be sent Syslog Server IP Address Logging informat...

Page 91: ... the most appropriate colour level for the speed of the connection to the MC5 IP Where the connection speed is slow or inconsistent there will be a necessary compromise between screen response and colour depth Full This mode is suitable only for fast network connections and will pass on the maximum colour depth being used by the host system Medium 256 colours This mode reduces the host system outp...

Page 92: ... and status section Rate limit mouse move events When ticked this feature reduces the mouse movement information that is sent to the MC5 IP and host system This is useful for slow connections and you will notice that the remote cursor will catch up with the local cursor roughly once every second Enable 3 button mouse emulation This feature allows you to use a 2 button mouse to emulate the middle b...

Page 93: ...iewer will launch in full screen mode Use the menu key usually F8 to exit from full screen mode Render cursor locally This option does not currently apply to MC5 IP connections Allow dynamic desktop resizing When ticked the viewer window will be automatically resized whenever the host system s screen resolution is altered Only use protocol version 3 3 This option does not apply to MC5 IP connectio...

Page 94: ...C5 IP is fully reconfigured then it will need to issued with a new identity In this case the previous identity listed in this tab should be removed so that a new identity can be created on the next connection Load Save Configuration File Reload Allows you to load a configuration file saved from this or another viewer Configuration File Save Allows you to save the current settings so that they can ...

Page 95: ...d Ctrl Alt Send F8 Send Ctrl Alt Del Sends the selected keypress es to the MC5 IP and host computer This is necessary because certain keys and key combinations are trapped by the VNC viewer Refresh Screen Requests data from the server for a complete redraw of the screen image not just the items that change New connection Displays the connection dialog so that you can log on to a different MC5 or V...

Page 96: ... browsers Inputs View only ignore mouse keyboard When ticked the viewer will not send keyboard or mouse information to the MC5 IP or host computer Accept clipboard from server This feature is restricted to software server versions of VNC and has no effect on MC5 IP installations Send clipboard to server This feature is restricted to software server versions of VNC and has no effect on MC5 IP insta...

Page 97: ...address section in order to use the telephone system efficiently it is vital for you to know your location relative to the person you are calling In this way you avoid dialling unnecessary numbers When one network device needs to talk to another the first thing that it will do is a quick calculation using its own IP address the other device s IP address and its own net mask Suppose a device with a...

Page 98: ...that the local part of the address is formed by only the last four bits If you use the diagram from the previous example and insert the new net mask it will have the following effect on the final result 192 192 168 168 142 142 154 154 144 1 1 1 0 0 0 0 1 1 1 0 0 0 1 0 0 0 1110 0 0 0 144 Thus when 154 is bit wise ANDed with 240 the result is 144 Likewise any local address from 192 168 142 144 throu...

Page 99: ...comes a little clearer The above mask has the form 11111111 11111111 11111111 11100000 Ignoring the initial three octets the final six zeroes of the mask would ensure that the 32 addresses from 64 01000000 to 95 01011111 would all be treated in the same manner See Net masks the binary explanation for details When defining a mask the important rule to remember is There must be no ones to the right ...

Page 100: ...hen the MC5 IP is situated behind a network firewall In order for a remote VNC viewer or web browser to make contact with your MC5 IP it is necessary for the firewall to allow communication through a particular numbered port to occur One specific function of firewalls is to restrict access to ports in order to prevent malicious attackers using them as a route into your network Every new port that ...

Page 101: ...AT RXD 2 5 TXD GND 3 4 GND Female 6 5 4 3 2 1 DTR 4 6 5V DSR 6 7 12V RTS 3 TXD 12V 8 CTS 9 RI 6pin mini DIN female 9pin D type female MC5 to power switch cable Power switch to power switch daisy chain cable 9pin D type female 4pin RJ9 4pin RJ9 4pin RJ9 RS232 serial flash upgrade cable 9pin D type female 9pin D type male ...

Page 102: ...d 9pin D type male SLAVE end 9pin D type male MASTER end 9pin D type male SLAVE1 end 9pin D type male Use this cable when two MC5 devices are being synchronised Use this cable when three MC5 devices are being synchronised SLAVE2 end 9pin D type male ...

Page 103: ... press down the key that follows means release the key that follows means press down and release the key that follows means wait 250ms note if a number immediately follows the asterisk then the delay will equal the number in milliseconds Note Hotkey sequences are not case sensitive Creating macro sequences Hot key macro sequences can be up to 256 characters long All keys are assumed to be released...

Page 104: ... scaling features of the viewer vesa 720 x 400 85Hz vesa 640 x 480 60Hz vesa 640 x 480 72Hz vesa 640 x 480 75Hz vesa 640 x 480 85Hz vesa 800 x 600 56Hz vesa 800 x 600 60Hz vesa 800 x 600 72Hz vesa 800 x 600 75Hz vesa 800 x 600 85Hz vesa 1024 x 768 60Hz vesa 1024 x 768 70Hz vesa 1024 x 768 75Hz vesa 1024 x 768 85Hz vesa 1152 x 864 75Hz vesa 1280 x 960 60Hz vesa 1280 x 1024 60Hz vesa 1280 x 1024 75H...

Page 105: ...turer s instructions when setting up and using power switching products Always ensure that the total ampere rating of the devices plugged into the power switching product does not exceed the power switching product s ampere rating Also make sure that the total ampere rating of all the devices plugged into the wall outlet does not exceed the wall outlet s ampere rating Warranty LINDY warrants that ...

Page 106: ...HIRD PARTY RIGHTS AND FITNESS FOR PARTICULAR PURPOSE 4 Limitation on Liability UNDER NO CIRCUMSTANCES SHALL REALVNC BE LIABLE FOR ANY CONSEQUENTIAL INDIRECT OR INCIDENTAL DAMAGES WHATSOEVER INCLUDING LOST PROFITS OR SAVINGS ARISING OUT OF THE USE OF THE SOFTWARE THE SERVICE OR THE INFORMATION RELIANCE ON THE DATA PRODUCED OR INABILITY TO USE THE SOFTWARE THE SERVICE OR THE INFORMATION EVEN IF REAL...

Page 107: ...he equipment and the receiver c Connect the equipment to an outlet on a circuit different from that to which the receiver is connected d Consult the supplier or an experienced radio TV technician for help FCC Compliance Statement United States This equipment generates uses and can radiate radio frequency energy and if not installed and used properly that is in strict accordance with the manufactur...

Page 108: ...S31015 67451 MUNDOLSHEIM CEDEX France Email france lindy fr Tel 0 825 825 111 Fax 03 88 20 57 74 Italia LINDY Italia Srl Via Varesina 126 B 22079 Villa Guardia CO Italia Email italia lindy it Tel 031 48 40 11 Fax 031 48 06 52 Schweiz Suisse Svizzera LINDY Elektronik AG Florenzstrasse 9 CH 4023 Basel Email info lindy ch Tel 061 3359700 Fax 061 3359709 North America LINDY Computer Connection Technol...

Page 109: ...e 86 Compensation for computer links 27 for remote user links 29 Computer connection 12 name editing 26 ports 5 registering 26 selecting 49 Computer Access Module connection 12 Configuration 22 initial IP 37 menus 23 67 overall steps 22 pages 79 saving and restoring 33 Configure IP port 75 Confirmation box 52 Connections 8 Computer Access Module 12 computer system 12 global user 11 host computer 9...

Page 110: ...onfiguration 76 84 Network port connection 11 Net mask 76 explanation 96 O Octets ip address 96 Operation 48 P Parts supplied and extra 6 Password admin 24 admin setting 75 forgotten 34 initial setup 36 remote logon 56 setting for users 80 Port Direct 88 Port number entering 64 Power control 5 connection 15 options 74 Power strings for switching 43 Power supply connecting 14 part number 6 Power sw...

Page 111: ...5 Username remote logon 56 User accounts 80 User list editing 25 User preferences 69 72 User Station 10 Use DHCP local setting 76 V Video compensation 27 Video modes 103 Video settings 62 Viewer window 58 VNC port initial setup 36 local setting 76 remote setting 84 when altered 40 VNC viewer connection 56 connection options 90 download 56 window options 94 W Warranty 104 Web browser connection 57 ...

Reviews: