background image

LINDY CPU Switch Multiscreen  Installation and Use 

Page 34 

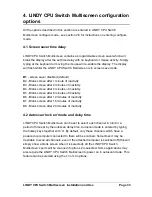
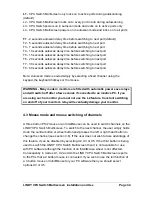
L1 - CPU Switch Multiscreen only locks on to active ports during autoscanning 

(default) 

L2 - CPU Switch Multiscreen locks on to every port in turn during autoscanning 

L3 - CPU Switch powers on in autoscan mode and locks on to active ports only 

L4 - CPU Switch Multiscreen powers on in autoscan mode and locks on to all ports 


T1 - 2 seconds autoscan delay time before switching to next port (default) 

T2 - 5 seconds autoscan delay time before switching to next port 

T3 - 7 seconds autoscan delay time before switching to next port 

T4 - 10 seconds autoscan delay time before switching to next port 

T5 - 15 seconds autoscan delay time before switching to next port 

T6 - 20 seconds autoscan delay time before switching to next port 

T7 - 30 seconds autoscan delay time before switching to next port 

T8 - 60 seconds autoscan delay time before switching to next port 


Note: Autoscan mode is ended simply by selecting a fixed channel using the 

keypad, the keyboard hotkeys or the mouse. 


WARNING - Many modern monitors are fitted with automatic power save relays 

and will switch off after a few seconds if connected to an inactive PC. If you 

are using such a monitor you must not use the L2 feature. Constant switching 

on and off of your monitor’s relay will eventually damage your monitor. 


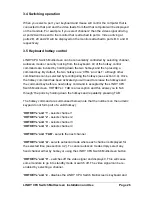
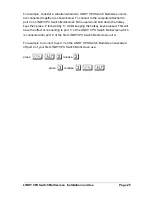
4.3 Mouse mode and mouse switching of channels 
 

A three button PS/2 mouse or an IntelliMouse can be used to switch channels on the 

LINDY CPU Switch Multiscreen. To switch to the next channel, the user simply holds 

down the central button or wheel button and presses the left or right hand button to 

change the channel (see section 3.6). If the user does not wish to take advantage of 

this feature, it can be disabled by selecting U2, U3 or U5. If the third button is being 

used to switch the LINDY CPU Switch Multiscreen then it is not available for use 

with PC software although the function of an IntelliMouse wheel is not affected. 

Consequently in modes U1, U2 and U4 the LINDY CPU Switch Multiscreen reports 

to the PCs that a 2 button mouse is connected. If you wish to use the full function of 

a 3 button mouse or IntelliMouse for your PC software then you should select 

options U3 or U5. 


Summary of Contents for CPU Multiscreen 32346

Page 1: ...on August 2001 Part Numbers 32346 32347 32348 and 32349 2001 LINDY Electronics Ltd Part Model 32346 LINDY CPU Switch Multiscreen 2 ports 2 screens Part Model 32347 LINDY CPU Switch Multiscreen 4 ports...

Page 2: ...ral mouse button To select a computer using the keyboard hotkeys hold down the CTRL and ALT keys press and release the required port key e g 1 and then release the CTRL and ALT keys Safety information...

Page 3: ...schlossenen Rechner permanent Monitor Maus und Tastatur Dies sorgt daf r dass zwischen den angeschlossenen Rechnern beliebig oft hin und her geschaltet werden kann ohne dass die Rechner das Maus bzw T...

Page 4: ...nnen jedoch auch geeignete einzelne LINDY Standardkabel verwendet werden Schlie en Sie Ihre Tastatur Ihren Monitor und Ihre PS 2 Maus an die DUNKELGR N markierten Ports auf der R ckseite des LINDY CP...

Page 5: ...n del medio Para seleccionar un ordenador utilizando las teclas r pidas del teclado mantenga pulsadas las teclas CTRL y ALT pulse y suelte la tecla del puerto requerida p e 1 y a continuaci n suelte...

Page 6: ...courci clavier maintenez les touches CTRL et ALT enfonc es appuyez sur la touche du port souhait ex 1 et rel chez puis rel chez les touches CTRL et ALT Consignes de s curit A n utiliser qu l int rieur...

Page 7: ...tivi tastiera tener premuti i tasti CTRL e ALT premere e rilasciare il tasto porta richiesta es 1 e quindi rilasciare i tasti CTRL e ALT Informazionoi riguardanti la sicurezza Da usare esclusivamente...

Page 8: ...e the right to change the specifications functions and circuitry of the product without notice All trademarks acknowledged Safety information For use in dry oil free indoor environments only Do not at...

Page 9: ...shall in all circumstances be limited to the replacement value of this product If any difficulty is experienced in the installation or use of this product that you are unable to resolve please contac...

Page 10: ...ch the receiver is connected d Consult the supplier or an experienced radio TV technician for help FCC Compliance Statement United States This equipment generates uses and can radiate radio frequency...

Page 11: ...on without the optional power adapter 14 2 5 Configuring your PCs 14 2 6 Configuring the LINDY CPU Switch Multiscreen 14 2 7 Summary of LINDY CPU Switch Multiscreen configuration options 15 2 8 Resett...

Page 12: ...ns for multiple video head applications 31 4 LINDY CPU Switch Multiscreen configuration options 33 4 1 Screen saver time delay 33 4 2 Autoscan lock on mode and delay time 33 4 3 Mouse mode and mouse s...

Page 13: ...ables several computers equipped with these multiple video facilities to be controlled from a keyboard mouse and an array of monitors All the monitors and the keyboard and mouse are switched together...

Page 14: ...atically restores keyboard and mouse states when channel changed Supports keyboard modes 1 2 and 3 and mouse prompt and stream modes for maximum compatibility Can be controlled remotely via an RS232 s...

Page 15: ...nected to LINDY CPU Switch Smart products for synchronised switching applications Optional power adapter can be used for video only or cascade applications 1 2 Package contents LINDY CPU Switch Multis...

Page 16: ...LINDY CPU Switch Multiscreen Installation and Use Page 9 1 4 Product information Figure 1 LINDY CPU Switch Multiscreen front view Figure 2a CPU Switch Multiscreen 4 Port 4 Screen part code 32349...

Page 17: ...LINDY CPU Switch Multiscreen Installation and Use Page 10 Figure 2b CPU Switch Multiscreen 4 Port 2 Screen part code 32347 Figure 2c CPU Switch Multiscreen 2 Port 4 Screen part code 32348...

Page 18: ...LINDY CPU Switch Multiscreen Installation and Use Page 11 Figure 2d CPU Switch Multiscreen 2 Port 2 Screen part code 32346 Figure 3 Remote control pad display optional accessory part 32255...

Page 19: ...use IntelliMouse Explorer compatible mouse If you wish to use the mouse to switch the LINDY CPU Switch Multiscreen s channel then you will need a three button mouse or an IntelliMouse The LINDY CPU Sw...

Page 20: ...he LINDY CPU Switch Multiscreen see figs 1 2 and 3 Next connect each computer system unit in turn with the keyboard cable mouse cable and video cables For the keyboard mouse and first video port LINDY...

Page 21: ...onnected computer or the optional power adapter If you are cascading the LINDY CPU Switch Multiscreen to another LINDY CPU Switch Multiscreen then a power adapter must be connected to all LINDY CPU Sw...

Page 22: ...e front panel display shows C In configure mode options are entered by typing a letter followed by a number followed by return Use ESC to abort the entry of an option The LINDY CPU Switch Multiscreen...

Page 23: ...re switching to next port T6 20 seconds autoscan delay time before switching to next port T7 30 seconds autoscan delay time before switching to next port T8 60 seconds autoscan delay time before switc...

Page 24: ...function F6 Restore IntelliMouse function F8 RESET all configurations to default settings Display confirms with r P Sets password see section 4 6 for instructions E Exits configure mode and returns th...

Page 25: ...re connect the shared mouse without powering down the system although this is generally not advisable see section 2 10 for details Keyboard and mouse mode switching The LINDY CPU Switch Multiscreen k...

Page 26: ...if the PS 2 mouse is unplugged and plugged back in whilst the PC is running Mouse movement can then only be restored by rebooting the PC This is because the mouse drivers only setup and enable the mou...

Page 27: ...nds until C is displayed You are now in configure mode 3 To restore a PS 2 mouse connection press I Or to restore an IntelliMouse connection press I 4 Exit from configure mode by typing I 5 Test the m...

Page 28: ...ch 7 Move option switch 7 on the underside of the LINDY CPU Switch Multiscreen to the ON position Step 3 Reset the LINDY CPU Switch Multiscreen Reset the LINDY CPU Switch Multiscreen by moving option...

Page 29: ...progress The display will again show a lower case U when the download is complete Move option switch 7 to the OFF position to exit upgrade mode and start normal operation You may check the new firmwar...

Page 30: ...y have unpredictable results and may damage your LINDY CPU Switch Multiscreen or computing equipment For obvious reasons the code that the LINDY CPU Switch Multiscreen uses to perform upgrades is not...

Page 31: ...el key is used to select which channel is currently controlled by the shared keyboard mouse and monitor ports Pressing the key during normal operation will cause the next channel to be selected The ke...

Page 32: ...s display usually shows the currently selected port If autoscan mode is selected the segments will illuminate in sequence in a clockwise direction interspersed with a display of the currently selected...

Page 33: ...ys see section 4 4 Once the hotkey command has been activated you will need to release the hotkeys and the command key before a new hotkey command is accepted by the LINDY CPU Switch Multiscreen HOTKE...

Page 34: ...ED release ED To tab through channels press ED Yrelease YpressY release Ypress Y release YED 3 6 Mouse control Computers may conveniently be selected using a three button mouse In order to switch to...

Page 35: ...character back to the sending device when the channel has been changed The serial interface pins are found on the options connector on the rear of the LINDY CPU Switch Multiscreen Pin assignments for...

Page 36: ...een B the user would hold down the hotkey keys then press 2 followed by 3 whilst keeping the hotkey keys pressed This will have the effect of connecting to port 3 of the LINDY CPU Switch Multiscreen w...

Page 37: ...LINDY CPU Switch Multiscreen Installation and Use Page 30 A typical cascade of two LINDY CPU Switch Multiscreens...

Page 38: ...ideo cards with multiple video heads Such configurations are typically required in banking and engineering applications where greater video real estate is required Whenever the LINDY CPU Switch Multis...

Page 39: ...LINDY CPU Switch Multiscreen Installation and Use Page 32 Synchronised LINDY CPU Switch Multiscreens used to switch eight video channels together...

Page 40: ...nk screen after 4 minutes of inactivity B5 Blank screen after 8 minutes of inactivity B6 Blank screen after 12 minutes of inactivity B7 Blank screen after 16 minutes of inactivity B8 Blank screen afte...

Page 41: ...or the mouse WARNING Many modern monitors are fitted with automatic power save relays and will switch off after a few seconds if connected to an inactive PC If you are using such a monitor you must no...

Page 42: ...ct mouse options U4 or U5 to enable the IntelliMouse features U1 LINDY CPU Switch Multiscreen channels are switchable using a 3 button mouse or IntelliMouse default LINDY CPU Switch Multiscreen report...

Page 43: ...ogether H7 RIGHT CTRL and RIGHT ALT keys together H8 No hotkey enabled 4 5 Cycling between all channels or just the active channels The LINDY CPU Switch Multiscreen can be set to cycle between all cha...

Page 44: ...ers and display P on the LINDY CPU Switch Multiscreen display Control can only be regained by typing the correct password on the keyboard To set the password in configure mode first type P then return...

Page 45: ...efault L8 Cascade query code EF 4 9 Resolving slow mouse problems Due to certain technical reasons some systems running particular combinations of operating system and mouse drivers are sensitive to s...

Page 46: ...ion and Use Page 39 4 10 Exit configure mode When you have finished configuring any special options simply type E followed by return to exit configure mode and return to normal operation mode The atta...

Page 47: ...or and mouse extension cables can be used to increase the distance from LINDY CPU Switch Multiscreen up to 10m Most keyboards and mice will also operate at distances of 20 metres A2 LINDY CPU Switch M...

Page 48: ...pter the cables should be no longer than 5 metres see section 2 4 for more details For operation with the power adapter cables should be no longer than 30 metres RS232 serial mice these require a spec...

Page 49: ...cable 5 metres long 33716 3 in 1 LINDY cable 10 metres long The optional power adapter may be required see section 2 4 Additional Video Connectors For the additional video connections we recommend hi...

Page 50: ...ld S VGA Monitor Cable 10 metres long 37254 Premium Gold S VGA Monitor Cable 15 metres long 37250 Premium Gold S VGA Monitor Cable 20 metres long 37251 Premium Gold S VGA Monitor Cable 30 metres long...

Page 51: ...nections shown below are to connect either COM1 or COM2 of a PC to the LINDY CPU Switch Multiscreen to allow flash upgrades A 5 RS232 synchronisation cable pin assignments The cable connections shown...

Page 52: ...sed Action Some older keyboards were designed for use with specific computers and are not truly AT or PS 2 compatible Try another keyboard Problem Mouse causes channel to change Action Some cheaper mi...

Reviews: