background image


3


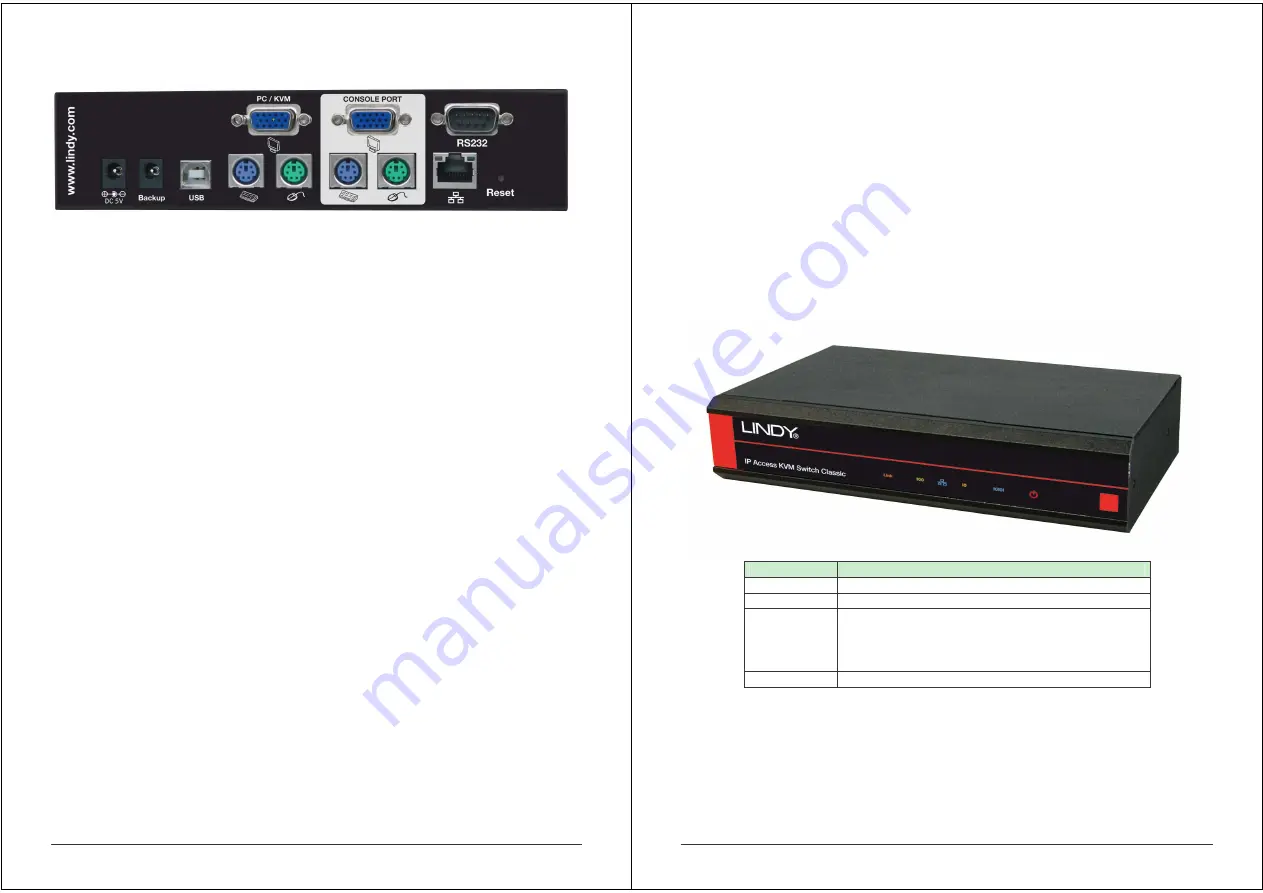
  2.2 Connections 


2.2.1 Host or KVM Switch Connection Side 


Use the supplied 3-in-1 combined KVM cable and USB cable to make the connections to the 

host computer. The DC power supply connection is also made here. Use the second DC port 

labelled backup for a redundant power supply if required. 


1.  Plug  the  power  adapter  into  the  mains  and  connect  the  jack  to  the  DC  power  supply 

socket 

2.  Connect the VGA port labelled PC connection to the VGA port on the host computer or 

KVM switch  

3.  Connect  the  keyboard  and  mouse  port  connections  to  the  PS/2  keyboard  and  mouse 

ports labelled PC on the host computer or KVM switch 

4.  (Optional) If you want to use the remote mass storage control feature, use the supplied 

USB A-B cable to connect the USB port on the IP ACCESS KVM SWITCH CLASSIC to a 

USB port on the host system 


2.2.2 Console Connection Side 


Connect your local keyboard, monitor and mouse console to the VGA and PS/2 ports labelled 

Console.  


2.2.3 Network Connection 


The IP ACCESS KVM SWITCH CLASSIC provides an RJ-45 port for an Ethernet connection. 

The  port  can  be  used  with  a  100Mbps,  100Base-TX  connection  or  a  10Mbps,  10Base-T 

connection.  The  IP  ACCESS  KVM  SWITCH  CLASSIC  will  sense  the  connection  speed  and 

automatically adjust to the appropriate operation mode. 


10Mbps Connection 


For 10Base-T Ethernet networks, the Ethernet adapter should use Category 3, 4, 5 or 6 UTP 

cable. To establish a 10Mbps connection, the cable must be connected to a 10Base-T hub. 


100Mbps Connection  


For  100Base-TX  Fast  Ethernet  networks,  the  IP  ACCESS  KVM  SWITCH  CLASSIC  supports 

Category 5 or 6 UTP cabling. To establish a 100Mbps connection the cable must be connected 

to a 100Base-TX hub. 


4


2.2.4 Dial up Line / Modem Connection 


The RS232 port of the IP ACCESS KVM SWITCH CLASSIC can either be used to connect to 

an  external  Modem  i.e.  to  set  up  a  dial  up  line  connection  or  can  be  used  to  connect  to  an 

external RS232 managed power switch. Use the supplied cable to connect the appropriate unit.  


2.2.5 Connecting an External Power Switch option


At  the  time  of  writing  (June  2008)  the  IP  ACCESS  KVM  SWITCH  CLASSIC  supports  the 

following external power switch options. Please refer to the individual manufacturers manuals 

for advice on connecting to the IP ACCESS KVM SWITCH CLASSIC. 


  Peppercon IPM-220L 

  Avocent SPC1 800/1600 

  Sentry In-Line Power Module 

  Leaning ePowerSwitch 


2.2.6. LED indicators and Switches 


LED 

Indication 

Power 

RED – On when power is applied 

IOIOI 

Blue – RS-232 Data Link Indicator 

LAN 

Ethernet 

Link/Act 

10/100Mbps 

Orange (10) -- 10BaseT Ethernet connection established 
Green (100) -- 100BaseT Ethernet connection established 

Blinking: Activity 


ON: When no data activity and link is connected


Link 

Green -- Blinking when data is being transmitted 


RESET button: on the rear panel, press the button to reboot the IP-KVM unit 


Summary of Contents for 39415

Page 1: ...Switch LITE the IP Access KVM SWITCH CLASSIC delivers an advanced IP KVM solution whilst retaining compatibility with older models This manual is based on the CPU IP Access Switch LITE manual and the...

Page 2: ...se Settings 9 3 4 6 Video Modes 9 4 USAGE 10 4 1 Prerequisites 10 4 2 Logging In 11 4 2 1 Login to the IP ACCESS SWITCH LITE 11 4 3 Navigation 12 4 3 1 Remote Console Main Window 13 4 3 2 Remote Conso...

Page 3: ...ement No impact on server or network performance Automatically senses video resolution for best possible screen capture High performance mouse tracking and synchronisation User console port for direct...

Page 4: ...thernet networks the Ethernet adapter should use Category 3 4 5 or 6 UTP cable To establish a 10Mbps connection the cable must be connected to a 10Base T hub 100Mbps Connection For 100Base TX Fast Eth...

Page 5: ...ith the parameters given in this table When configuring with a serial terminal reset the IP ACCESS KVM SWITCH CLASSIC and immediately press the ESC key You will see some device information and a promp...

Page 6: ...e synchronization between the local and remote mouse cursors The IP ACCESS KVM SWITCH CLASSIC addresses this problem with an intelligent synchronization algorithm There are two mouse modes available o...

Page 7: ...er of common video modes When running X11 on the host system please do not use any custom mode lines with special video modes If you do the IP ACCESS KVM SWITCH CLASSIC switch may not be able to detec...

Page 8: ...M SWITCH CLASSIC for the first time Not changing the password for the super user is a severe security risk and could result in unauthorized access to the switch and to the host system s to which it is...

Page 9: ...nd your host system uses a US English keyboard layout for instance some special keys on the German keyboard will not work as expected Instead the keys will result in their US English counterpart You c...

Page 10: ...video settings The IP ACCESS KVM SWITCH CLASSIC features two different dialogs which influence the video settings Video Settings through the HTML Frontend To enable the local video port select this op...

Page 11: ...sion quality depends on the video picture itself e g the number of the colours or the diversity of pixels The lower the compression quality the more data have to be sent and the longer it may take to...

Page 12: ...og into the device The credentials that need to be entered for authentication are identical to those of the web interface That means the user management of the Telnet interface is entirely controlled...

Page 13: ...included on the supplied CD Launch RawWrite you will see the window opposite Insert your floppy disk into your floppy drive Click the Read tab and then click on Select a name and destination for the f...

Page 14: ...n navigate to the Copy Disc section Select the CD ROM or DVD drive you would like to create an image from Specify the filename of the image and save the CD ROM content in that file Example 1 Create a...

Page 15: ...sticks can be redirected It is even possible to enable a write support so that for the remote machine it is possible to write data to your local disc Please note that Drive Redirection works on a lev...

Page 16: ...age emulation and hide the virtual drive if no image file is currently loaded To set this option press the button Apply IMPORTANT 1 Drive Redirection is only possible with Windows 2000 and later versi...

Page 17: ...and use the Remote Console The default password for both accounts is pass Ensure you change the passwords as soon as you have installed and accessed the IP ACCESS KVM SWITCH CLASSIC for the first time...

Page 18: ...en several users are accessing the IP ACCESS KVM SWITCH CLASSIC simultaneously The standard colour depth is 16 bit 65536 colours The other colour depths are intended for slower network connections in...

Page 19: ...of the combination is encountered In this case all pressed keys will be released in reversed sequence So the minus sign builds single separate keypresses and releases The star inserts a pause with a...

Page 20: ...tting should be suitable for most situations Force Composite Sync Required for Sun Computers To support signal transmission from a Sun machine enable this option If not enabled the picture of the remo...

Page 21: ...Enable this option to exclude the IP ACCESS KVM SWITCH CLASSIC from the setup protocol 38 5 5 2 Dynamic DNS A freely available Dynamic DNS service dyndns org can be used in the following scenario see...

Page 22: ...ing again to the Dynamic DNS server by the IP ACCESS KVM SWITCH CLASSIC 40 5 5 3 Security Force HTTPS If this option is enabled access to the web front end is only possible using an HTTPS connection T...

Page 23: ...will not match the network configuration that will be applied to the IP ACCESS KVM SWITCH CLASSIC by its user The certificate s underlying secret key is also used for securing the SSL handshake Hence...

Page 24: ...s Note If you destroy the CSR on the IP ACCESS KVM SWITCH CLASSIC there is no way to get it back In case you deleted it by mistake you have to repeat the three steps as described previously 44 Confirm...

Page 25: ...u must make sure it is not interfering with the IP settings of the IP ACCESS KVM SWITCH CLASSIC and your console computer The default value will work in most cases Modem client IP address This IP addr...

Page 26: ...after the IP ACCESS KVM SWITCH CLASSIC has been started If the IP ACCESS KVM SWITCH CLASSIC loses power or a hard reset is performed all logging data will be lost To avoid this use one of the log met...

Page 27: ...its IP address from which host the user comes from and its activity status is displayed RC means that the Remote Console is open If the Remote Console is opened in exclusive mode the term exclusive is...

Page 28: ...essible However you will be required to login once again Note This process is not reversible and may take some minutes Make sure the IP ACCESS KVM SWITCH CLASSIC s power supply will not be interrupted...

Page 29: ...ly configured Q 006 Special key combinations e g ALT F2 ALT F3 are intercepted by the console system and not transmitted to the host A 006 You have to define a so called Button Key This can be done in...

Page 30: ...CAPE ESC F1 F2 F3 F4 F5 F6 F7 F8 F9 F10 F11 F12 PRINTSCREEN SCROLL LOCK BREAK INSERT HOME PAGE UP DELETE END PAGE DOWN UP LEFT DOWN RIGHT NUM LOCK NUMPAD0 NUMPAD1 NUMPAD2 NUMPAD3 NUMPAD4 NUMPAD5 NUMPA...

Page 31: ...onnection 10 100 Ethernet telephone line modem needed Firmware Upgrade Port 1 x Serial DB9 Pin Max Video Resolution Local 1600 x 1200 Remote 1280 x 1024 OS Compatibility MS Windows family Unix Sum Sol...

Page 32: ...ry to correct the interference by one or more of the following measures Reorient or relocate the receiving antenna Increase the separation between the equipment and receiver Connect the equipment into...

Reviews: