15
Options
Opens the Options menu. A short description of each of the options
follows:
Monitor Only
Toggles the ‘Monitor Only’ filter on or off. If the filter is switched on,
no remote console interaction is possible but monitoring is.
Exclusive Access
If a user has the appropriate permission, he can force the Remote
Consoles of all other users to close. No one can open the Remote
Console at the same time again until this user disables the exclusive
access, or logs off.
A change in the access mode is also visible in the status line indicated by this icon.
Scaling
Allows you to scale down the Remote Console window: 25% / 50% / 100% / Scale to fit. You
can still use both mouse and keyboard; however the scaling algorithm will not preserve all
display details.
Mouse Handling
The submenu for mouse handling offers three options for synchronizing the local and the
remote mouse pointer.
Mouse Mode
Allows switching between Single Mouse Mode and Double Mouse Mode
Fast Sync
The fast synchronization is used to correct a temporary, but fixed skew.
Intelligent Sync
Use this option if the fast sync does not work or the mouse settings have
been changed on the host system.
Note: This method takes more time than fast sync and requires a correctly
adjusted picture. Use the auto adjustment function or the manual correction in
the Video Settings panel to setup the picture.
Local Cursor
Offers a list of different cursor shapes to choose from for the local mouse pointer: Transparent,
Default, Big, Pixel, Crosshair. The selected shape will be saved for the current user and
activated the next time this user opens the Remote Console. The number of available shapes
depends on the Java Virtual Machine; a version of 1.2 or higher offers the full list.
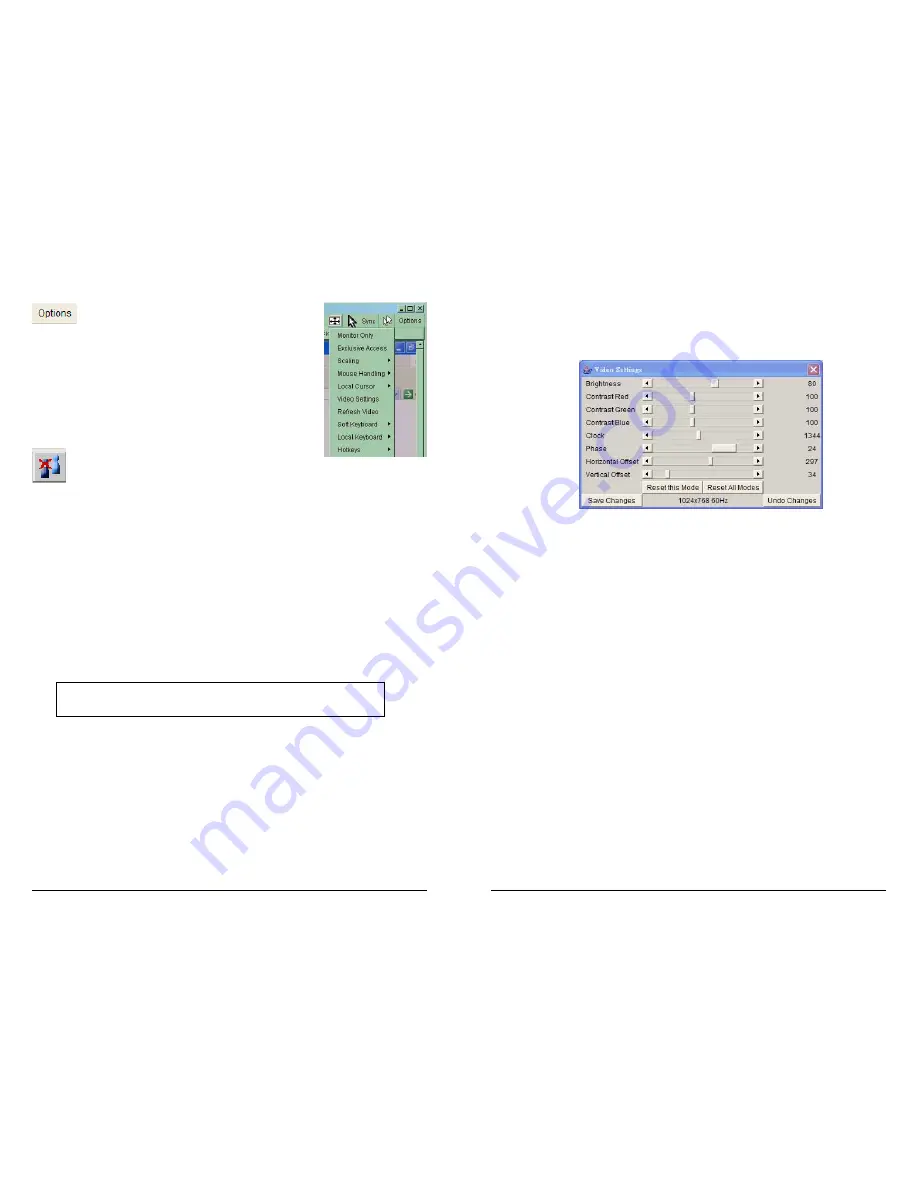
Video Settings
Opens a panel for changing the KVM OVER IP SWITCH video settings. The KVM OVER IP
SWITCH features two different dialogs, which influence the video settings:
Video Settings in the KVM section in the front end menu:
The Noise Filter option defines how the KVM OVER IP SWITCH reacts to small changes in the
video input signal. A large filter setting needs less network traffic and leads to a faster video
display, but small changes in some display regions may not be recognized immediately. A small
16
filter displays all changes instantly but may lead to a constant amount of network traffic even if
display content is not really changing (depending on the quality of the video input signal). All in
all the default setting should be suitable for most situations.
Video Settings through the remote console:
Brightness
Controls the brightness of the picture
Contrast
Controls the contrast of the picture
Clock
Defines the horizontal frequency for a video line and depends on the video mode. Different
video card types may require different values here. The default settings in conjunction with the
auto adjustment procedure should be adequate for most common configurations. If the picture
quality is still bad after auto adjustment you may change this setting together with the sampling
phase to achieve a better quality.
Phase
Defines the phase for video sampling, used to control the display quality together with the
setting for sampling clock.
Horizontal Offset
Use the left and right buttons to move the picture in a horizontal direction
Vertical Offset
Use the left and right buttons to move the picture in a vertical direction
Reset this Mode
Reset mode specific settings to the factory-made defaults.
Reset all Modes
Reset all settings to the factory-made defaults.
Save Changes
Save changes permanently
Undo Changes
Restore last settings


