background image

                                                                                                                                          Suzhou Lily Tech. Co., Ltd.


Page  2. Total  5  pages


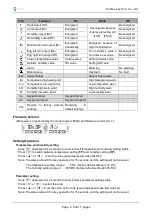
Icon 

Function 

On 

Blink 

Off 


Heat output (R3) 

Energized 

Deenergized because 

of delay protecting (ref. 

t2

h2

Deenergized 


Cool output (R3) 

Energized 

Deenergized 


Humidify output (R2) 

Energized 

Deenergized 


Dehumidify output (R2) 

Energized 

Deenergized 


Multifunction fan output (R1) 

Energized 

periodically 

Energized  because  of 

high limit protection 

Deenergized 


Egg left turn output (R4) 

Energized 

Turn  counter’s  value  ≥ 

Turn times’ set value 

Deenergized 


Egg right turn output (R5) 

Energized 

Deenergized 


Celsius temperature value 

Celsius value 

Setting Celsius value 


Relative humidity value 

RH value 

Setting RH value 


Alarm 


Alarming 

No alarming 


Maintenance 


Has fault 

No fault 

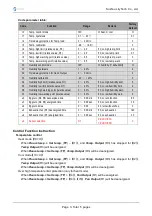
E01 

Sensor failure 


Sensor failure warn 


tHi 

Temperature high warn point 


High temperature warn 


tLo 

Temperature low warn point 


Low temperature warn 


hH 

Humidity high warn point 


High humidity warn 


hL 

Humidity low warn point 


Low humidity warn 


Lo 

Keypad locked 

Keypad locked 


Un 

Keypad unlocked 

Keypad unlocked   


UnL 

Restore  to  factory  default 

settings 

Restoring 

to 

default settings 


Firmware Version 

After power on reset, display the model name (7850A) and firmware version (A1.

2

): 


Setting Operation 

Temperature and humidity setting


Keep

S

depressed for 2 seconds to enter into/exit temperature and humidity setting status. 

Press

P

to switch between temperature setting (

TP

) and humidity setting (

HP

). 

Press

or

  to set the value (keep depressed make fast set). 

Note: The status will exit if no key operation for 15 seconds, and the setting will not be saved. 

              The temperature setting range 0 

  65

  (factory default setting is 37.8

). 

            The humidity setting range 0 

  80%RH (factory default setting is 60%RH). 


Parameter setting 

Keep

P

depressed for 2 seconds to enter into/exit parameter setting status. 

Press

S

or

P

to select the code. 

Press

or

to set the value of the code (keep depressed make fast vale set). 

Note: The status will exit if no key operation for 15 seconds, and the setting will not be saved. 
Summary of Contents for ZL-7850A

Page 1: ...5 ZL SHr03A 2 25 ZL SHr05B Temperature 1 Setting range Humidity 0 80 RH Temperature 0 65 Display range Humidity 0 99 RH Temperature 20 80 Output Temp Output 5A Humi Output and Fan Output 3A 2 Egg turns 1A Working environment 10 45 90 RH without dew Case dimension L78 x W34 5 x D71 mm Drilling size L 71 x W29 mm Case materials PC ABS fireproof Protection level IP65 Front panel only Key Function Hea...

Page 2: ...dity warn hL Humidity low warn point Low humidity warn Lo Keypad locked Keypad locked Un Keypad unlocked Keypad unlocked UnL Restore to factory default settings Restoring to default settings Firmware Version After power on reset display the model name 7850A and firmware version A1 2 Setting Operation Temperature and humidity setting Keep S depressed for 2 seconds to enter into exit temperature and...

Page 3: ...elative value 0 80 If 0 no high humidity warn 0 h7 Humidity low warning point relative value 0 80 If 0 no low humidity warn 0 u0 Egg turn R4 R5 deenergized time 0 999 min If 0 no turn function 60 u1 Egg turn R4 R5 energized time 0 999 sec If 0 no turn function 30 u2 Egg turn times 0 999 If 0 turn without shop 0 u3 Exhaustion fan R1 deenergized time 0 999 min If 0 no exhaustion 120 u4 Exhaustion fa...

Page 4: ...for 2 seconds starts manual egg right turning keeping depressed for 2 seconds starts manual egg left turning Pressing S and simultaneously shows the full egg turn counter value Power on reset will reset the full egg turn counter value to zero Timer exhaustion control R1 Fan Output R1 will be energized for u4 after deenergized for u3 periodically Warning control When there is warning the buzzer wil...

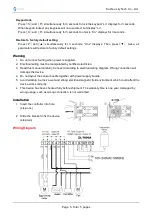
Page 5: ...iring when power is supplied 2 Electrical wiring must be manipulated by certified electrician 3 Read this manual carefully Connect according to electrical wiring diagram Wrong connection will damage the device 4 Do not layout the sensor bundle together with power supply bundle 5 Avoid working in erosive wet and strong electrical magnetic field environment which could affect the device works correc...

Reviews: