4. Device Concept
RAP-B511 series
– User's Manual
26
Applied firmware package: v1.1.0b3b3 | LDC software: v2.5.1b5
Turn off the lamp
Do the following setting on the UI Config page
:
Step 2.
Select the
Button1
and set the operation mode to
Toggle
. The first button press changes the interaction
state to true. It happens automatically.
Step 3.
Choose the
TRUE feedbacks
tab and click on the
RS-232 message recognized
condition. Write the serial
message which is sent by the relay box about the lamp status in the entry field of the pop-up window
(e.g. 'the lamp is turned on'). Click
Ok
to save.
Step 4.
Choose the
FALSE feedbacks
tab and click on the
RS-232 message recognized
condition. Write the serial
message which is sent by the relay box about the lamp status in the entry field of the pop-up window
(e.g. 'the lamp is turned off'). Click
Ok
to save.
The RS-232 recognizer settings has to be done with Lightware Device Controller Software (see details in the
section) or with LW3 protocol commands (see more information in the
section).
For more information about the button configuration, see
section.
4.3.3.
TCP Recognizer
DIFFERENCE:
Below mentioned features are available from FW package v1.1.0b3.
The feature is almost the same as in case of the RS-232 but for the network interface: the incoming TCP
messages can be processed which may trigger actions. The combination of the TCP recognizer and the
Event Manager gives numerous opportunities for creating automatic room solutions.
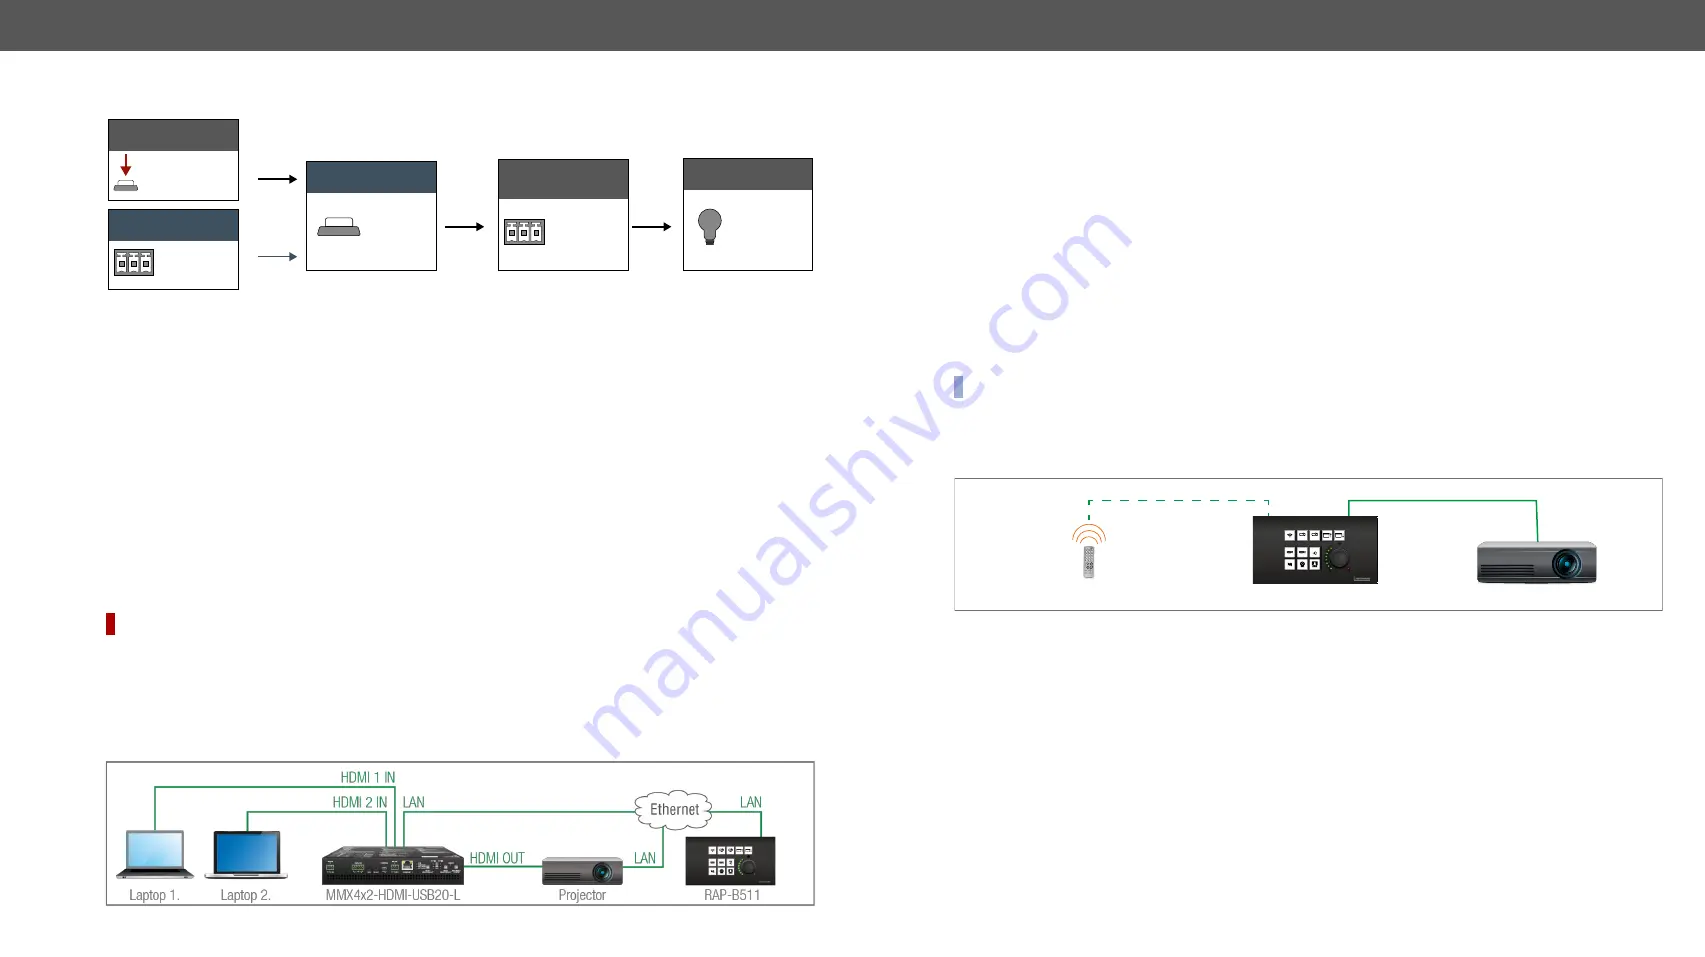
TCP Recognizer Example
When the Projector switches off, the button light (2) of the RAP-B511 is turned off automatically.
User interaction
Button press 2.
‘the lamp is
turned off’
Interaction state
FALSE
Result
The lamp is
turned off
Send
RS-232 mes
sage
‘turn off the
lamp’
Incoming
RS-232 mes
sage
When the power-off process is started in the projector, it will send a message over Ethernet. That message
will be recognized by the RAP-B511 and will be used as a Condition in Event Manager.
How to set up the RAP?
Step 1.
Configure the recognizer for the communication by the LDC, (see the
section) or by LW3
protocol commands (see the
section). Define the desired device as a TCP
client. (The Projector is saved as 'C1' in this example.)
Step 2.
Create the following event in the Event manager:
E1.
When the
(PWR!001 "On")
message is recognized from the C1 client, the Background light of
Button LED2 is set to
Off
state.
For more information about setting the events in LDC, see the
section.
4.3.4.
IR Recognizer
The RAP-B511 has a built-in IR eye with IR recognizer function. The incoming signal is stored in hash
(fingerprint), and it can trigger actions in Event Manager.
INFO:
All settings are available in the LDC software, more details can be found in the
section.
IR Recognizer Example
IR signals are sent by the Remote controller, the projector is connected to the Ethernet port of the RAP-B511.
The projector can be powered on via the RAP-B511 by using the remote controller with the following way:
▪
Set an action in Event Manager: if the power button is pressed on the Remote controller, the RAP-B511
sends a control command ('Power on') to the projector via Ethernet. In this case you can control the
device via the RAP-B511 remotely. See the details about the Event Manager settings in the
section.
4.3.5.
GPIO Input Level Change
The GPIO (General Purpose Input/Output) port is a multifunctional input/output interface to control the
RAP-B511 or third-party devices and peripherals. You can establish connection between the controller/
controllable device and the RAP-B511 by the 4-pole Phoenix connector. Three pin's direction is configurable
independently based on needs of the application.
When the GPIO pin is used as an input, it is able to receive feedbacks from the other device by changing the
input level. The configuration is available in
.
IR IN
Remote controller
Ethernet
ON
OFF
AUTO
RAP-B511
Projector


