background image

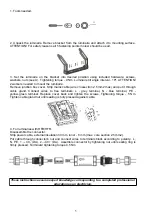
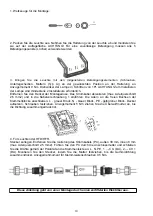
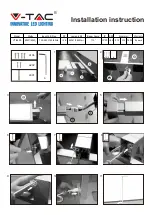
1. Tools needed.

2. Unpack the luminaire. Remove bracket from the luminaire and attach it to mounting surface.
ATTENTION! For safety reasons all 5 fastening points (holes) should be used.

3.  Set  the  luminaire  on  the  bracket  into  desired  position  using  included  hardware:  screws,
washers, nuts (see A). Tightening torque - 9 Nm. Luminaire tilt angle interval - 18º. ATTENTION!
2 workers needed to mount the luminaire.
Remove junction box cover. Strip mains cable (wire crossection 2.5 mm2 max) and put it through
cable  gland.  Connect  wires  to  free  terminals:  L  -  grey  terminal,  N  -  blue  terminal,  PE  -
yellow-green  terminal.  Replace  cover  back  and  tighten  the  screws.  Tightening  torque  -  5  Nm.
Tighten cable gland nut until sealing is fully pressed against cable.

4. For luminaries with HFD/HFR.
Disassemble the connector.
Strip power cable, external insulation 30 mm, inner - 8 mm (max. core section 2.5 mm2).
Put cable through connector's nut and connect wires to terminals block according to polarity:  L,
N, РЕ, 1 → C0- (DA), 2 →C0+ (DA).  Assemble connector by tightening nut until sealing ring is
firmly pressed. Terminals' tightening torque 0.5 Nm.

These instructions assume expert knowledge corresponding to a completed professional 

education as an electrician.

5

Summary of Contents for 1997027060

Page 1: ...HB LED FLOODLIGHT Manual Montageanleitung ...

Page 2: ...nal value Luminous flux flickeing 5 Luminaire corresponds to the protection classification IP by IEC 60529 Diffuser type Polycarbonate lenses Further information about luminaire s dimensions shown in the table please see Overall and installation dimensions section Notizen Die zulässige Abweichung der Werte Leistung Lichtstrom Masse von den Sollwerten beträgt 10 Die zulässige Abweichung der CCT Wer...

Page 3: ...Weight kg Length A mm Width B mm Heigth С mm Mounting dimension D mm Mounting dimension E mm Einschaltstro m А Einschaltstro mimpulszeit μs Gewicht kg Länge A mm Breite B mm Höhe c mm Montagemaß D mm Montagemaß E mm 65 250 37 880 535 360 320 100 3 ...

Page 4: ... operate the luminaire if the diffuser is undamaged Unauthorized disassembling modification and repair is prohibited In case of malfunction the luminaire should be immediately switched off and report to manufacturer or specialized luminaire service The luminaire has passed a high voltage test for insulation and electric strength according to IEC 60598 1 The LED luminaries are considered as low haz...

Page 5: ...Connect wires to free terminals L grey terminal N blue terminal PE yellow green terminal Replace cover back and tighten the screws Tightening torque 5 Nm Tighten cable gland nut until sealing is fully pressed against cable 4 For luminaries with HFD HFR Disassemble the connector Strip power cable external insulation 30 mm inner 8 mm max core section 2 5 mm2 Put cable through connector s nut and con...

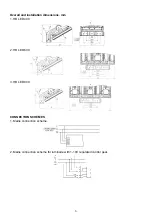
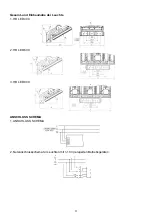
Page 6: ...Overall and installation dimensions mm 1 HB LED 400 2 HB LED 600 3 HB LED 800 CONNECTION SCHEMES 1 Mains connection scheme 2 Mains connection scheme for luminaire with 1 10V regulated control gear 6 ...

Page 7: ...nths from date of delivery Warranty does not apply to color change of painted surfaces and plastic parts during luminaire operation Luminous flux level is at least 70 of the nominal value during the warranty period Warranty will cover the entire period given that assembly installation and operation of luminaires are handled by specialized technical personnel and according to the luminaire s manual...

Page 8: ...Company stamp More information can be found on our website https www ltcompany com en Hotline 0049 89 550 59 8611 8 ...

Page 9: ...n Sie die Leuchte nur in Betrieb wenn der Diffusor nicht beschädigt ist Nicht autorisiertes Zerlegen Modifizieren und Reparieren ist verboten Im Falle einer Fehlfunktion sollte die Leuchte sofort ausgeschaltet werden und sich beim Hersteller oder spezialisierten Leuchtenservice melden Leuchte hat einen Hochspannungstest für Isolation und Spannungsfestigkeit gemäß IEC 60598 1 2011 bestanden Die LED...

Page 10: ... Aderquerschnitt 2 5 mm2 und in die Kabelverschraubung 1 einführen Die Adern an die freien Buchsen der Klemmenblöcke anschließen L grauer Block N blauer Block PE gelbgrüner Block Deckel aufsetzen Schrauben festziehen Anzugsmoment 5 Nm Ziehen Sie die Überwurfmutter an bis die Dichtung zusammengedrückt ist 4 Für Leuchten der HFD HFR Stecker zerlegen Entfernen Sie die Isolierung des Stromkabels PC au...

Page 11: ...Gesamt und Einbaumaße der Leuchte 1 HB LED 400 2 HB LED 600 3 HB LED 800 ANSCHLUSS SCHEMA 1 ANSCHLUSS SCHEMA 2 Netzanschlussschema für Leuchten mit 1 10V geregelten Betriebsgeräten 11 ...

Page 12: ...eckt sich über den gesamten Zeitraum da Produktion Montage und Bedienung der Leuchten von spezialisiertem Fachpersonal und gemäß Bedienungsanleitung durchgeführt werden Die Lebensdauer der Leuchte unter normalen klimatischen Bedingungen beträgt mindestens 8 Jahre insofern die Installation und Betriebsanweisungen befolgt werden 8 Jahre für Leuchten mit Gehäuse und oder optischen Teilen Diffusor aus...

Page 13: ...Hotline Nummer 0049 89 550 59 8611 20 09 2020 2 01 14 13 ...

Reviews: