background image

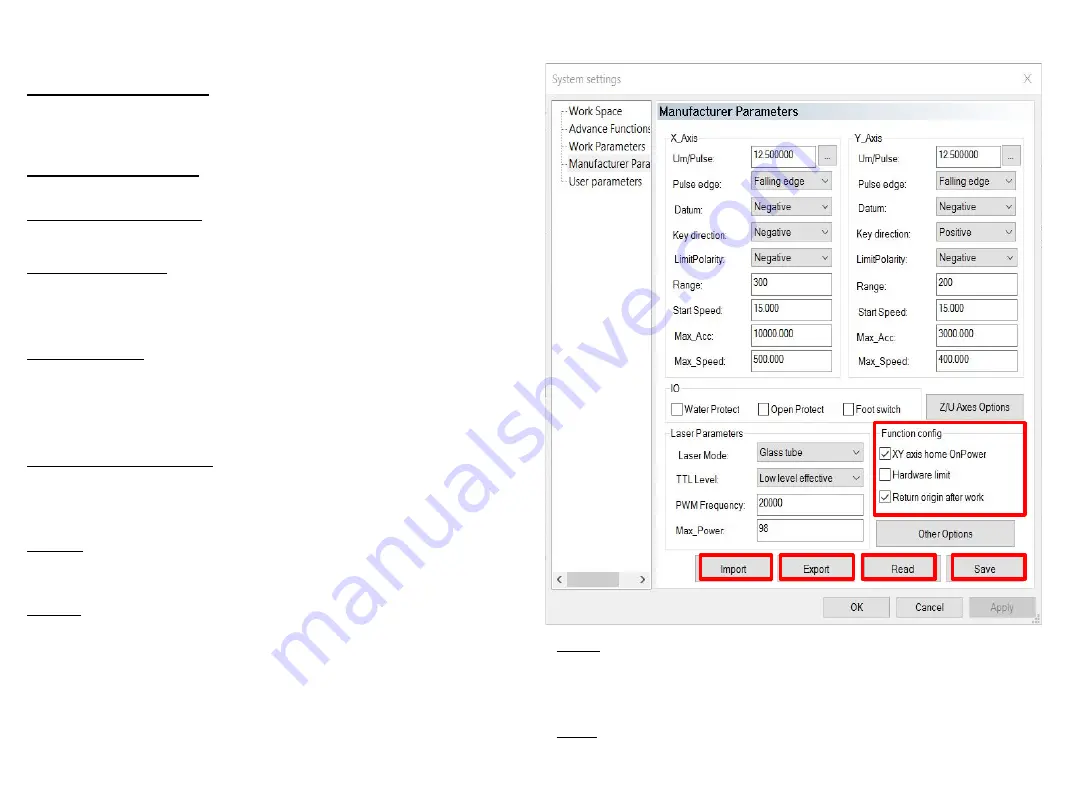
Function configuration 

XY axis home On Power: If selected, when machine starts, X axis 

and Y axis will run reset movement simultaneously (Shall select 

the option normally)
Z axis home On Power: If selected, when machine starts, Z axis 
will run reset movement

(Shall not select the option normally)

U axis home On Power: If selected, when machine starts, U axis 
will run reset movement.(Shall not select the option normally)
U axis for feeding: If selected, start U axis feeding function. If it’s 
not selected, U axis feeding function will not work. (Shall select 
the option normally)

Hardware limit: If selected, system will apply real-time monitoring 
on limit signal according to the direction of the movement. When 
detecting a limit signal as low level, ongoing work will suspend, 
and “Reach limit!” will be displayed on the LED.

Return origin after work: If selected, system will return to origin 
after job completes. Not selected, system will stay in place after 
job completes.

Import: allows import manufacturer’s complete setting parameter 
files. Click Import and then locate the file and open.

Export: allows copying the current parameter settings. Click 
export and then locate the file and open. The exported parameter 
can be used to modify the current main board parameter through 
AWC708 main board U disk port.

Read: shows the current settings of the parameters on the machine. 
Click read and save the software interface settings into control panel 
RAM, and give control panel correct settings.

Save: sends the parameter settings to the laser machine. If you do not 
click save after setting the parameters, the settings will not be in 
applied.

15

Summary of Contents for LO-E5

Page 1: ...AnnexDepot Corp www Lightobject com LO E5 CONTROLLER MANUAL...

Page 2: ...o LaserCAD v7 Software LaserCAD Main Interface LaserCAD Quick Start Work Space Advanced Functions Work Parameters Manufacturer Parameters User Parameters Open Save files and Importing Exporting Creati...

Page 3: ...Layers Layer Parameters Cut Parameters Laser Parameters Engraving Machine Controls USB Connection Mode Transferring to Laser Machine CorelDraw AutoCAD Based Software 24 25 26 27 28 29 30 31...

Page 4: ...What s Included with the E5 1 USB cable plug to mount on side of Laser Machine 1 USB 2 0 Extension cable 1...

Page 5: ...LO E5 DSP Control Panel 2...

Page 6: ...isk Files 2 Axes Control 3 Common Params 4 Work Mode 5 Cut Box 6 Rotate Function 7 Language 8 System Version Main Screen Power 10 0 10 0 Speed 200 0 To change parameter settings in this page press the...

Page 7: ...rom the USB or computer that were saved on the machine 2 Axes Control The setting that resets the Z axis and U axis 3 Common Params Jog mm increments with each push FocusDis the distance between the l...

Page 8: ...t Diameter Language Name Version 5 Cut Box Allows users to start cutting a box blank 6 Rotate Function Settings when using the rotary for round objects 7 Language Selects language used for machine 8 S...

Page 9: ...rent settings from the user The system consists of a control system control panel and compatible software This manual is an introduction on how to use the software to complete machining tasks Composit...

Page 10: ...ties during using tool It can control the change of object by setting relevant properties in property bar Draw Bar With draw tool in draw bar it makes operation more flexible and convenient Control Pa...

Page 11: ...y to the machine 8 Double click on the layer on the right and it will bring up the Layer Parameters 9 In this page the power and speed of the laser can be adjusted The option to cut or engrave is avai...

Page 12: ...origin of machine Zero Limit position The setting must be exactly the same with the actual machine zero position or the machined image could be reversed or flipped Selected Color Determines color of s...

Page 13: ...graving method must be one way vertical or shifted to rotate engrave data for it to realize the function of rotating engraving For two way vertical set Rotate axis control to be value of X axes pulse...

Page 14: ...to the diameter of circle use the current set speed limit to process the circle If parameter is set properly it will greatly improve the circle cutting quality Click the add and delete and modify to...

Page 15: ...ssed image size will be different from the actual size Pulse Edge Trigger edge when motor is rotated by motor driver If the pulse edge setting is not correct may lead to cutting error Datum Axis movin...

Page 16: ...lly limit the speed below max speed for safety IO Function Switch Water Protect The water protection ports of AWC708 control panel are Laser1 Protect and Laser2 Protect When Water Protect is selected...

Page 17: ...m will output the two signals for low level when laser is off the system will output the two signals for high level If High level effective is selected when laser is on the system will output the two...

Page 18: ...limit signal as low level ongoing work will suspend and Reach limit will be displayed on the LED Return origin after work If selected system will return to origin after job completes Not selected sys...

Page 19: ...e process The bigger the value is the faster the space is results in a bigger dither accordingly Value range is between 10000 60000 normally Cut Jerk Speed of acceleration during cutting process The b...

Page 20: ...elow Select corresponding file and click Open Unite Lines Apply unite lines setting when importing the image Introduction of Unite Lines please refer to 3 13 5 DST PLT Auto Smooth Apply auto smooth se...

Page 21: ...click Drag the mouse on screen to draw Bezier Draw a Rectangle Click Rectangle option in Draw menu or click Drag the mouse on screen to draw rectangle at any size Press Ctrl key and drag the mouse at...

Page 22: ...and drag all contacted objects will be selected 4 Add Deselect selected objects Add object Select the first object then press Shift then click or box select the objects you want to add Deselect objec...

Page 23: ...y click the button Tilting and rotating objects is very simple Rotating Objects there are 2 ways to rotate the object 1 Click and input rotate angle in then click to complete rotation 2 Click and doub...

Page 24: ...around objects then allows to zoom object The operation is simple direct but with low accuracy Click and input horizontal size value and vertical size value in the text box and then press Enter and o...

Page 25: ...of laser head relative to figure To access this first click the options on the toolbar Then click on Position relative Following are diagrams with different positions of laser head relative to figure...

Page 26: ...ight Height of all datum after array Auto convert calculation According to the space calculate the rows and columns needed automatically Click Auto convert calculation 23 Material width X Width of mat...

Page 27: ...Layers Double Click on a layer to enter layer parameters 24...

Page 28: ...g cutting Working power Maximum power To adjust the maximum value of laser power during processing Corner power Minimum power the lowest power value during variable motion It s the power of Make sure...

Page 29: ...scanning from right to left or it releases laser when it s scanning from left to right Y_swing Laser head releases laser to scan image back and forth in vertical direction Y_unilateralism Laser head r...

Page 30: ...of file data The option is mainly used to confirm the placed position of parts to be processed Clip box cut completed part from working material Light press Release Light to turn on or turn off the l...

Page 31: ...Mode The window above will appear Then click the Add button In this next window you can change the device name and press FindCom to find the laser machine After that is done press ok and your compute...

Page 32: ...ance of feeding axis Z axes after each task completed Document Data Optimize Will optimize settings of the current document Gap Optimize Select this option then system will confirm the cutting directi...

Page 33: ...Coreldraw AutoCAD Based Software For manual download of AWCLaserCut Tool Click Menu Tools Macros Run Macro or Macro Note Only supports AutoCAD versions 2004 2008 CorelDraw x6 30...

Page 34: ...t is done click Run and the AWCLaserCut tool will be added These tools will be added that can be dragged into the toolbar by using the mouse If these tools disappear all of a sudden users can right cl...

Page 35: ...LOE5 01 2016 21 Blue Sky Court Sacramento CA 95828 Phone 916 572 6080 Fax 916 880 5600...

Reviews: