background image

LIGHT MY BRICKS TECHNIC DIY DESIGNER LIGHT KIT INSTALL ATION GUIDE

INSTALL ATION GUIDE

25

 LEGEND:

DISCONNECT

TURN / FLIP

TWIST / BRAID

DIRECTIONAL

POWER ON / TEST

CONNECT / RECONNECT

CHECK FOR CR2032 BATTERIES 
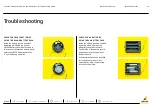
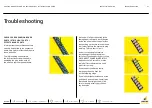
USING THE ROUND BATTERY PACK
Inside the battery pack is a symbol 

indicating which side the (round) 

CR2032 battery should be inserted. In 

this case, for the stacked battery pack, 

ensure that BOTH batteries have the 

“+” symbol facing upwards.

Troubleshooting

CHECK FOR AA BATTERIES  
USING THE AA BATTERY PACK
Inside the battery pack are symbols 

indicating which direction the  

AA battery should be inserted.  

The flat side of the battery should  

be paired with the spring side of  

the battery pack.

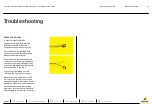
If the batteries have been installed 

correctly and your kit still isn’t 

operating correctly, the next step  

is to check the wiring.

TROUBLESHOOTING

Summary of Contents for Technic DIY Designer Kit

Page 1: ...INSTALLATION GUIDE 1 LIGHT MY BRICKS TECHNIC DIY DESIGNER LIGHT KIT INSTALLATION GUIDE Light My Bricks Technic DIY Designer Kit Installation Guide ...

Page 2: ...njoy PACAKAGE CONTENTS PACKAGE CONTENTS 8 White 30cm Bit Lights 8 x White 15cm Bit Lights 1 x Rotating 30cm Bit Light 1 x Multi Effects Board 2 x 6 Port Expansion Boards 1 x 8 Port Expansion Board 1 x 12 Port Expansion Board 2 x 5cm Connecting Cable 2 x 15cm Connecting Cables 2 x 30cm Connecting Cables 1 x 50cm Connecting Cables 8 x Adhesive Squares 1 x USB Power Cable 1 x AA Battery Pack requires...

Page 3: ...T KIT INSTALLATION GUIDE INSTALLATION GUIDE 3 Contents 4 Introduction 5 Lighting Chain 6 Bit Lights 12 Powering 14 Multi Effects 17 Rotating Bit Light 20 Extras 21 Beyond The Kit Upgradeing 22 Conclusion 23 Troubleshooting 38 Contact CONTENTS ...

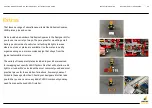
Page 4: ...istic industrial flashing beacons for the Bucket Wheel Excavator The following information will have you covered to light up your Technic set Let s begin We ll now go over several of the most versatile and effective lighting techniques you ll utilise to light your Technic set We ve featured several of our favourite LEGO Technic sets but remember these techniques can be applied to any sets Same com...

Page 5: ...O EXPANSION BOARD EXPANSION BOARD MULTI EFFECTS EXPANSION BOARD Effects Headlights Tail Lights LEGEND BIT LIGHTS ROTATING BIT LIGHT POWER SOURCE CONNECTING CABLE Your power source is at the beginning or head of the chain Then your expansion boards and connecting cables serve as the body from there providing you with the ports you need to connect lights and other components or limbs to Never connec...

Page 6: ... spotlights interior lights just to name a few The light head can fit comfortably under any 1x1 plate and the connected wire can snake and wind through and around almost any hole wedge cross or pin you ll find in a Technic set One instance where a bit light will not fit is under a standard LEGO flat tile You ll find included in your designer kit a series of the most common square and round transpa...

Page 7: ...ing up look for the soldered symbol on the left side of the port The connector side with the wires exposed should be facing toward the soldered symbol as you insert into the port If a plug won t fit easily into a port connector do not force it Incorrectly inserting the connector can can result in bent pins inside the port or possible overheating of the expansion board when connected The next few p...

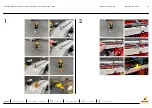
Page 8: ...LIGHT MY BRICKS TECHNIC DIY DESIGNER LIGHT KIT INSTALLATION GUIDE INSTALLATION GUIDE 8 LEGEND DISCONNECT TURN FLIP TWIST BRAID DIRECTIONAL POWER ON TEST CONNECT RECONNECT BIT LIGHTS 1 ...

Page 9: ...LIGHT MY BRICKS TECHNIC DIY DESIGNER LIGHT KIT INSTALLATION GUIDE INSTALLATION GUIDE 9 LEGEND DISCONNECT TURN FLIP TWIST BRAID DIRECTIONAL POWER ON TEST CONNECT RECONNECT 2 BIT LIGHTS ...

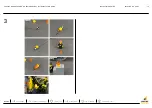
Page 10: ...LIGHT MY BRICKS TECHNIC DIY DESIGNER LIGHT KIT INSTALLATION GUIDE INSTALLATION GUIDE 10 LEGEND DISCONNECT TURN FLIP TWIST BRAID DIRECTIONAL POWER ON TEST CONNECT RECONNECT 3 BIT LIGHTS 4 ...

Page 11: ...LIGHT MY BRICKS TECHNIC DIY DESIGNER LIGHT KIT INSTALLATION GUIDE INSTALLATION GUIDE 11 LEGEND DISCONNECT TURN FLIP TWIST BRAID DIRECTIONAL POWER ON TEST CONNECT RECONNECT 5 BIT LIGHTS 6 ...

Page 12: ...ng for small vehicles you should opt for a battery pack For larger stationary structures USB to mains power is better suited Battery packs as a power source will allow your vehicle to be manoeuvred unencumbered by wires and depending on the build may be hidden inside the set However batteries drain faster and need to be replaced whereas mains power connected via USB will allow for non stop energy ...

Page 13: ... component please try a different port on the expansion board to verify where the fault lies with the light or expansion board To correct any issues with expansion board ports please view the section addressing expansion board issues on our online troubleshooting guide LEGEND DISCONNECT TURN FLIP TWIST BRAID DIRECTIONAL POWER ON TEST CONNECT RECONNECT 1 3 USB Power Bank sold seperately ...

Page 14: ... and 2 etc When the board is engaged and powered on the lights will emit left to right in sequence whichever effect you have selected at the intensity you have adjusted via the control wheel Of course you aren t limited to a single bit light per output port Simply extend the chain by connecting an expansion board to each output with a connecting cable the same as you would with the rest of your de...

Page 15: ...NIC DIY DESIGNER LIGHT KIT INSTALLATION GUIDE INSTALLATION GUIDE 15 LEGEND DISCONNECT TURN FLIP TWIST BRAID DIRECTIONAL POWER ON TEST CONNECT RECONNECT MULTI EFFECTS BOARD 1 2 3 Connecting cable connects to the IN port 5V ...

Page 16: ...pect an issue with a component please try a different port on the expansion board to verify where the fault lies with the light or expansion board To correct any issues with expansion board ports please view the section addressing expansion board issues on our online troubleshooting guide LEGEND DISCONNECT TURN FLIP TWIST BRAID DIRECTIONAL POWER ON TEST CONNECT RECONNECT ...

Page 17: ...in a range of LEGO Technic pieces including a 1x1 round brick cone or inside the axis of a 2x2 round brick If you take a look at some of the LEGO pieces included in your Designer Kit you ll find a 1x1 transparent orange cone as well as a Technic half pin which together will allow you to connect and place your Rotating Bit Light to any Technic hole The Rotating Bit Light s effect is built in and op...

Page 18: ...LIGHT MY BRICKS TECHNIC DIY DESIGNER LIGHT KIT INSTALLATION GUIDE INSTALLATION GUIDE 18 LEGEND DISCONNECT TURN FLIP TWIST BRAID DIRECTIONAL POWER ON TEST CONNECT RECONNECT ROTATING BIT LIGHT 1 2 ...

Page 19: ...LIGHT MY BRICKS TECHNIC DIY DESIGNER LIGHT KIT INSTALLATION GUIDE INSTALLATION GUIDE 19 LEGEND DISCONNECT TURN FLIP TWIST BRAID DIRECTIONAL POWER ON TEST CONNECT RECONNECT ROTATING BIT LIGHT 3 ...

Page 20: ... plates are available Use them also to neatly organise wiring on a more complex design that strays from the typical automobile structure The variety of transparent plates included in your kit are reserved for swapping out specific LEGO Technic tiles that will not allow a bit light to sit under We ve included the most commonly used and most practical pieces for these kinds of situations however you...

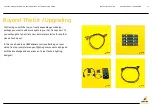
Page 21: ...erhaps you want to add more lights to your Car Transporter Or you ve thought of an entirely new but simple solution for another classic Technic set In this case head to our DIY store to continue building out your vision from our complete range of lighting components equipped with the knowledge and experience of a real Technic lighting designer INTRO BEYOND THE KIT UPGRADING ...

Page 22: ...ion We hope you ve enjoyed designing your own Technic light kit Of course should you run into any difficulties or have any questions at all our customer service team is on hand to assist any and all problems that may arise Head on over to our contact page to get in touch Happy lighting CONCLUSION ...

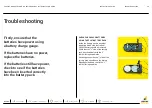
Page 23: ...ly To prevent unnecessary damage to components we highly recommend that the User Guide section Important things to note is read carefully Follow the handling procedures in the User Guide to help prevent faults and damages to your Light My Bricks components If you are experiencing issues with your Light My Bricks set watch our troubleshooting video here or read on for a list of common causes to hel...

Page 24: ...teries still have power check to see if the batteries have been inserted correctly into the battery pack Troubleshooting CHECK FOR CR2032 BATTERIES USING THE FLAT BATTERY PACK Inside the battery pack is a symbol indicating which side the round CR2032 battery should be inserted Check that the side of the battery pack has the battery with the symbol facing downwards On the opposite side the side of ...

Page 25: ...should be inserted In this case for the stacked battery pack ensure that BOTH batteries have the symbol facing upwards Troubleshooting CHECK FOR AA BATTERIES USING THE AA BATTERY PACK Inside the battery pack are symbols indicating which direction the AA battery should be inserted The flat side of the battery should be paired with the spring side of the battery pack If the batteries have been insta...

Page 26: ...aged when not handled correctly Be careful when removing unpacked components out of the packaging and ensure not to forcibly pull at the wires as this can damage the soldering that attach the wires to the LEDs If the wiring is detached from the LED itself the light will not operate When connecting lights to your LEGO set check that there are no pinched wires underneath or in between bricks and pla...

Page 27: ...ight connected to the damaged port not work but if the pins inside the port are bent to a point they are touching each other this can result in all other lights in the system to stop working This is a short circuit A short circuit can also result in overheating of the board cable or batteries If you suspect a short circuit DISCONNECT POWER IMMEDIATELY Batteries can fail catch fire or even explode ...

Page 28: ...nquiry regarding the online shop our products or a general enquiry please refer to our Frequently Asked Questions webpage here Alternatively you can contact our Customer Services team by completing the form here or email us at info lightmybricks com We thank you for purchasing this product and hope you enjoy CONTACT ...

Page 29: ...LIGHT MY BRICKS TECHNIC DIY DESIGNER LIGHT KIT INSTALLATION GUIDE lightmybricks com ...

Reviews: