background image


2

Introduction 

Thank you for the purchase of your FLAT0505 5x5W 4-in-1 RGBW Wash Fixture by Light Emotion. We are 

confident you will be satisfied with your purchase and enjoy many years of use from this Professional Light 

Emotion product. Please read these instructions carefully to ensure the product is well look after and used correctly 

to avoid any potential problems. 

Please note that as part of our ongoing commitment to continuous improvement and product development, the 

specifications in this manual are subject to change without notice. Whilst every care has been taken in the 

preparation of this manual we reserve the right to change specifications in the course of product improvement.   


What is in the box: 

- 1 x FLAT0505 fixture   

- Power cable 

- IR remote control 

- This user manual 

1. Safety Instructions: 


Please read these instructions carefully. It includes important information about the installation usage and 

maintenance of this product. 


- Please keep this User Manual for future consultation. If you sell the unit to another user, be sure that they also 

receive this instruction booklet. 

- Always make sure that you are connecting to the proper voltage and that the line voltage you are connecting to is 

not higher than that stated on the sticker of the fixture. 

- This product is intended for indoor use only. To prevent risk of fire or shock, do not expose fixture to rain or 

moisture. 

- Make sure there are no flammable materials close to the unit while operating. 

- The unit must be installed in a location with adequate ventilation, at least 50cm from adjacent surface. Be sure that 

no ventilation slots are blocked. 

- Always disconnect from power source before servicing. 

- Secure fixture to stands, trussing and the like using a safety chain. 

- Maximum ambient temperature is 40˚C. Do not operate fixture at temperatures higher than this. 

- In the event of serious operating problem, stop using the unit immediately. Never try to repair the unit by yourself. 

Repairs carried out by unskilled people can lead to damage or malfunction. Please contact the nearest authorized 

technical assistance centre.   

- Make sure power cord is never crimped or damaged. 

- Never disconnect power cord by pulling or tugging on the cord. 

- Never carry the fixture directly from the cord. Carry by holding the unit directly or via the hanging bracket. 

- Avoid direct eye exposure to the light source while it is on. 

Summary of Contents for FLAT0505R

Page 1: ...Remote User s instruction manual This manual contains important information about the safe installation and use of this product Please read this instruction manual carefully before installing or operating Please keep these instructions in a safe place for future reference V1 01 ...

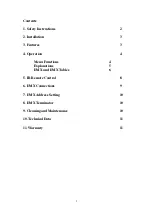
Page 2: ...allation 3 3 Features 3 4 Operation 4 Menu Functions 4 Explanations 5 DMX and DMX Tables 6 5 IR Remote Control 8 6 DMX Connections 9 7 DMX Address Setting 10 8 DMX Terminator 10 9 Cleaning and Maintenance 10 10 Technical Data 11 11 Warranty 11 ...

Page 3: ... booklet Always make sure that you are connecting to the proper voltage and that the line voltage you are connecting to is not higher than that stated on the sticker of the fixture This product is intended for indoor use only To prevent risk of fire or shock do not expose fixture to rain or moisture Make sure there are no flammable materials close to the unit while operating The unit must be insta...

Page 4: ...ct lighting fixture and is only intended to be used as an effect for entertainment and production applications Due to our ongoing commitment to constantly reviewing and improving products features and specifications are subject to change without prior notice It features 5 x 5W 4 in 1 LEDs which have red green blue and white built into each LED lens Being 4 in 1 the user has complete control over c...

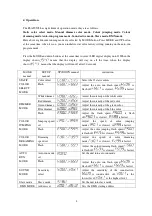
Page 5: ... off is slowest is fastest DIMMER MODE White dimmer Adjust the intensity of the white color Red dimmer Adjust the intensity of the red color Green dimmer Adjust the intensity of the green color Blue dimmer Adjust the intensity of the blue color Flash Adjust the flash speed is flash off is slowest is fastest COLOR JUMPING MODE Jumping speed set Adjust the speed of color jumping mode is slowest is f...

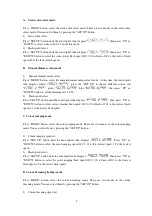
Page 6: ...ng rate 0 255 2 Flash speed select Press SET UP button until the four digital tube displays then press UP or DOWN button to select colour dimmer flash speed 00 99 00 is flash off 01 is the slowest flash speed 99 is the fastest flash speed C Colour jumping mode Press MODE button select the color jumping mode There are two modes in the color jumping mode You can select them by pressing the SET UP bu...

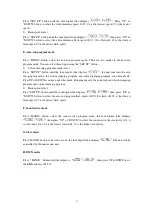
Page 7: ...colour jumping program and color dreaming program run alternatively Press UP or DOWN is no use under this mode Running speed is the current speed of color jumping program and colour dreaming program 2 Flash speed select Press SET UP button until the four digital tube displays then press UP or DOWN button to select the auto run program flash speed 00 99 00 is flash off 01 is the slowest flash speed...

Page 8: ...d No function No functionNo functionNo function 3 27 38 Green 4 39 51 Blue 5 52 64 White 6 65 76 R G 7 77 89 R B 8 90 102 R W 9 103 114 G B 10 115 127 G W 11 128 140 B W 12 141 152 R G B 13 153 165 R G W 14 166 178 R B W 15 179 190 G B W 16 191 204 R G B W 17 205 217 Color change Speed 0 255 slow fast 18 218 230 Color dreaming 19 231 242 Auto run 20 243 255 Sound active Sensitivity 8 255 insensiti...

Page 9: ...mode 1 When the flat par goes into the static color mode press and or put in two numbers 00 15 to select the 15 static colours You can press FLASH to turn on flash and press and or put in two numbers 00 99 to adjust the flash speed 00 is to turn off flash 01 is the slowest speed 99 is the fastest speed 2 When the flat par goes into color jumping mode or color dreaming mode press and or put in two ...

Page 10: ...r After all the three number are put in the red green and blue lights will flash 2 3 times which indicate that the DMX address is right and it go in to the DMX MODE automatically If the address is wrong the red light will be on New DMX address should be put in If the 951 are put in red and green lights will be on Put 0 to initialize the program If the wrong address is put in the red light will be ...

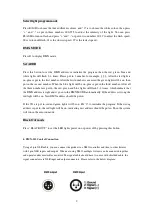
Page 11: ...s of 16 channels so in that case fixture 1 on channel 1 fixture 2 on channel 17 3 on 33 and so on Refer to your DMX controllers instruction manual on how best to manage your DMX channel allocation 8 DMX 512 connection with DMX terminator A DMX terminator helps to reduce noise on the DMX chain and makes the light respond to control more accurately It should be plugged in to the last fixture in any ...

Page 12: ...iginal purchase receipt Please keep both your original purchase receipt and this instruction manual together and in a safe place for future reference Should the product be sold within the warranty period be sure to pass on both to the new purchaser so they are able to claim warranty should they need to We recommend you register your warranty online at www industrygear com au Purchased from _______...

Reviews: