A s s e m b l y S t e p 5
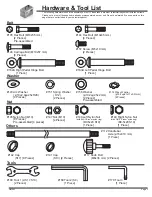
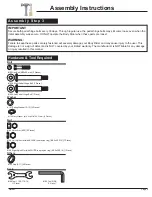
Hardware & Tool Required
Bolt
#157 Screw (M5x10 mm)
[2 Pieces]
Others
#117 Knob Bolt
(M8x36 mm)
[2 Pieces]
Tools
#170 Tool 3 (S13-14-15)
[1 Piece]
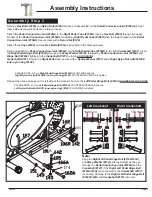
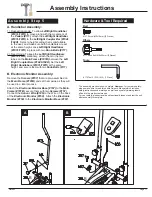
A. Handlebar Assembly:
1). Dual-action mode: To allow
Left/Right Handlebar
(#107L/107R)
to move along with the movement of
the
Pedals (#111)
, attach the
Left/Right Handlebar
(#107L/107R)
to the
Left/Right Coupler Bar (#104L
/104R)
. Select a height setting that is comfortable
to the user, and make sure both handlebars are set
at the same height. Lock
Left/Right Handlebar
(#107L/107R)
in place with two
Knob Bolts (#117)
.
2). Fixed mode: To keep the
Left/Right Handlebars
(#107L/107R)
stationary, attach them to the two
tubes on the
Main Frame (#101B)
between the
Left
/
Right Coupler Bars (#104L/104R)
. Set the
Left
/
Right Handlebars (#107L/107R)
at the same
height, and, secure them with two
Knob Bolts (#117)
.
B. Electronic Monitor Assembly:
Remove the
Screws (#157)
that are pre-assembled on
the
Main Frame (#101B)
and set them aside as they will
be used in a later process.
Attach the
Electronic Monitor Base (#167)
to the
Main
Frame (#101B)
, secure them with two
Screws (#157)
.
Connect the
Sensor Wire (#126)
to the Wire on the back
of the
Electronic Monitor (#150)
. Attach the
Electronic
Monitor (#150)
to the
Electronic Monitor Base (#167)
.
A
B
B
B
#42 WASHER FOR M10 BOLT,T2.0 1PC
#42 WASHER FOR M10 BOLT,T2.0 1PC
#42 WASHER FOR M10 BOLT,T2.0 1PC
Assembly Instructions
The assembly process is now complete.
However
, for your own safety,
please make sure to read this entire Owner’s Manual which includes
safety instructions and warnings, as well as any safety/warning labels
affixed to the product before use.
For your safety, please visually and functionally inspect and test the unit
after assembly is complete.
QM893
1
1
e
g
a
P


