background image


                                                                               LIFESPAN ZOOM                        Page 0 


Product may vary slightly from the item pictured due to model upgrades.


 ZOOM USER’S MANUAL 


This is HIGH-POWER item; please DO NOT USE THE SAME OUTLET WITH 

OTHER HIGH-POWER HOUSEHOLD APPLIANCE like air-conditioning etc.  

Please choose an outlet exclusively for the machine and make sure the fuse 

is 10A. 

Summary of Contents for ZOOM

Page 1: ...em pictured due to model upgrades ZOOM USER S MANUAL This is HIGH POWER item please DO NOT USE THE SAME OUTLET WITH OTHER HIGH POWER HOUSEHOLD APPLIANCE like air conditioning etc Please choose an outlet exclusively for the machine and make sure the fuse is 10A ...

Page 2: ... 1 Keys for Meter Panel 6 4 2 Getting Started 7 4 3 Self Checking 8 4 4 Quick Start Operation 8 4 5 Incline Feature 8 4 6 Pulse Grip Feature 8 4 7 Calorie Display 8 4 8 Folding and Unfolding Treadmill 9 4 8 1 Folding 9 4 8 2 Unfolding 9 4 8 3 Transport 9 4 9 Programmable Operations 9 4 10 To Select a Program 9 6 TROUBLE SHOOTING 26 6 1 Alarm signals 26 7 EXERCISE GUIDE 27 8 SPARE PARTS LIST 28 9 I...

Page 3: ...lt Do not block the rear of the treadmill Provide a minimum of 1 metre clearance between the rear of the treadmill and any fixed object Place your unit on a solid level surface when in use Never allow children on or near the treadmill When running make sure the plastic clip is fastened on your clothing It is for your safety should you fall or move too far back on the treadmill Keep hands away from...

Page 4: ...ver without first disconnecting AC power NEVER expose this treadmill to rain or moisture This treadmill is not designed for use outdoors near a pool or in any other high humidity environment 1 2 IMPORTANT OPERATION INSTRUCTIONS Be sure to read the entire manual before operating your machine Understand that changes in speed and incline do not occur immediately Set your desired speed on the computer...

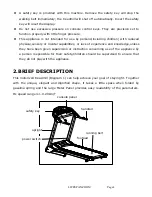
Page 5: ...ntal capabilities or lack of experience and knowledge unless they have been given supervision or instruction concerning use of the appliance by a person responsible for their safety Children should be supervised to ensure that they do not play with the appliance 2 BRIEF DESCRIPTION This motorized treadmill Diagram 1 can help achieve your goal of staying fit Together with the unique elegant and dig...

Page 6: ...rs speed time distance heart rate calorie Display LED Frequency 50Hz Input current 10A Motor DC 2 5hp continuous Temperature for running 5 40 degrees Speed range 1 20km h Auto incline 0 20 levels Running surface 520 3000mm Program 36 pre set programs Time display range 0 00 99 59 minutes seconds Distance display range 0 00 9 99km Calorie display range 0 00 999 calorie Machine size L W H 1930 850 1...

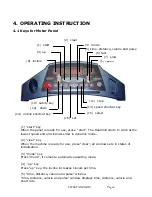
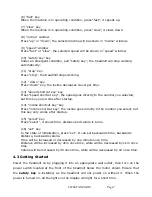
Page 7: ...n the panel is ready for use press start The treadmill starts to work at the lowest speed and all windows show in dynamic mode 2 clear key When the machine is ready for use press clear all windows are in states of initialization 3 mode key Press mode it comes to automatic operating mode 4 up key Press up key the incline increases 1levels per time 5 time distance calorie and pulse window time dista...

Page 8: ...p 14 incline shortcut key key Press incline shortcut key the incline goes directly to the number you select but this key only works after startup 15 select key Press select it shows time distance and calorie in turns 16 set key In the state of initialization press set It can set backwards time backwards distance backwards calorie Time will be increased or decreased by one minute once time Distance...

Page 9: ... state of running singly press STOP the walking belt will gradually slow down if the speed is above 3 5km h if under 3 5km h then it will stop immediately 5 In the state of running singly press CLEAR will reset all number except the speed Then enter into manual mode 6 To stop the tread belt press and release the STOP 4 5 Incline Feature Incline may be adjusted anytime after belt movement The incli...

Page 10: ...aps and roll the treadmill away 4 9 Programmable Operations This treadmill offers 36 present programs P1 P2 P3 P36 see attachment Each preset program has a maximum speed level that is displayed when a desired workout is chosen The speed that the particular program will be displayed in the Speed window Each program has various speed changes throughout 4 10 To Select a Program Make sure the machine ...

Page 11: ...LIFESPAN ZOOM Page 10 ...

Page 12: ...LIFESPAN ZOOM Page 11 ...

Page 13: ...LIFESPAN ZOOM Page 12 ...

Page 14: ...LIFESPAN ZOOM Page 13 ...

Page 15: ...LIFESPAN ZOOM Page 14 ...

Page 16: ...LIFESPAN ZOOM Page 15 ...

Page 17: ...LIFESPAN ZOOM Page 16 ...

Page 18: ...LIFESPAN ZOOM Page 17 ...

Page 19: ...LIFESPAN ZOOM Page 18 ...

Page 20: ...LIFESPAN ZOOM Page 19 ...

Page 21: ...LIFESPAN ZOOM Page 20 ...

Page 22: ...LIFESPAN ZOOM Page 21 MAINTENANCE Reasonable cleaning lubricating should be made to extend the life time of this unit Performance is maximized when the belt and mat are kept as clean as possible ...

Page 23: ... treadmill Inspect the power cord If the power cord is damaged contact Lifespan Fitness Make sure the power cord is not underneath the treadmill or in any other area where it can become pinched or cut Check the tension and alignment of the running belt Make sure that the treadmill belt will not damage any other components on the treadmill by being misaligned EVERY WEEK Clean underneath the treadmi...

Page 24: ...op surface of the running deck Tighten both rear roller bolts matching up the marks for proper position to original position After you have applied lubricant plug in the power cord key start the treadmill and walk on the belt for two minutes to spread the lubricant Lubricate the air shocks with Teflon based spray SERVICING IF YOU FAIL TO COMPLY WITH LIFESPAN S MAINTENANCE AND SERVICING STEPs ABOVE...

Page 25: ...of your treadmill and that is why we recommend you constantly lubricate this friction point to prolong the useful life of your treadmill Lubrication should be applied after approximately the first 50 hours of operation We recommend lubrication of the deck according to the following timetable Light use less that 3 hours per week every 6 months Medium use 3 5 hours a week every 3 months Heavy use mo...

Page 26: ...joggers and runners in order to provide a smooth steady running surface Adjustment must be made from the right and left rear roller in order to adjust tension with the Hexagonal Wrench provided in the parts package The adjustment bolt is located at the end of the rails as noted in diagram below Right bolt Left bolt Note Adjustment is thru the small hold on the end caps Tighten the rear roller only...

Page 27: ...This treadmill is designed in a way that in the event of an electrical fault the machine will turn off automatically to prevent any injuries to the user and to prevent damage to the machine i e motor When the treadmill behaves erratically simply reset the treadmill by turning the power switch off waiting for 1 minute then turning the power button back on If after you have reset the treadmill it is...

Page 28: ...rm signals are displayed single press CLEAR to reset the displays and try again No Power 1 Check fuses They are located on the controller under the motor cover next to the on off switch 2 Check power outlet Plug something else into the power outlet to ensure that the power outlet is working correctly 3 Check Power Cable You may need to take it to an electrician 7 EXERCISE GUIDE PLEASE NOTE Before ...

Page 29: ...nute reduce the wear and tear of your heart So as you can see the fitter you are the healthier and greater you will feel 8 SPARE PARTS LIST Spare parts List Item no Description Unit Quantity 1 Safety key piece 1 2 Silicone oil bottle 1 3 Cup head hexagonal screw M8X35 piece 2 4 Cup head hexagonal screw M8X16 piece 4 5 Hexagonal screw M10X120 piece 2 6 Hexagonal screw M10X60 piece 2 7 Cross pan scr...

Page 30: ...LIFESPAN ZOOM Page 29 9 INSTALLATION GUIDE 1 bolt M10 60 paline washer D10 bolt M10 120 saddle washer D10 2 upright machine body ...

Page 31: ...LIFESPAN ZOOM Page 30 bolt M8 35 4 console bolt M8 16 3 handrail ...

Page 32: ...LIFESPAN ZOOM Page 31 left cover right cover screw M5 10 screw ST4 2 13 5 left handrail cover right handrail cover left cover right cover ...

Page 33: ...se note If there are changes in function and specification due to technical improvement we will not keep you informed WARRANTY REGISTRATION Please visit the following link to complete the product warranty form online Please visit http warrantyform lifespanfitness com au PLEASE NOTE YOUR WARRANTY IS ONLY VALID IF YOU CAN PROVE YOU ARE THE ORIGINAL PURCHASER ON THIS ITEM i e a copy of the receipt in...

Reviews: