background image

-1

3

-

Allow exhaust filter to dry 24 hours in the shade

before putting it back. Make sure that the filters

dry completely.
FOR OPTIONAL PERFORMANCE, CHECK

FILTERS FREQUENTLY AND CLEAN WHEN

DIRTY.

FILTERS CLEANING / CHANGING

CAUTION

Wet filter can cause permanent

damage to cleaner. 

Ensure that all filters dry completely.
The cycle of the cleaning.

• Air filter - Every 2 months.

• Exhaust filter - Once a year.

Filter cover button

Filter frame

Filter

Dust bin cover

Press the filter cover button and separate the

filter frame and the filter from the dust bin cover

as shown. 

Clean the filter frame and the filter in cold water

only. DO NOT USE DETERGENT OR SOAP.

Let filter dry for 24 hours in the shade before

putting it back.

TO CLEAN EXHAUST FILTER

Remove exhaust filter from vacuum and clean

the filter in cold water only. DO NOT USE 

DETERGENT AND SOAP. 

OPEN

Summary of Contents for VF5718 Series

Page 1: ...Size W H Designer Designer Confirm Color cover body Part No Description Date No Date Chage Record Change content ECO No 1 2 3 4 5 6 7 8 9 VF5720 VF5718 English 22 2 1 145 215 2009 01 08 MFL56848301 LIU GUANG QUAN MANUAL OWNERS 100g ...

Page 2: ...MODEL VF5720 P No MFL56848301 Upright Vacuum Cleaner Owner s Manual PLEASE READ THIS MANUAL THOROUGHLY AND CAREFULLY BEFORE OPERATING THE VACUUM CLEANER VF5718 ...

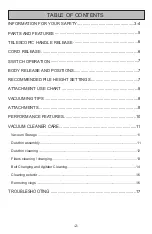
Page 3: ...ELEASE AND POSITIONS 7 RECOMMENDED PILE HEIGHT SETTINGS 7 ATTACHMENT USE CHART 8 VACUUMING TIPS 8 ATTACHMENTS 8 PERFORMANCE FEATURES 10 VACUUM CLEANER CARE 11 Vacuum Storage 11 Dust bin assembly 11 Dust bin cleaning 12 Filters cleaning changing 13 Belt Changing and Agitator Cleaning 14 Cleaning exterior 16 Removing clogs 16 TROUBLESHOOTING 17 ...

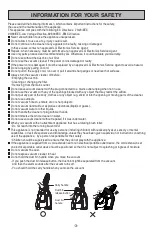
Page 4: ...t may restrict the airflow Do not put any part of the body clothes or any object e g stick or into the opening or moving parts of the cleaner Do not use outdoors Do not vacuum hot ash embers etc or sharp objects Do not vacuum flammable or explosive substances liquids or gases Do not vacuum water or other liquids Do not handle the cleaner or plug with wet hands Do not immerse the whole cleaner in w...

Page 5: ...till does not run contact a qualified electrician Important for users in the UK The wires in the mains lead of this appliance are coloured in accordance with the following code BLUE neutral BROWN live VERY IMPORTANT Do not earth the appliance If a 13 amp plug is fitted fit a 13 amp BS 1362 fuse If any other type of plug is used protect with a 15 amp fuse at the distribution board For appliances wh...

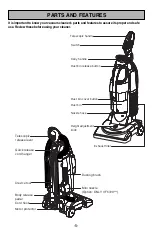
Page 6: ... these before using your cleaner Exhaust filter Dust bin cover button Dust bin Nozzle hose Height adjustment knob Telescopic handle Carry handle Dust bin release button Switch Telescopic release lever Quick release cord hanger Crevice tool Cord hook Body release pedal Motor protector Dusting brush Mini nozzle Option ONLY VF5720 ...

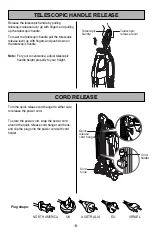
Page 7: ...ence adjust telescopic handle height properly to your height Turn the quick release cord hanger to either side to release the power cord To store the power cord wrap the power cord around the quick release cord hanger and hook and clip the plug onto the power cord with cord holder TELESCOPIC HANDLE RELEASE CORD RELEASE Telescopic release lever Telescopic handle Plug shape NORTH AMERICA UK AUSTRALI...

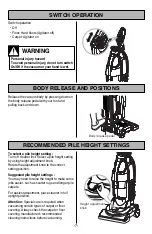
Page 8: ... adjustment knob to the correct setting position Suggested pile height settings You may need to raise the height to make some jobs easier such as scatter rugs and longer pile carpets For easiest adjustment place cleaner in full upright position Attention Special care is required when vacuuming certain types of carpet or floor covering Always check the carpet or floor covering manufacturer s recomm...

Page 9: ...ion ONLY VF5720 Furniture Between Cushions Drapes Stairs Walls X X X X X X X X X X X Always clean attachments before using on fabrics The attachments are subject to change according to the buyer s request VACUUMING TIPS ATTACHMENTS Carpet edges Use attachments such as crevice tool dusting brush Mini nozzle on carpet edges See page 8 9 WARNING Personal Injury Hazard Use care if vacuum cleaner is pl...

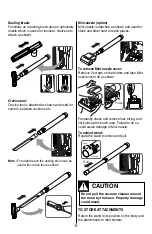
Page 10: ... and used for stairs and other hard to reach places To remove Mini nozzle cover Remove 2 screws on the bottom and take Mini nozzle cover off as shown Frequently check and remove hair string and lint build up the brush area Failure to do so could cause damage to Mini nozzle To extend wand Rotate the wand to unlock and pull TO STORE ATTACHMENTS Return the wand to its position on the body and the att...

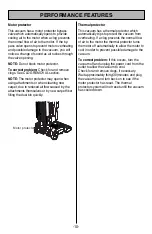
Page 11: ... attachments themselves or by new carpet fiber filling the dust bin quickly Thermal protector This vacuum has a thermal protector which automatically trips to protect the vacuum from overheating If a clog prevents the normal flow of air to the motor the thermal protector turns the motor off automatically to allow the motor to cool in order to prevent possible damage to the vacuum To correct proble...

Page 12: ...ys follow all safety precautions when cleaning and servicing the vacuum cleaner WARNING Electrical shock and personal injury hazard Disconnect electrical supply before servicing or cleaning the unit Failure to do so could result in electrical shock or personal injury from cleaner suddenly starting VACUUM CLEANER CARE Dust bin lid The dust bin lid covers up the dust bin Air filter The air filter th...

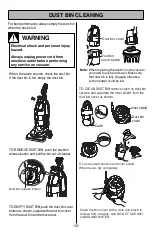
Page 13: ...m electrical outlet before performing any service on vacuum TO CLEAN DUST BIN remove catch on dust bin cyclone and separate the inner shield from the dust bin cover as shown Inner shield Catch Dust bin cover Do not use wet dust bin and inner shield When reuse dry completely Dust bin cover Dust bin cover button Clean dust bin cover with a cloth and brush to remove fluff or debris And DO NOT USE ANY...

Page 14: ...ycle of the cleaning Air filter Every 2 months Exhaust filter Once a year Filter cover button Filter frame Filter Dust bin cover Press the filter cover button and separate the filter frame and the filter from the dust bin cover as shown Clean the filter frame and the filter in cold water only DO NOT USE DETERGENT OR SOAP Let filter dry for 24 hours in the shade before putting it back TO CLEAN EXHA...

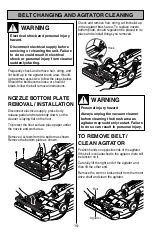
Page 15: ...the floor To protect the floor surface place paper under the nozzle and work area Remove 4 screws from the bottom as shown Remove the bottom plate as shown Check and remove hair string ad lint build up in the agitator brush area To replace nozzle bottom plate should regulation be placed in its place and reinstall things you removed TO REMOVE BELT CLEAN AGITATOR Position hands on opposite ends of t...

Page 16: ...at agitator left end put left end of agitator into slot in nozzle base as shown Press firmly checking to see that each end is completely inserted And then turn agitator making sure that belt turns freely and is not pinched between agitator and agitator shield To replace the nozzle bottom plate follow the NOZZLE BOTTOM PLATE REMOVAL INSTALLATION section Page 14 WARNING Be careful when removing the ...

Page 17: ...DO NOT use tools if they are wet The hose located on the vacuum cleaner carries the dirt from the nozzle up to the dust bin If the hose should become clogged Unplug vacuum Remove the assembled wand nozzle hose and check them Check the base of the hose for clogging as shown Check suction inlet and filters for clogs Note Clogged filters can cause suction power to be low To clean the filter refer to ...

Page 18: ...s in the wrong position 1 Turn off the vacuum and empty the dust bin 2 Turn off the vacuum and remove the obstacle from the dust bin 3 Turn off the vacuum and reattach the dust bin in the correct position installed 1 Plug in firmly check Motor protection system fuse 2 Push switch to floor or carpet mode 3 See To correct problem page 9 1 Empty dust bin and clean the filters 2 Replace agitator belt ...

Page 19: ... 18 Note ...

Page 20: ... 19 Note ...

Page 21: ... 20 Note ...

Page 22: ......

Reviews: