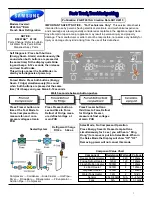
2-15. Failure Diagnosis Function
1. Failure diagnosis function is function to facilitate service when nonconforming matters affecting performance of product
during use of product.
2. In occurrence of failure, pressing the function adjustment button does not perform function and only alarm sound (“Ding~”) rings.
3. If nonconforming matters occurred are released during display of failure code, MICOM returns to the original state (Reset).
4. Failure code is displayed on the display part of setting temperature for the freezing room and the display part of setting
temperature for the cold storage room of LCD, which are placed at the display part of a refrigerator. All the LCD graphics
other than a failure code are turned off.
✽
In display of the failure mode, all LCDs of setting temperature for freezing/ setting temperature for cold storage are turned
off (excluding Note1 and Note2).
MICOM FUNCTION
- 30 -
TEMP
TEMP
OFF
ROOM
TEMP
MAX
MIN
MAX
MIN
CRUSHED
CUBED
WATER
TEMP
TEMP
OFF
ROOM
TEMP
MAX
MIN
MAX
MIN
Failure Code
display Part
High quality type
(GR-P207, L207, P247, L247)
Failure Code
display Part
Basic type
GR-C247, B247, C207, B207)
C
A
B
E
C
D
A
B
●
●
: Normal Operation
1
2
3
4
5
6
7
8
9
10
11
Er
FS
Er
RS
Setting temperature
display (Note 2)
Er
DS
Er
dH
Er
FF
Er
CF
Er
CO
Setting temperature
display (Note 1)
Setting temperature
display (Note 2)
Setting temperature
display (Note 2)
Failure code display part
Setting
temperature
for freezing
Setting
temperature for
cold storage
No.
Item
Contents of failure
Freezer
Fan
Compressor
Stepping
motor damper
Defrost
Heater
M/C room
Fan
Product operation status in failure
Failure of freezer
sensor
Failure of refrigerator
sensor 1
Failure of refrigerator
sensor 2
Failure of frost
removal sensor
Poor of frost
removal
Failure of BLDC FAN
at freezing room
Failure of BLDC FAN
at machine room
Failure of
Communication
Failure of
Outside Sensor
Failure of ice
removal sensor
Failure of ice
maker unit
Snapping or short-circuit of
freezer sensor
Snapping or short-circuit of
refrigerator sensor 1
Snapping or short-circuit of
refrigerator sensor 2
Snapping or short-circuit of frost
removal sensor
Snapping of frost removal heater
or temperature fuse, pull-out of
connector (indicated minimum 4
hours after failure occurs)
Poor motor, hooking of wires to
fan. Contact of structures to Fan.
Snapping or short-circuit of L/wire
(if there is no fan motor signal for
more than 115 seconds in
operation of fan motor
Connection between main PCB
and display PCB. Snapping or
short-circuit of L/wire.
Transmission between main PCB
and display PCB. Poor TR and
receiving part.
Snapping or short-circuit of outside
temperature perceiving sensor
Snapping or short-circuit of ice-
making sensor
Poor motor or Hall IC within ice-maker
unit. Snapping or short-circuit of
L/Wire. Poor main PCB drive circuit.
Standard
RPM
Standard
RPM
Standard
RPM
Standard
RPM
Standard
RPM
OFF
Standard
RPM
Standard
RPM
●
●
●
●
●
●
●
●
●
●
●
●
●
●
●
●
●
●
OFF
●
●
●
●
●
●
●
●
ON for 15minutes
OFF for 15minutes
●
●
●
●
●
●
●
●
●
●
●
●
●
●
●
●
●
●
●
●
●
●
●
●
●
●
No frost
removal
●
●
●
●
●
●
●
●
●
●
●
●
●
●
●
●
Open for 10munutes,
closing for 15 minutes
●
●
●
●
●
●
●
●
●
●
●
●
●
●
●
●
●
●
Summary of Contents for SxS GR-L207MSU
Page 44: ...2 GR C247 B247 C207 B207 EXPLATION FOR MICOM CIRCUIT 44 a b c d ...
Page 52: ...2 GR C247 B247 C207 B207 EXPLATION FOR MICOM CIRCUIT 52 ...
Page 53: ...3 2 Parts list 1 GR P247 L247 P207 L207 EXPLATION FOR MICOM CIRCUIT 53 ...
Page 54: ...EXPLATION FOR MICOM CIRCUIT 54 ...
Page 55: ...2 GR C247 B247 C207 B207 EXPLATION FOR MICOM CIRCUIT 55 ...
Page 56: ...EXPLATION FOR MICOM CIRCUIT 56 ...
Page 58: ...2 GR C247 B247 C207 B207 EXPLATION FOR MICOM CIRCUIT 58 DOUBLE SIDE TAPE SPREAD SHEET ...
Page 60: ...2 GR C247 B247 C207 B207 60 Reception Transmission Parts without mark means SMD parts ...
Page 62: ...EXPLATION FOR MICOM CIRCUIT 62 PCB ASSEMBLY DISPLAY PCB ASSEMBLY MAGIC DISPLAY ...
Page 63: ...2 GR C247 B247 C207 B207 EXPLATION FOR MICOM CIRCUIT 63 ...
Page 64: ...EXPLATION FOR MICOM CIRCUIT 64 PCB ASSEMBLY DISPLAY PCB ASSEMBLY MAGIC DISPLAY ...
Page 71: ...CIRCUIT 71 ...
Page 72: ...CIRCUIT 72 ...


