background image

49

SERVICE SETTING

ENGLISH

48

USER SETTING

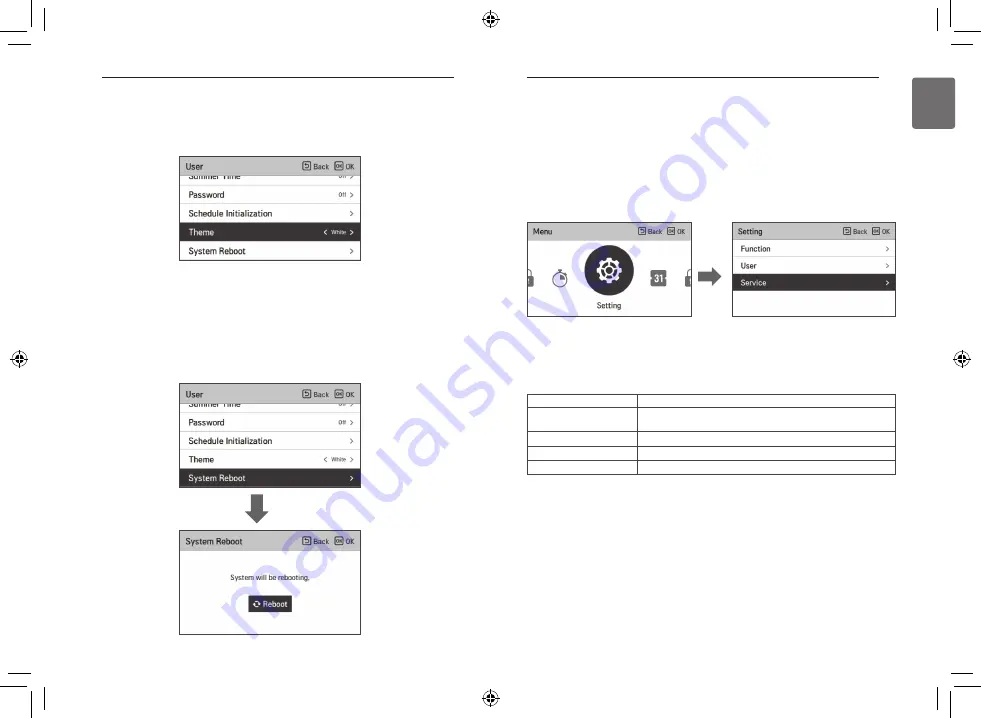
Theme

Set the theme of the remote controller screen.

• Select either white or black using [<,>(left/right)] button.

System Reboot

Restart the remote controller.

• In the user setting list, select the system restart setting category, and press [OK] button to

move to the detail screen.

- In the detail screen, when you press [OK] button, a popup message is displayed, press the

check button, to restart the system.

- For forced reset, press down [On/Off + Back] button for 5 seconds to restart the system.

OK

OK

Menu

Description

Service contact 

Check and input the service center phone number that you can call
when there is service issue.

Model information

View product and capacity information 

RMC Version Information

Check the remote controller model name and software version.

Open Source License

View the remote controller’s open source license.

Service setting

• You can set the product service functions.

• Some functions may not be displayed/operated in some product types.

SERVICE SETTING

How to enter service setting

To enter the menu displayed at the bottom, you need to enter the service setting menu as
follows.

• In the menu screen, press [<,>(left/right)] button to select the setting category, and press [OK]

button to move to the setting list.

• In the setting list, select the service setting category, and press [OK] button to move to the

service setting list.

Summary of Contents for PREMTW101

Page 1: ... with the national wiring standards by authorized personnel only Please retain this installation manual for future reference after reading it thoroughly WIRED REMOTE CONTROLLER PREMTW101 Copyright 2019 LG Electronics Inc All Rights Reserved MFL69312308 Rev 00_102119 ENGLISH 中文 ČEŠTINA DEUTSCH ΕΛΛΗΝΙΚΆ ESPAÑOL FRANÇAIS ITALIANO NEDERLANDS POLSKI LIMBA ROMÂNĂ УКРАÏНСЬКА РУССКИЙ ЯЗЫК ...

Page 2: ...vice center or installation specialty store when reinstalling the installed product There is risk of fire electric shock explosion equipment malfunction or injury Do not disassemble fix and modify products randomly There is risk of fire electric shock explosion equipment malfunction or injury The product shall be installed according to the national standards and local code Apply totally enclosed n...

Page 3: ...G 27 How to enter schedule 28 Daily schedule 29 Schedules Edit 30 Schedules Edit Add schedule 31 Exception Day TABLE OF CONTENTS TABLE OF CONTENTS If product gets wet contact your dealer or authorized service center There is risk of fire electric shock explosion equipment malfunction or injury If the instructions are not followed it may cause death or severe injury of the user Do not use sharp or ...

Page 4: ...ng set temp 74 DHW set temp 75 Cooling Heating only mode 76 Screed drying 78 Heater on temperature 80 Water supply off temp during cooling 82 Outdoor temp for auto mode 83 Indoor air temp for auto mode 84 LWT for auto mode 85 Tank disinfection setting 1 2 86 Tank setting 1 87 Tank setting 2 89 Heater priority 90 DHW time setting 91 Use Heating Tank Heater 92 Pump frequency setting LPM 93 TH on off...

Page 5: ...RIPTION Remote controller OK On Off button OK button Back button Up Down Left Right button Operation display window Operation display window Operation and Settings status display Back button When you move to the previous stage from the menu s setting stage Up down left right button When you change the menu s setting value OK button When you save the menu s setting value On Off button When you turn...

Page 6: ... at the bottom of the screen when an operation is turned On Off or if a function is set cancelled The popup message is mainly displayed when an error occurred in the product In each detail screen of the menu as in the box in the left figure when icons are displayed at the same time you can immediately apply the setting value by pressing left right button For the values that can be set in each cate...

Page 7: ...seconds it returns to the main screen basic position basic position indoor temperature display part In the screens except the main screen if there is no remote controller operation for 1 minute it moves to the main screen OPERATION SETTING On Off will be turned on or off Press the remote controller s On Off button If the product is in operation On Off button will be illuminated If the product is i...

Page 8: ...t AI Auto mode 2 Select the desired temperature category 3 Adjust the desired temperature level by press up down button 14 OPERATION SETTING Heating operation Set the desired temperature higher than the water temperature Water temperature is displayed on the default screen of the remote controller When the desired temperature is set lower than the water temperature warm water doesn t come out If y...

Page 9: ...temperature sensor and temperature control logic is the same as the leaving water temperature operation Room temperature Leaving water temperature Room temperature can be set by using remote sensor s internal temperature sensor If the desired temperature is lower than the water temperature the heating is not performed Set the desired temperature higher than the water temperature DHW heating operat...

Page 10: ...HW temperature Only displayed when DHW heating mode Solar heat temperature View solar power temperature Only displayed when DHW water heating mode 18 TEMPERATURE SETTING 2nd circuit mode Mode Description Room 1 temperature View room 1 temperature Room 2 temperature View room 2 temperature Inlet temperature View inlet temperature Outlet temperature View outlet temperature DHW temperature View DHW t...

Page 11: ... off the corresponding lock function OK Zone target temperature It is the function to set the target temperature for valve control by zone The number of zones set in the zone setup menu of installer setting is activated For zone selected by sensor type Set the target temperature 16 30 C or Open Close For zones selected by thermostat Display Controlled by Thermostat Temperature not controllable OK ...

Page 12: ...trance and setting method In the menu screen press left right button to select the timer category and press OK button to move to the timer setting list screen In the timer setting list screen press up down button to select the timer to set and press OK button to move to the detail screen After setting the value when you press OK button the timer is activated After setting the value if you press Ba...

Page 13: ...4 Hours reference NOTE If the product operation is On the easy timer turns off the operation after the corresponding time If the product operation is Off the easy timer turns on the operation after the corresponding time If the easy timer operation is turned On Off before the timer operation the set timer will be cleared NOTE Even if the Turn on Reseravation operation is turned On Off after the se...

Page 14: ...schedule setting list screen In the schedule setting list screen press up down button to select the menu to set and press OK button to move to the detail screen There are 3 options in schedule formula depending on product function Room Hot water Heater of hot water tank OK NOTE Even if the Turn off Reservation operation is turned On Off after the setting and before the timer operation the set time...

Page 15: ...the remote controller In the schedule list select the daily schedule status category and press OK button to move to the daily schedule status detail screen You can use the remote controller s left right button to check other date s timer information You can edit the saved schedule s timer information Select the schedule to edit using up down button and press OK button to move to the edit screen Se...

Page 16: ...setting Add schedule is completed 30 SCHEDULE SETTING Exception Day It is the function to automatically stop the operation on the set timer day In the schedule list select the exception day category and press OK button to move to the Exception day designation detail screen In the exception day you can check and add change delete the exception day information saved in the remote controller To add a...

Page 17: ... setting list OK 32 INFORMATION OF METER INTERFACE INFORMATION OF METER INTERFACE It provides useful information on the mount of energy and power during the week month year Opening Energy option these are presented on screen You can use this function only when Meter interface is activated in installer setting Instantaneous Power Power Calorie The information includes instantaneous power as well as...

Page 18: ... It is the function to set the start and end time of the outdoor unit s low noise mode operation Wi Fi Pairing It is the function to control remotely through network with indoor unit Water Temperature Setting If you select Air Water as the temperature control mode This option is activated on screen It is the function to set target water temperature 3nd Party Boiler It is the function to linkage th...

Page 19: ...This option is listed up on function setting display It is the function to set target water temperature 36 FUNCTION SETTING Wi Fi Pairing It is the function to control remotely through network with indoor unit OK NOTE This function is not default It can be activated after setting value in installer mode ...

Page 20: ... screen brightness Date Set the date displayed on the remote controller Time Set the time displayed on the remote controller Summer Time Set the summer time in the remote controller Password Set the password to prevent unauthorized change to remote controller settings Schedule Initialization Initialize all timer settings in the remote controller Theme Set the theme of the remote controller screen ...

Page 21: ...n the user setting list select the language category and press OK button to move to the detail screen After the setting if you press OK button the setting is saved and moves to the previous screen OK Language 한국어 English Français Italiano Deutsche Español Polski Čeština ελληνικά Nederlands Românesc Português Magyar Hrvatski Srpski Türk Українська Български Slovenščina 中国 CAUTION The temperature un...

Page 22: ...SER SETTING Screen Saver Timer Adjust the screen Off time of the remote controller Select the following setting values using left right button LCD Brightness In Idle Adjust the remote controller s screen brightness Select the following setting values using left right button Value 0 10 default 20 30 Value 15 seconds 30 seconds default 1 min CAUTION Selecting longer stand by screen will decrease LCD...

Page 23: ...day gets shorter When it becomes AM 02 00 on the DST start date the current time changes to AM 03 00 and when it becomes AM 02 00 of the DST end date the current time changes to AM 01 00 OK 44 USER SETTING Time Set the time displayed on the remote controller In the user setting list select the time category and press OK button to move to the detail screen After the setting if you press OK button t...

Page 24: ...schedule and exception date in the remote controller OK 46 USER SETTING Password Set the password to prevent unauthorized change to remote controller settings Select the user password setting category and press OK button to move to the detail screen If the password is set when you enter menu setting you need to input password to enter the setting list When you forgot the password you can initializ...

Page 25: ...ce center phone number that you can call when there is service issue Model information View product and capacity information RMC Version Information Check the remote controller model name and software version Open Source License View the remote controller s open source license Service setting You can set the product service functions Some functions may not be displayed operated in some product typ...

Page 26: ...e to the edit screen change it and press OK button to change the service contact point OK OK Model Information Check product and capacity information to which the remote controller is connected In the service setting list select model information category and press OK button to move to the detail screen The unit capacity 1 kWh 1 kBtu 0 29307 kWh is the result calculated based on Btu There may be a...

Page 27: ...rsion In the service setting list select the RMC version information and press OK button to move to the detail screen OK Open Source License View the remote controller s open source license In the service setting list select the open source license category and press OK button to move to the detail screen OK ...

Page 28: ...pper center boss for fixing the bent cable When you remove the remote controller from the installation plate insert a small flat head screwdriver into the bottom side separation hole and turn clockwise to separate the remote controller There are 2 separation holes at the bottom part Slowly separate one by one Be careful not to damage the internal parts during the removal Order of Separation Wall S...

Page 29: ...ollers for one indoor unit A dedicated cable must be used for the connection If necessary use an extension cable additionally and install 2 Remo cable PZCWRC2 Extension cable PZCWRC1 For normal operation one should be set as master and the other as slave Refer to the function Installation setting RMC master slave After completing the RMC master slave setting turn off the power of indoor unit and t...

Page 30: ...he installer setting Input the password and press OK button to move to the installer setting list Installer setting password Main screen menu setting service RMC version information SW Version Example SW version 1 00 1 a In the above case the password is 1001 OK OK CAUTION The installer setting mode is the mode to set the remote controller s detail function If the installer setting mode is incorre...

Page 31: ...rt Grid SG setting Select whether to use or not use the SG Mode function of the product set the operation option value in SG1 step Seasonal auto temp setting Set the operating temperature in Seasonal Auto mode Installer setting You can set the product user functions Some functions may not be displayed operated in some product types Function Description Test Run Test run operates Multi V in Cooling...

Page 32: ...stall additional valve in product to control additional operation area Use External Pump Set up to control an external water pump 3rd Party Boiler Configuration to control 3rd party boiler Meter Interface When installing the meter interface to measure energy calorie in the product set unit spec for each port Pump Prerun Overrun Set to reach the optimum flow rate by circulating the heating water wi...

Page 33: ...r temperature is determined In the installer setting list Select Temperature Sensor category and press OK button to move to the detail screen Value Water Air Air Water OK 64 INSTALLER SETTING 3 Minutes Delay Temporarily eliminates the 3 minute delay function of the outdoor unit Comp Factory use only In the installer setting list select 3 Minutes Delay category and press OK button to move to the de...

Page 34: ...tely purchased and installed Change setting values using left right button Value Auto manual NOTE For dry contact mode related detail functions refer to the individual dry contact manual What is dry contact It means the contact point signal input when the hotel card key human body detection sensor etc are interfacing with the air conditioner Added system functionality by using external inputs dry ...

Page 35: ... M S Description Master Using group control this master sets the mode of slave IDU s Slave If the unit is set as the slave it blocks a change of opposite operating mode cooling heating Pump test run The pump test run is the function to test run by operating the water pump This function can be used for air vents flow sensors and others In the installer setting list Pump Test run category and press ...

Page 36: ...ng temperature range when leaving water temperature is selected as setting temperature In the installer setting list select water cooling set temp category and press OK button to move to the detail screen OK NOTE The setting range differs depending on the connected product NOTE Water condensation on the radiator While cooling operation cold water may not flow to the radiator If cold water enters t...

Page 37: ...to move to the detail screen OK 72 INSTALLER SETTING Water heating set temp Determine heating setting temperature range when leaving water temperature is selected as setting temperature In the installer setting list select Water heating set temp category and press OK button to move to the detail screen OK NOTE The setting range differs depending on the connected product NOTE The setting range diff...

Page 38: ...t DHW set temp category and press OK button to move to the detail screen OK Cooling Heating only mode Set the Operation mode lock when Multi V Indoor unit is used only cooling mode in summer and Hydro Kit is used only heating in winter OK Value1 Value2 Oil Recovery Release Set Type 0 Type 1 74 INSTALLER SETTING NOTE The setting range differs depending on the connected product ...

Page 39: ... LW temperature is 25 C or higher it is set to 25 C forcibly Step 1 2 3 4 5 6 7 8 9 10 11 Leaving Water target temperature C 25 Max T Off 25 35 45 Max T Max T 45 35 25 Duration hours 72 96 72 24 24 24 24 Holding time 72 72 72 OK NOTE During Screed drying operation button input except for installer function and temperature display is restricted When the power is applied again after a power outage d...

Page 40: ... Switch No 6 and 7 is set as OFF OFF Example If Heater on temperature is set as 1 and DIP switch No 6 and 7 is set as OFF OFF then full capacity of electric heater will start operation when outdoor air temperature is below 1 C and current leaving water temperature or room air temperature is much belower than target leaving water temperature or target room air temperature 78 INSTALLER SETTING Heate...

Page 41: ...he leaving water temperature is below 10 C 80 INSTALLER SETTING Water supply off temp during cooling Determine leaving water temperature when the unit is turned off This function is used for preventing condensation on the floor in cooling mode In the installer setting list select Water supply off temp during cooling category and press OK button to move to the detail screen Function Value Default S...

Page 42: ...nction to set outdoor Min Max temperature for auto mode OK Indoor air temp for auto mode It is the function to set indoor Min Max temperature for auto mode OK NOTE The setting range differs depending on the connected product NOTE The setting range differs depending on the connected product ...

Page 43: ... Start date Determining the date when the disinfection mode is running Start time Determining the time when the disinfection mode is running Max temp Target temperature of disinfection mode Duration time Duration of disinfection mode Time Start time Max temp Duration time Water temperature Inside DHW Temperature profile of Disinfection operation OK OK NOTE The setting range differs depending on th...

Page 44: ...K button to move to the detail screen OK 86 INSTALLER SETTING Tank setting 2 In the installer setting list select tank setting 2 category and press OK button to move to the detail screen Value Range Hysteresis 4 2 Heating priority Floor heating DHW OK NOTE The setting range differs depending on the connected product ...

Page 45: ... can not be heated while DHW heating On the other hand if the Heating priority is set as Floor heating that means heating priority is on under floor heating DHW tank is ONLY heated by water heater In this case the under floor heating is not stopped while DHW is heated Water heater off temperature Time Session A Session B Session C Session D Target DHW temperature set by user Starting temperature o...

Page 46: ...ong time DHW tank heater will not be turned on in DHW heating operation Example of timing chart DHW tank heating is enabled DHW tank heater is enabled DHW tank heating operation DHW tank heater operation 1 active 0 not active A Active time S Stop time B Boost heater delay time Time B B A S S S 1 0 1 0 1 0 1 0 OK 90 INSTALLER SETTING Use Heating Tank Heater It is the function to change the setting ...

Page 47: ... LPM TH on off Variable heating air It is a function to adjust the heating air temperature Thermal On Off temperature according to the field environment in preparation for heating or heating claim You can set the following setting values using left right button Value Description TH On TH Off Type0 0 5 C 1 5 C Type1 1 C 2 C Type2 2 C 3 C Type3 3 C 4 C ...

Page 48: ...left right button Value Description TH On TH Off Type0 2 C 2 C Type1 3 C 3 C Type2 4 C 4 C Type3 1 C 1 C 94 INSTALLER SETTING Value Description TH On TH Off Type0 0 5 C 0 5 C Type1 1 C 1 C Type2 2 C 2 C Type3 3 C 3 C TH on off Variable cooling air It is a function to adjust the cooling air temperature Thermal On Off temperature according to the field environment in preparation for cooling or cooli...

Page 49: ...llowing setting values using left right button Value Description TH On TH Off Type0 0 5 C 0 5 C Type1 1 C 1 C Type2 2 C 2 C Type3 3 C 3 C 96 INSTALLER SETTING Heating temp setting At the leaving water control in heating mode the control reference water temperature position setting If the air leaving water temperature selection setting is set to leaving water temperature Change setting values using...

Page 50: ... right button Value Outlet Default Inlet 98 INSTALLER SETTING Pump setting in heating It is a function to help the water pump s mechanical life by putting the water pump s rest time Installer setting function to set water pump operation delay time option in heating mode In the installer setting list select Pump setting in heating category and press OK button to move to the detail screen OK Type Ti...

Page 51: ... select Pump setting in cooling category and press OK button to move to the detail screen OK 100 INSTALLER SETTING Forced operation If the product is not used for a long time the product will be forced to operate to prevent pump failure and PHEX freezing Water pump off After 20 consecutive hours disable enable the logic that drives the water pump by itself In the installer setting list select Forc...

Page 52: ...s Dry Contact installation D C Not Installed Do not use install Dry Contact D C Installed Use install Dry Contact 102 INSTALLER SETTING Pump Capacity It is a function to enable installer to control Pump capacity application model In the installer setting list select Pump Capacity category and press OK button to move to the detail screen OK Value Description 100 Default 10 100 Change unit 5 NOTE CN...

Page 53: ...Smart Grid SG category and press OK button to move to the detail screen OK 104 INSTALLER SETTING Pump frequency setting RPM It is a function to enable installer to control pump RPM of BLDC pump application model In the installer setting list select Pump frequency setting RPM category and press OK button to move to the detail screen The function is not available for some products OK Value Descripti...

Page 54: ...n OK Function Description Boundary Set Point in graph Attribute Outdoor1 Heat Out1 Heating lower ambient temp Out1 Out2 1 Set point 5 Outdoor Air Temp Outdoor2 Heat Out2 Heating higher ambient temp Out2 Out1 1 Out2 Out3 5 Set point 6 Outdoor Air Temp Outdoor3 Cool Out3 Cooling lower ambient temp Out3 Out2 5 Out3 Out4 1 Set point 7 Outdoor Air Temp Outdoor4 Cool Out4 Cooling higher ambient temp Out...

Page 55: ...ble from indoor unit In the installer setting list select Modbus Address and press OK button to move to the detail screen OK Refrigerant Leak Sensor The installation of the flare coupling part and the welding part leakage sensor of the indoor unit is set Change setting values using left right button Value Installed Not Installed NOTE To use this function switch No 1 of option switch 1 must be turn...

Page 56: ...st select CN EXT Port category and press OK button to move to the detail screen Value Not use Simple Operation Simple Dry Contact Single emergency stop All emergency stop OK IDU Address Verification Check the result of Auto Addressing of outdoor unit with remote control In the installer setting list select the indoor unit address check category and press OK button to move to the detail screen OK ...

Page 57: ... set that only one of the outdoor unit remote controller can control the low noise operation Change setting values using left right button Value Description RMC Low noise operation switch setting of outdoor unit PCB is ignored Function Setting Low noise operation time menu is activated ODU default It is controlled by outdoor unit according to switch setting value of low noise operation of outdoor ...

Page 58: ...f Room1 can not be set lower than Room2 temperature Setting range Add Zone 2nd Circuit function setting Use Not Use Value Closing Time 60 999 seconds Default 240 Hysteresis Thermal On Off 1 5 C Default 2 114 INSTALLER SETTING Anti freezing Temperature Anti freeze temperature setting is available in installer mode It prevents frostbite from happening In the range of 25 to 5 degree celsius Change se...

Page 59: ...xternal boiler External boiler OFF condition If External air temperature external boiler operation temperature value installer setting Hysteresis installer setting turn off external boiler operation and operate indoor unit If the mode of this function is set to Auto you can set temperature of the boiler and hysteresis respectively 116 INSTALLER SETTING Use External Pump This function can be set to...

Page 60: ...modbus address and unit in this function Activating the modbus address option you choose one address B0 or B1 or don t use Then you set the port and specification in range of 0000 0 9999 9 pulse kW as shown in the figure below OK Estimated energy display This function can set to display energy data which outdoor unit estimated power consumption data without wattmeter Setting value Description Use ...

Page 61: ...cal life If the water pump has been off for 20 hours Water pump will operate for the set time OK Solar Thermal System It is function to set operation reference value in Solar Thermal System In the installer setting list select Solar thermal system category and press OK button to move to the detail screen NOTE The setting range differs depending on the connected product NOTE To use this function sw...

Page 62: ...this function Solar Pump flush setting Oper Cycle When using the solar pump flush function the solar water pump operates at the set time Oper Time When using the solar pump flush function the solar water pump operates during the set time Function Value Range Default Solar collector set temp Min 5 C 50 C 10 C Max 60 C 105 C 95 C DHW set temp Max 20 C 90 C 80 C TH on off Variable solar Temp On 3 C 4...

Page 63: ...reen The current flow rate can be checked Range 7 80 L min The function is not available for some products OK Valve test This function is provided to check if each valve works properly after installing setting the zone module Value1 Value2 Description Start Stop Open Close When selecting zone the status is OPEN NOTE If the test is not stopped after the start of valve test the test is automatically...

Page 64: ... initialization setting category and press OK button to move to the detail screen When you press initialization button a popup screen appears and when you press check button password initialization starts and the user password is changed to 0000 OK NOTE Error history lookup range 50 Error history information Item date time mode including Off set temperature incoming temperature outgoing temperatur...

Page 65: ...rred license terms warranty disclaimers and copyright notices are available for download LG Electronics will also provide open source code to you on CD ROM for a charge covering the cost of performing such distribution such as the cost of media shipping and handling upon email request to opensource lge com This offer is valid for a period of three years after our last shipment of this product This...

Page 66: ......

Reviews: