43
Installation
Due to our policy of continuous product innovation, some specifications may change without notification.
©LG Electronics U.S.A., Inc., Englewood Cliffs, NJ. All rights reserved. “LG” is a registered trademark of LG Corp.
Pipe In (Liquid)
Thermistor
Pipe Out (Vapor)
Thermistor
Air Handler Unit
Tie
Thermistor
45°
Step 1
Step 2
Thermistor Installation
AHU COMMUNICATIONS KIT INSTALLATION
Thermistor
Air Flow
Air Handler Unit
AHU Communications Kit
Return Air
Thermistor
T
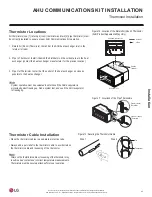
Figure 10: Location of the Return Air (Room) Thermistor
(AHU Product Appearance May Vary).
Figure 11: Locations of the Pipe Thermistors.
Figure 12: Securing the Thermistor Cable.
Thermistor Locations
All thermistors (one [1] return air [room] thermistor and two [2] pipe thermistor) must
be correctly installed to ensure proper AHU Communications Kit operation.
1. Return Air (Room) Thermistor: Install it at the AHU heat exchanger inlet in the
return air stream.
2. Pipe In Thermistor: Install it behind the distributor on the coldest area in the heat
exchanger (contact the heat exchanger manufacturer for the precise location).
3. Pipe Out Thermistor: Install it at the outlet of the heat exchanger as close as
possible to the heat exchanger.
System operation must be evaluated to determine if the AHU evaporator is
protected against freezing up� Run a system test, and see if the AHU evaporator
is freezing up�
Thermistor Cable Installation
• Place the thermistor cables in a separate protective tube.
• Always add a pull-relief to the thermistor cable to avoid strain on
the thermistor cable and loosening of the thermistor.
Strain on the thermistor cable or loosening of the thermistor may
result in a bad contact and incorrect temperature measurements�
Thermistors must be securely attached for proper operation�

