background image

7

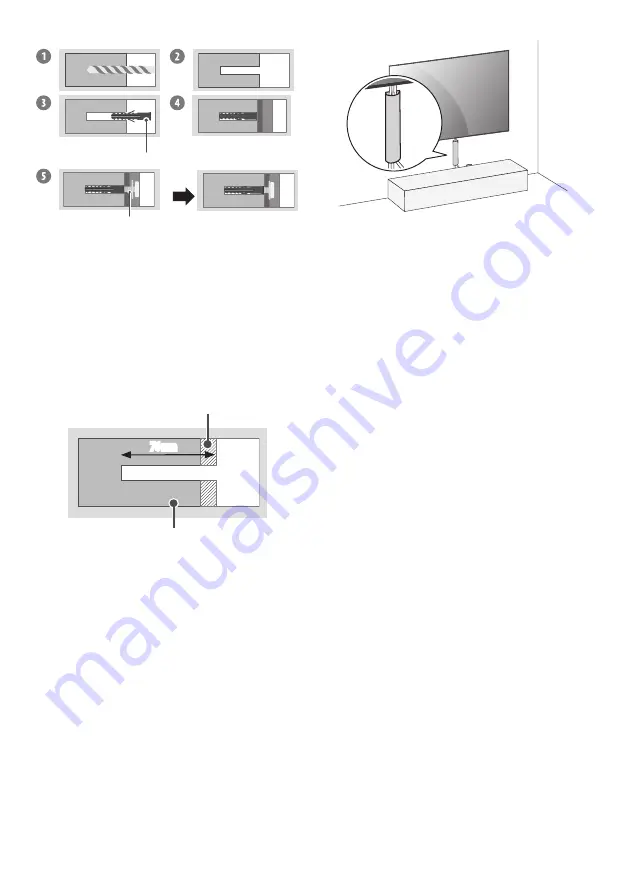
For installation on concrete wall

Wall mounting anchor

Wall mounting screw 

1  Drill holes in anchor locations with a drill bit of Ø 8 mm to a depth of 

80 mm to 100 mm.

2  Clean the drilled holes.
3  Insert the enclosed anchors for fixing the wall mount into the holes. (Use 

a hammer when inserting anchors.)

4  Push the wall mount support closely toward the wall to match the hole 

locations.

5  Tighten screws for fixing the wall mount to the holes. At this time, tighten 

the screws to a torque of between 45 kgf/cm to 60 kgf/cm.

For installation on wood stud

Drywall

Wood stud

76 mm

Use the Ø 4 mm drill bit for wood to drill holes with the depth of 76 mm. 
(Clean the drilled hole.)
Without using the wall mounting anchor, fasten the wall mounting screw 
directly to the wood stud.

After Installation


When connecting additional cables from the sides, we recommend 
holding the centre of the TV horizontally or vertically and pulling the 
product to make sure there is sufficient distance from the wall before 
connecting.


When connecting additional cables from the bottom, we recommend 
releasing the TV from the wall mount before connecting.

(For example)


Use cable management systems to arrange the cables at the bottom of 
the TV as shown below. Cable managements are not provided with the 
product, so purchase them separately.


After installing the product, be sure to use it adhered to the wall.


-

Using the product while it is not adhered to the wall may damage or 
shake the product.


Do not use a sharp object when you detached the cable cover. This could 
damage the cable or the cabinet. It may also cause personal harm. 
(Depending on model)

Antenna/Cable

Connect the TV to a wall antenna socket with an RF cable (75 Ω).


Use a signal splitter to use more than 2 TVs.


If the image quality is poor, install a signal amplifier properly to improve 
the image quality.


If the image quality is poor with an antenna connected, try to realign the 
antenna in the correct direction.


An antenna cable and converter are not supplied.


For a location that is not supported with Ultra HD broadcasting, this TV 
cannot receive Ultra HD broadcasts directly.

Satellite dish

Connect the TV to a satellite dish to a satellite socket with a satellite RF cable 
(75 Ω). (Depending on model)

Summary of Contents for OLED65G26LA

Page 1: ...ence OWNER S MANUAL Please read this manual carefully before operating your set and retain it for future reference The model and serial number of the product are located on the back and on one side of the product Record them below in case you ever need service Model Serial No MFL718562032203REV02 ...

Page 2: ...osure that may be of sufficient magnitude to constitute a risk of electric shock to persons This symbol is intended to alert the user to the presence of important operating and maintenance servicing instructions in the literature accompanying the appliance WARNING TO REDUCETHE RISK OF FIRE AND ELECTRIC SHOCK DO NOT EXPOSETHIS PRODUCTTO RAIN OR MOISTURE TO PREVENTTHE SPREAD OF FIRE KEEP CANDLES OR ...

Page 3: ...secticide lubricants wax car industrial abrasive thinner benzene alcohol etc which can damage the product and or its panel Otherwise this may result in electric shock or product damage Protect the power cord from physical or mechanical abuse such as being twisted kinked pinched closed in a door or walked upon Pay particular attention to plugs wall outlets and the point where the cord exits the dev...

Page 4: ...duct If you install theTV on a stand you need to take actions to prevent the product from overturning Otherwise the product may fall over which may cause injury Do not use any unapproved items to ensure the safety and product life span Any damage or injuries caused by using unapproved items are not covered by the warranty Make sure that the screws are inserted correctly and fastened securely If th...

Page 5: ...ointed by the store prior to moving or replacing the product after installation Installation is a technical task and safety issues may arise if an individual attempts to install or move the product personally Do not hang on the product or subject it to severe impact after installation Doing so may cause the product to fall and cause personal injury When installing the product on a wall do not hang...

Page 6: ...cified tensile load and do not allow any external force to be applied to the product Avoid accidents by using work tools with care during installation Tools for Installation shaped screwdriver manual or electric level drill Ø 8 mm drill bit for concrete or Ø 4 mm drill bit for steel Securing TV to the Wall Except for OLW480B LSW440B Please use theTV close to the wall after installation How to fix ...

Page 7: ...connecting additional cables from the bottom we recommend releasing theTV from the wall mount before connecting For example Use cable management systems to arrange the cables at the bottom of theTV as shown below Cable managements are not provided with the product so purchase them separately After installing the product be sure to use it adhered to the wall Using the product while it is not adhere...

Page 8: ...fied cable with the HDMI logo attached If you do not use a certified HDMI cable the screen may not display or a connection error may occur Recommended HDMI CableTypes Ultra High Speed HDMI cable 3 m or less USB Some USB Hubs may not work If a USB device connected using a USB Hub is not detected connect it to the USB port on theTV directly Note For an optimal connection HDMI cables and USB devices ...

Page 9: ...ing standards may not be supported An additional device may be necessary to support certain 8K standards Upscaled and enhanced 8K images will vary depending on the source content Depending on model Environment condition OperatingTemperature 0 C to 40 C Operating Humidity Less than 80 StorageTemperature 20 C to 60 C Storage Humidity Less than 85 For information of the power supply and power consump...

Page 10: ... distance of 20 cm between the device and the body Open Source Software Notice Information To obtain the source code that is contained in this product under GPL LGPL MPL and other open source licenses that have the obligation to disclose source code and to access all referred license terms copyright notices and other relevant documents please visit https opensource lge com LG Electronics will also...

Page 11: ...r a prolonged period of time may cause image sticking Avoid displaying a fixed image on theTV screen for a long period of time Generated Sound Cracking noise A cracking noise that occurs when watching or turning off theTV is generated by plastic thermal contraction due to temperature and humidity This noise is common for products where thermal deformation is required Electrical circuit humming pan...

Page 12: ...l cleaning feature to check the status of the screen by itself and prevent image retention that leaves an image on a screen This feature automatically calculates the optimal execution time based on the accumulated viewing time and is automatically executed when the TV is turned off While this feature is running horizontal lines may appear at the top and bottom of the screen The pixel cleaning feat...

Page 13: ... You can run the Magic Explorer feature when the pointer colour is changed to purple If watching a programme press and hold down the pointer onto the video When using TV Guide Settings Sports Alert or Art Gallery press and hold down on the text Power Turns theTV on or off STB Power You can turn your set top box on or off by adding the set top box to the universal remote control for yourTV 1 Access...

Page 14: ...ady that is turned off Press the Home button or the Back button to watchTV when the screen is in Always Ready that is turned on Press the Wheel OK button to display the wallpaper when the screen is in Always Ready that is turned off and press the button to watch TV Note Using Always Ready may increase energy consumption For more information about the feature refer to the Support User Guide Trouble...

Page 15: ... operate like a general remote control To display the pointer on the screen again shake Magic Remote to the left and right Back Returns to the previous level Back Clears on screen displays and returns to last input viewing 1 1 1 1 1 1 Microphone Number buttons Enters numbers Accesses the Quick Help More actions Displays more remote control functions Audio descriptions function will be enabled Prog...

Page 16: ...when the screen is in Always Ready that is turned on Press the Wheel OK button to display the wallpaper when the screen is in Always Ready that is turned off and press the button to watchTV Note Using Always Ready may increase energy consumption For models with motion sensors such as G2 if you set screen on with the motion sensor theTV will turn on by recognising the motion For more information ab...

Reviews: