background image

21

ENGLISH

Y

P

B

P

R


R

L MONO

AUDIO

VIDEO

S-VIDEO

AV INPUT

COMPONENT (DVD/DTV INPUT)

AC INPUT

R

L

AUDIO

RGB 2 INPUT

(DIGITAL RGB INPUT)

RGB 1 INPUT

(PC/DTV INPUT)

RS 232C INPUT

(CONTROL/SERVICE)

R

L

AUDIO

VIDEO

Camcorder

Video game set

DDR

DC OUTPUT

(DC 12V)

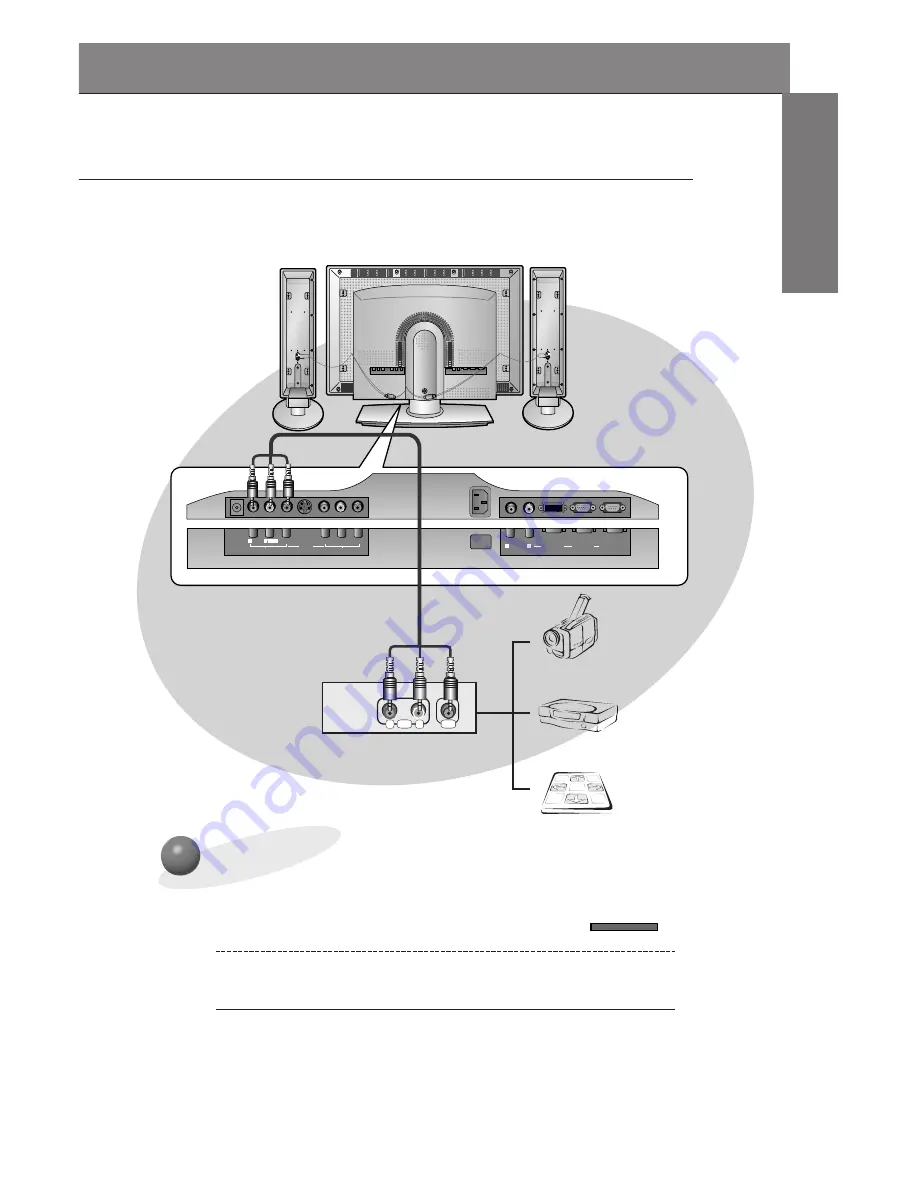
To watch external AV source

Press INPUT SELECT button on the
remote control of the monitor to select

VIDEO

.

1

Operate the corresponding external equip-
ment. See external equipment operating
guide.

2

External AV Source Setup

- As shown below, when connecting the Monitor to an external source, match the

colors of AV input jacks on the Monitor with the output jacks on the audio/video
equipment: Video = yellow, Audio (Left) = white, Audio (Right) = red.

Back panel of the Monitor

INPUT SELECT

Summary of Contents for MW-30LZ10

Page 1: ...MW 30LZ10 OWNER S MANUAL LCD AV MONITOR LCD AV MONITOR manual carefully before oper re reference number and serial number of tached on the back of the set formation to your dealer when ice ...

Page 2: ...d used in accordance with the instructions may cause harmful interference to radio communications However there is no guarantee that interference will not occur in a particular installation If this equipment does cause harmful interference to radio or television reception which can be determined by turning the equipment off and on the user is encouraged to try to correct the interfer ence by one o...

Page 3: ...s Setup and Operation Turning on the Monitor 29 Checking features 30 Sleep Timer Setting Sleep Timer 31 Picture Sound Auto picture control 32 Adjusting picture appearance 33 Auto Sound Control 34 Adjusting Sound Bass Treble Balance 35 Special Features Selecting language for the menus 36 Adjusting color temperature 37 Using the screen saver function 38 Setting picture format 39 Using the Zoom in ou...

Page 4: ...ightning or thunder storm unplug the Monitor aerial from the wall outlet This may cause damaged the Monitor or could give an electric shock In case of using a receiver VCR Digital Set Top Box contact your service center to construct an antenna because it needs skilled man This may cause an electric shock The mains plug should be inserted fully into the power outlet to avoid a fire hazard This may ...

Page 5: ...r where it might be exposed to dust This may cause a fire hazard Ensure good ventilation around the monitor The dis tance between the monitor and the wall should be more than 10cm It make internal temperature increase and causes a fire Do not cover the vent grilles of the monitor This may cause a fire hazard Do not place the monitor close to sources of steam or oil such as a humidifier This may cr...

Page 6: ... are not possi ble a separate circuit breaker should be employed and installed by a quali fied electrician Do not connect ground to telephone wires lightning rods or gas pipe In case of using a receiver VCR Digital Set Top Box do not place an antenna in the vicinity of power lines This may cause an electric shock The mains plug should be inserted fully into the power outlet to avoid a fire hazard ...

Page 7: ... VCR Digital Set Top Box Bend antenna cable between inside and outside building to prevent rain from flowing in This may cause water damaged inside the Monitor and could give an electric shock Do not place heavy objects on the power cord This may cause a fire or an electric shock hazard Do not use too many plugs on the Mains multi outlet It may result in overheating of the outlet and causes a fire...

Page 8: ...use a fire hazard Dispose of used batteries carefully and safely In the case of a battery being swallowed by a child please con sult a doctor immediately Do not place anything containing liquid on top of the monitor such as flowerpot cup cosmetics or candle This may cause a fire hazard If water is spilt into the monitor unplug it from the mains supply out let immediately and consult your Service A...

Page 9: ...ng part of the power outlet is loose This may cause a fire or an electric shock hazard Do not drop the monitor or allow impact shock This may cause mechanical failure or injury In case of impact shock or damage to the monitor switch it off and unplug it from the outlet and contact your service center This may cause a fire or an electric shock hazard Do not allow any objects to fall into the monito...

Page 10: ...c shock hazard In the event that an image does not appear on the screen please switch it off and unplug it from the mains suuply and contact your Service Centre This may cause a fire or an electric shock hazard In the event of a lightning or thunder storm unplug the Monitor and aerial from the wall outlet This will prevent damage to the Monitor and possible electric shock Do not attempt to service...

Page 11: ...t Unplug this product from the wall outlet before cleaning Do not use liquid clean ers or aerosol cleaners This may cause damage to the Monitor or cause an electric shock hazard Do not place heavy objects on the Monitor This may cause serious injury to a child or adult The distance between eyes and the screen should be about 1 5m If not eyes will strain Unplug the Monitor from the wall outlet when...

Page 12: ...T SELECT INPUT SELECT Front Panel Controls Main power button INPUT SELECT button Power standby indicator Illuminates orange in stand by mode Illuminates green when the Monitor is turned on Remote control sensor MENU button D D E E buttons VOLUME F F G G buttons Sub power button ...

Page 13: ...ERVICE DC OUTPUT DC 12V R L Ω EXTERNAL SPEAKER 6 Back Panel Connection Panel Overview A V Input COMPONENT DVD DTV INPUT jacks S video Audio Input sound R L jacks RGB 1 PC DTV INPUT RGB 2 DIGITAL RGB INPUT jack RS 232C jacks AC INPUT jack Input RGB2 Digital RGB when input signal supporting DVI D You can use it from jacks DC OUTPUT DC 12V jack The DC OUTPUT jack is optional item ...

Page 14: ...he Monitor 14 1 2 3 4 5 6 7 8 0 9 SLEEP INPUT SELECT POWER APC DASP ARC PIP ARC PIP TWIN PICTURE SWAP SUB INPUT MENU MUTE VOL VOL ENTER ZOOM ZOOM WIN SIZE WIN POSITION VOL buttons PIP button ARC button APC button PIP buttons SLEEP button Refer to p 31 ENTER button POWER button SWAP button MENU button ...

Page 15: ...ss of this button changes the mode as shown below RGB2 COMPONENT RGB1 S VIDEO MUTE button switches the sound on or off DASP button Refer to p 34 PIP ARC select button TWIN PICTURE button Refer to p 42 46 VIDEO INPUT SELECT button SUB INPUT button UP DOWN buttons ...

Page 16: ...ZOOM WIN SIZE WIN POSITION Remote control Owner s Manual Alkaline batteries DVI computer cable PC sound cable video cable 1 5V 1 5V Speaker cable Optional Extras Speaker Tilt wall mounting braket CH1 CH2 CH3 CH S W CH4 CH1 CH2 CH3 CH S W CH4 A V wireless transmitter receiver option C H 1 C H 2 C H 3 C H S W C H 4 C H 1 C H 2 C H 3 C H S W C H 4 Accesories Optional extras ...

Page 17: ...alkaline batteries Don t mix used batteries with new batteries Notes for using the remote control Make sure these are no objects between the remote control and its sensor Don t place the remote control near a heater or damp place Strong impact on the remote con trol may cause operation failure Signal from the remote control may be disturbed by sun light or other strong light In this case turn the ...

Page 18: ...ght red If you have a mono VCR connect the audio cable from the VCR to the AUDIO L MONO input of the Plasma Monitor If you connect an S VIDEO VCR to the S VIDEO input the picture quality is improved compared to connecting a regular VCR to the Video input Avoid having a fixed image remain on the screen for a long period of time A frozen still picture from a VCR or if a CH label is displayed display...

Page 19: ...GB 1 INPUT PC DTV INPUT RS 232C INPUT CONTROL SERVICE DC OUTPUT DC 12V Back panel of the Monitor To watch VCR Press INPUT SELECT button on the remote control and select VIDEO When connecting with S Video select the S VIDEO 1 Insert a video tape into the VCR and press the PLAY button on the VCR See VCR owner s manual 2 INPUT SELECT ...

Page 20: ...ONO AUDIO VIDEO S VIDEO AV INPUT COMPONENT DVD DTV INPUT AC INPUT R L AUDIO RGB 2 INPUT DIGITAL RGB INPUT RGB 1 INPUT PC DTV INPUT RS 232C INPUT CONTROL SERVICE DC OUTPUT DC 12V To watch cable TV Press INPUT SELECT button on the remote control and select VIDEO source 1 Tune to cable service provided channels using the cable box 2 Tips For further information regarding cable TV service contact your...

Page 21: ...ternal AV source Press INPUT SELECT button on the remote control of the monitor to select VIDEO 1 Operate the corresponding external equip ment See external equipment operating guide 2 External AV Source Setup As shown below when connecting the Monitor to an external source match the colors of AV input jacks on the Monitor with the output jacks on the audio video equipment Video yellow Audio Left ...

Page 22: ...according to its owner s manual Turn on the DVD player and insert a DVD Component Input ports Connect DVD player jacks to Monitor Component input jacks as indicated below Y PB PR R L MONO AUDIO VIDEO S VIDEO AV INPUT COMPONENT DVD DTV INPUT AC INPUT R L AUDIO RGB 2 INPUT DIGITAL RGB INPUT RGB 1 INPUT PC DTV INPUT RS 232C INPUT CONTROL SERVICE B R R AUDIO L DC OUTPUT DC 12V Back panel of a DVD play...

Page 23: ... Y PB R P DTV OUTPUT DC OUTPUT DC 12V Turn on the digital SET TOP BOX Refer to the owner s manual for the digital SET TOP BOX Press INPUT SELECT button on the remote control to select COMPONENT or RGB1 Back panel of a digital SET TOP BOX or You can use either the Monitor s COMPONENT DVD DTV INPUT inputs or the single RGB1 PC DTV INPUT for video connections depending on your Set Top Box connectors ...

Page 24: ...less AV transmitter c Connect the adaptor to the DC input of the wireless AV transmitter d Connect the power plug to the wall outlet socket after connecting the power cord to the adaptor Only adjust this function in some models When connecting the wireless transmitter with external equipments match the colors of connecting ports Video yellow Audio L white Audio R red If you have a mono VCR connect...

Page 25: ...er on and adjust channel number same to the channel num ber of a transmitter with the channel button Place the wireless AV receiver toward the wire less transmitter b Connect the AV input ports of the Monitor to the AV INPUT port of the receiver c Connect the DC output of the monitor to DC input of the wireless receiver with DC cable Only adjust this function in some models When connecting the wir...

Page 26: ...able from the PC to the Audio ports of the Monitor If your PC computer is equipped with a sound card adjust the sound output on the PC Select the display resolution of the PC to 1024X768 for the best picture This monitor s reso lution is 1280X768 PC Setup First turn on the PC computer and press the ON OFF button on the Monitor to apply power to it Second turn on the display by pressing the button ...

Page 27: ...8 46 875 1024x768 1152x864 832x624 1280x960 1280x1024 75 00 53 674 85 06 56 000 90 00 64 016 100 00 48 363 60 00 56 476 70 06 60 023 75 02 68 677 84 99 54 348 60 05 67 500 75 00 77 487 85 05 49 725 74 55 60 000 60 00 75 000 75 00 63 981 60 02 79 976 75 02 Resolution Horizontal Frequency KHz Vertical Frequency Hz 640x480 800x600 Tips Synchronization input form separate Dos mode may not work dependi...

Page 28: ... 75 00 43 269 85 00 35 156 56 25 37 879 60 31 48 077 72 18 46 875 1024x768 1152x864 832x624 1280x960 1280x1024 75 00 53 674 85 06 48 363 60 00 56 476 70 06 60 023 75 02 68 677 84 99 54 348 60 05 67 500 75 00 77 487 85 05 49 725 74 55 60 000 60 00 75 000 75 00 63 981 60 02 Resolution Horizontal Frequency KHz Vertical Frequency Hz 640x480 800x600 ...

Page 29: ...e Monitor or press the POWER or INPUT SELECT button on the remote control and then the Monitor will be turned on If the Monitor is turned off with the remote control button Press the main ON OFF button on the Monitor to turn on the Monitor If the Monitor is turned off with the ON OFF button on the Monitor Press the main ON OFF button on the Monitor and then press the or INPUT SELECT button on the ...

Page 30: ...u Use the remote control to make adjustments Select VIDEO input source SOUND SPECIAL PICTURE ADJ TWIN PIP PICTURE APC Contrast Brightness Color Sharpness Tint Screen DASP Treble Bass Balance Language Color TEMP R Adjust G Adjust B Adjust Screen Saver Set ID Auto Config ARC Main Zoom In Out Position Clock Adjust Phase Adjust Reset Twin PIP Input Main Input Sub Win Size Win Position Win Reset D E Mo...

Page 31: ... set setting time is changed as follows To release sleep time setting press the SLEEP button repeatedly to select 10 20 30 120 180 240 90 60 Tips To check remaining sleep time after setting press the SLEEP or ENTER button just once If you turn the Monitor off after setting the sleep timer the setting is erased The sleep timer will then have to be set again SLEEP 10 SLEEP ...

Page 32: ...ed picture condition Each press of APC button or UP DOWN buttons changes the screen display as shown below You can also select Clear Soft or User in the PICTURE menu Clear Soft User Auto picture control Use APC to set the Monitor for the best picture appearance APC Clear Soft User APC D E Adjust A Exit User ...

Page 33: ...ro priate adjustments and then press the ENTER button Press the UP DOWN buttons to select other items Press the MENU button and then press the UP DOWN button to select PICTURE menu Press the VOL G button Adjusting picture appearance MENU VOL VOL VOL VOL PICTURE D E Move F Prev APC Contrast Brightness Color Sharpness Tint Screen Contrast G 100 Contrast 80 FG Adjust D E Move A Prev ENTER ...

Page 34: ...iate audio tone levels based on the program content 1 Press the DASP button 2 Press the DASP or UP DOWN button to select a sound setup Each press of DASP or UP DOWN buttons changes the screen display as shown below You can also select Normal Cinema Music Sports or User in the SOUND menu Normal Cinema User Music Sports DASP Normal Cinema Music Sports User DASP D E Adjust A Exit Normal ...

Page 35: ...P DOWN button to select SOUND menu Press the VOL G button 2 Use the VOL buttons to make appropriate adjustments and then press the ENTER button Press the UP DOWN buttons to select other items MENU VOL VOL VOL VOL ENTER SOUND DASP Treble Bass Balance D E Move Treble G 100 SOUND DASP Treble Bass Balance 50 F Prev A Prev Adjust Bass and Balance in the same way FGAdjust ...

Page 36: ...MENU button and then press the UP DOWN button to select SPECIAL menu Press the VOL G button MENU VOL VOL ENTER Language Color TEMP R Adjust G Adjust B Adjust Screen saver Set ID Move D E SPECIAL ENGLISH FRANÇAIS ESPAÑOL PORTUGUÊS DEUTSCH ITALIANO Language G Language Color TEMP R Adjust G Adjust B Adjust Screen saver Set ID SPECIAL ENGLISH FRANÇAIS ESPAÑOL PORTUGUÊS DEUTSCH ITALIANO ENGLISH D E Mov...

Page 37: ...lect your desired color temperature and then press the ENTER button Press the UP DOWN button to select R Adjust G Adjust and B Adjust in the same way Press the VOL F button again to move other menu MENU VOL VOL ENTER SPECIAL Language Color TEMP R Adjust G Adjust B Adjust Screen Saver Set ID D E Move SPECIAL Language Color TEMP R Adjust G Adjust B Adjust Screen Saver Set ID D E Move Color TEMP G F ...

Page 38: ...ence of Right Bottom Left Up every 10 minutes SCREEN SAVER function will help to prevent the effect of the permanent image but it is possible to permanently burn the screen with a prolonged still image Press the MENU button and then press the UP DOWN button to select SPECIAL menu Press the VOL G button MENU VOL VOL SPECIAL Language Color TEMP R Adjust G Adjust B Adjust Screen saver Set ID D E Move...

Page 39: ... can also select WIDE NORMAL or ZOOM in the PICTURE menu Each time you press ARC buttons you can select WIDE NORMAL or ZOOM alternatively WIDE WIDE NORMAL ZOOM NORMAL ZOOM Wide and normal size are possible in RGB1 PC and RGB2 mode and Wide normal and zoom size are possible in RGB1 DTV mode ARC ...

Page 40: ...djust desired zoom in or out Press the MENU button and then press the UP DOWN button to select PICTURE ADJ menu Press the VOL G button MENU VOL VOL VOL VOL PICTURE ADJ Auto Config ARC Main Zoom In Out Position Clock Adjust Phase Adjust Reset D E Move Zoom In Out G F Prev G Adjust 0 PICTURE ADJ Auto Config ARC Main Zoom In Out Position Clock Adjust Phase Adjust Reset FG Adjust 10 A Prev ...

Page 41: ...DJ menu Press the VOL G button MENU VOL VOL VOL VOL Initializing PICTURE ADJ Auto Config ARC Main Zoom In Out Position Clock Adjust Phase Adjust Reset D E Move Position G F Prev Adjust F D E G PICTURE ADJ Auto Config ARC Main Zoom In Out Position Clock Adjust Phase Adjust Reset Adjust A Prev F D E G To initialize the adjusted value select Reset with the UP DOWN button and then press the VOL G butt...

Page 42: ... video DVD 480i the sub picture is RGB1 DTV more than 480p RGB2 Press the PIP button PIP Adjusting the size of sub picture Press the WIN SIZE button to select the size of sub picture WIN SIZE FGAdjust A Exit Watching sub picture as 4 3 or 16 9 PIP ARC It you press the PIP button again the function is off Press VOL F G button to adjust desired size WIN SIZE doesn t work when there is no signal in s...

Page 43: ... the VOL F G button and UP DOWN button to adjust the position Change the main picture and the sub picture Press the SWAP button in PIP SWAP RGB1 VIDEO VIDEO RGB1 RGB1 VIDEO Viewing External Source Equipment Press the SUB INPUT button in PIP SUB INPUT Tips You can select Window Size Window Position PIP Input in the TWIN PIP menu ...

Page 44: ...M is possible to 50 Press the ZOOM button to reduce the zoom effect Zoom 25 F D E G A Pos Adj Exit Moving the enlarged picture Press the VOL F G button or UP DOWN button to adjust the position of main picture It dose not operate when the ZOOM is 0 Zoom 25 F D E G A Pos Adj Exit VOL VOL Zoom in out main picture ...

Page 45: ... the SUB INPUT button to select the input select of sub menu When the main picture is RGB1 DTV more than 480p the sub picture is Input S video DVD 480i and when the main picture is Input S video DVD 480i the sub picture is RGB1 DTV more than 480p RGB2 TWIN 1 TWIN 2 TWIN OFF Twin picture function Each time you press TWIN PICTURE buttons you can select TWIN1 TWIN2 or TWIN OFF alternatively ...

Page 46: ...oesn t work in the twin picture mode WIN Size function doesn t work when there is no signal of main sub picture FGAdjust A Exit Window Size Twin picture function PIP TWIN PICTURE let you view different inputs on your monitor screen at the same time Color of main picture may be different from PIP s in PIP TWIN PICTURE When the main picture is RGB1 DTV more than 480p the sub picture is Input S video...

Page 47: ...t Brightness Color Sharpness Tint Screen D E Move Screen G VCR TV PICTURE APC Contrast Brightness Color Sharpness Tint Screen D E Move A Prev VCR TV TV F Prev This function works in Video and S video modes Use this option to correct trembling or picture instability while viewing a video tape Use the UP DOWN buttons to select TV or VCR Select the VCR option if watching a VCR Select the TV option fo...

Page 48: ... through the menus shown below Picture adj menu Sound menu Twin pip menu SOUND SPECIAL PICTURE ADJ TWIN PIP PICTURE APC Contrast Brightness Color Sharpness Tint Screen DASP Treble Bass Balance Language Color TEMP R Adjust G Adjust B Adjust Screen Saver Set ID Auto Config ARC Main Zoom In Out Position Clock Adjust Phase Adjust Reset Twin PIP Input Main Input Sub Win Size Win Position Win Reset D E ...

Page 49: ...in Zoom In Out Position Clock Adjust Phase Adjust Reset D E Move Auto Config G F Prev To Set PICTURE ADJ Auto Config ARC Main Zoom In Out Position Clock Adjust Phase Adjust Reset OK 3 If the picture needed to be adjusted a little bit more after auto adjustment you can manually adjust the Clock Adjust and Phase Adjust adjustment Tips The picture may appear strange while auto adjustment is taking pl...

Page 50: ... Move A Prev Horizontal Vertical position and CLOCK PHASE adjustment work in RGB1 PC mode and Horizontal Vertical position only work in RGB DTV mode 480p 720p 1080i ENTER 3 Adjust Phase Adjust in the same way The adjustment range of Clock Adjust is 50 50 The adjustment range of Phase Adjust is 0 31 Based on the input mode the adjustment range of Clock Adjust Phase Adjust may change Based on the in...

Page 51: ...D DTV INPUT AC INPUT R L AUDIO RGB 2 INPUT DIGITAL RGB INPUT RGB 1 INPUT PC DTV INPUT RS 232C INPUT CONTROL SERVICE DC OUTPUT DC 12V Monitor Rear Connections Panel Connect the RS 232C serial connector input jack with the rear of moniter s RS 232C input jack RS 232C connection cables are not supplied with the Monitor How to connect external control equipment External Control Device Setup ...

Page 52: ...ess the VOL G button 2 Use the VOL button to adjust Set ID to choose the desired monitor ID number and then press the ENTER button The adjustment range of Set ID is 1 99 External Control Device Setup MENU VOL VOL VOL VOL ENTER SPECIAL Language Color TEMP R Adjust G Adjust B Adjust Screen Saver Set ID D E Move Set ID G F Prev 1 SPECIAL Language Color TEMP R Adjust G Adjust B Adjust Screen Saver Set...

Page 53: ...CII code Use the Crossed reverse cable The RS 232C input jack is used to control the Monitor s functions using an external control device NAME Command Command DATA 01 Power k a 0 1 02 Input Select k b 0 4 03 Aspect Ratio k c 0 2 04 Screen mute k d 0 1 05 Volume mute k e 0 1 06 Volume control k f 0 64 07 Contrast k g 0 64 08 Brightness k h 0 64 09 Color k i 0 64 10 Tint k j 0 64 11 Sharpness k k 0 ...

Page 54: ...nt based on this format when receiving abnormal data from non viable functions or communication errors Data 01 illegal code This command is not supported 02 not support function This function doesn t work 03 wait more time Try again a few minute later Command2 Set ID NG Data x Transmission Receiving Protocol 01 Power Command p G To control Power On Off of the Monitor Transmission Data 0 Power Off ...

Page 55: ...adjust the screen format You can also adjust the screen format using the ARC button on remote control or in the Picture Adj menu Transmission Data 0 Wide screen 16 9 1 Normal screen 4 3 2 Full screen Zoom k c Set ID Data Cr Acknowledgement Data 0 Wide screen 16 9 1 Normal screen 4 3 2 Full screen Zoom Using the PC input you select either Wide screen 16 9 or Normal screen 4 3 c Set ID OK Data X 04 ...

Page 56: ...Min 0 Max 64 k Set ID OK Data X 12 OSD select Command l G To select OSD On Screen Display on off Transmission Data 0 OSD off 1 OSD on k l Set ID Data Cr Acknowledgement Data 0 OSD off 1 OSD on l Set ID OK Data X This function is setting mode when the remote control is not used 13 Remote control lock mode Command m G To set up the locking function of set remote control Transmission k m Set ID Data ...

Page 57: ...owledgement Data 0 Right down on screen 1 Left down on screen 2 Left up on screen 3 Right up on screen q Set ID OK Data X 15 PIP size Command e G To select PIP size Transmission Data 0 Normal screen 4 3 1 Wide screen 16 9 k o Set ID Data Cr Acknowledgement Data 0 Normal screen 4 3 1 Wide screen 16 9 o Set ID OK Data X 18 Bass Command s G To adjust the screen bass You can also adjust bass in the so...

Page 58: ...a X 22 G Adjust Command w G To adjust G adjust in the color temperature Transmission k w Set ID Data Cr Acknowledgement Data Min 0 Max 64 Data Min 0 Max 64 Transmit as Hexadecimal code k w Set ID Data Cr x 23 B Adjust Command G To adjust B adjust in the color temperature Transmission k Set ID Data Cr Acknowledgement Data Min 0 Max 64 Data Min 0 Max 64 Transmit as Hexadecimal code Set ID OK Data X ...

Page 59: ...ce between the Monitor and the VCR Activate any function to restore the brightness of the picture If still picture is on the screen for more than 5 minutes the screen gets dark The remote control doesn t work Check to see if there is any object between the LCD Monitor and the remote control causing obstruction Check to see if the batteries are installed with the correct polarities Refer to 17 page...

Page 60: ...your service center if the picture has not appeared after five minutes Horizontal vertical bars or picture shaking Check for local interference such as an electrical appliance or power tool Strange sound from inside the monitor A change in ambient humidity or temperature may result in an unusual noise at the time of switching off or on of the monitor and does not indicate a fault with the monitor ...

Page 61: ...61 ENGLISH Note ...

Page 62: ...62 Note ...

Page 63: ...th inches mm Weight pounds kg Power requirement Resolution Colors MW 30LZ10 29 9 759 21 5 546 7 1 179 5 40 6 18 4 AC 100 240V 50 60Hz 1280 x 768 Dot 16 770 000 256 steps of each R G and B The specifications shown above may be changed without prior notice for quality improvement ...

Page 64: ......

Reviews: