background image

11

ENG

ENGLISH

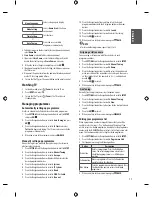
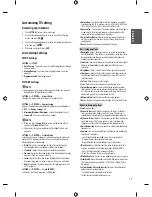
Menu Language

Selects a language to display.

  

Mode Setting

Selects 

Home Use

 for the home 

environment.

  

Time Setting

Sets the time.

  

Auto Tuning

Scans and saves available 

programmes automatically.


To display images in the best quality for your home environment, 

select 

Home Use

.


Store Demo

 is suitable for the retail environment.


If you select 

Store Demo

, any customized settings will switch 

back to the default settings of 

Store Demo

 in 5 minutes.

When the basic settings are complete, press the


OK

  .


If you do not complete the Initial setting, it will appear whenever 

the TV turns on.


Disconnect the power cord from the power outlet when you do not 

use the TV for a long period of time.

To turn the TV off, press the power button on the remote control.

Watching TV

1

  In Standby mode, press


(Power)

 to turn the TV on.

2

  Press 

INPUT

 and select 

TV

.

3

  To turn the TV off, press


(Power)

.


The TV switches to 

Standby mode.

Managing programmes

Automatically setting up programme

Use this to automatically find and store all available programmes.

1

  Press 

SETTINGS

 and the Navigation buttons to scroll to 

SETUP


and press 

OK

  .

2

  Press the Navigation buttons to scroll to 

Auto Tuning

 and press 

OK

  .

3

  Press the Navigation buttons to scroll to 

To Start

 and select      

To Start

 to begin auto tuning. The TV scans and saves available 

programmes automatically.

4

  When you return to the previous menu, press   

BACK

.

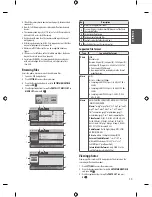
Manually setting up programme

Manual Tuning lets you manually tune and arrange the stations in 

whatever order you desire.

1

  Press 

SETTINGS

 and the Navigation buttons to scroll to 

SETUP

.

2

  Press the Navigation buttons to scroll to 

Manual Tuning

.

3

  Press the Navigation buttons to scroll to 

Storage

.

4

  Press the Navigation buttons or Number buttons to select the 

desired programme number.

5

  Press the Navigation buttons to scroll to 

System

.

6

  Press the Navigation buttons to scroll to 

TV System

.

7

  Press the Navigation buttons to scroll to 

Band

.

8

  Press the Navigation buttons to scroll to 

V/UHF

 or

 Cable

.

9

  Press the Navigation buttons to scroll to 

Channel

.

10

  Press the Navigation buttons and then select the desired 

programme number with the Navigation buttons or Number 

buttons.

11

  Press the Navigation buttons to scroll to 

Search

.

12

  Press the Navigation buttons to scroll and start Searching.

13

  Press the 

OK

   to store it.

14

  When you return to the previous menu, press   

BACK

.

 NOTE


To store another programme, repeat steps 3 to 13.

Assigning a station name

You can assign a station name with five characters to each 

programme number.

1

  Press 

SETTINGS

 and the Navigation buttons to scroll to 

SETUP

.

2

  Press the Navigation buttons to scroll to 

Manual Tuning

.

3

  Press the Navigation buttons to scroll to 

Name

4

  Press the Navigation buttons to scroll to select the position and 

make your choice of the second character, and so on. You can use 

an the alphabet A to Z, the number 0 to 9, +/ -, and blank and 

press 

OK

  .

5

  Press the 

OK

   to store it.

6

  When you return to the previous menu, press   

BACK

Fine Tuning

Normally fine tuning is only necessary if reception is poor.

1

  Press 

SETTINGS

 and the Navigation buttons to scroll to 

SETUP

.

2

  Press the Navigation buttons to scroll to 

Manual Tuning

.

3

  Press the Navigation buttons to scroll to 

Fine.


4

  Press the Navigation buttons to fine tune for the best picture and 

sound.

5

  Press the 

OK

   to store it.

6

  When you return to the previous menu, press   

BACK

.

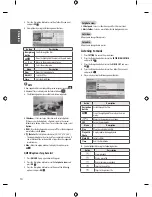
Editing your programme list

When a programme number is skipped, it means that you will be 

unable to select it using   P   button during TV viewing. If you 

wish to select the skipped programme, directly enter the programme 

number with the NUMBER buttons or select it in the Programme edit 

menu. This function enables you to skip the stored programmes.

1

  Press 

SETTINGS

 and the Navigation buttons to scroll to 

SETUP

.

2

  Press the Navigation buttons to scroll to 

Programme


Edit

.

3

  Edit programmes using the following buttons.

Button

Description

Red button

Deletes a programme. Press the Red button 

twice. The selected programme is deleted, all 

the following programmes are shifted up one 

position.

Yellow button Moves a programme. Press the Yellow button 

again to release this function.

Blue button

Selects a programme number to be skipped. Press 

the Blue button again to release the skipped 

programme.

4

  When you return to the previous menu, press   

BACK

.


Summary of Contents for MT47 SERIES

Page 1: ...e read this manual carefully before operating your set and retain it for future reference Safety and Reference OWNER S MANUAL MT47 MT48 P NO MFL68783002 1501 REV00 Printed in Indonesia www lg com MFL68783002 ...

Page 2: ...ges to certain functionalities of this television TV Guide Picture sound etc may change the power consumption Depending upon such changed setting eg Retail mode the power consumption may vary which possibly could exceed the stated energy consumption To reset the television to Star rating qualified settings select Home mode from the initial set up procedure in factory settings under the Set up menu...

Page 3: ...service personnel when The power cord or plug is damaged or frayed Liquid has been spilled into the monitor The monitor has been exposed to rain or water The monitor does not operate normally following the operating instructions Adjust only those controls that are covered in the operating instructions An improper adjustment of other controls may result in damage and often requires extensive work b...

Page 4: ...dual image prevention function on the product and when the product is not used turn off the power Burn in and related problems are not covered by the warranty on this product Do NOT install this product on a wall where there is high risk of exposure to oil fumes or mist This may damage product and cause is to fail CAUTION Make sure the product ventilation hole is not blocked Install the product in...

Page 5: ...another power cord make sure that it is certified by the applicable national standards when not provided by the supplier If the power cable is faulty in any way please contact the manufacturer or the nearest authorized repair service provider for a replacement Precautions in moving the product WARNING Make sure to turn off the product You may be electrocuted or the product can be damaged Make sure...

Page 6: ...rce code under GPL LGPL MPL and other open source licenses that is contained in this product please visit http opensource lge com In addition to the source code all referred license terms warranty disclaimers and copyright notices are available for download LG Electronics will also provide open source code to you on CD ROM for a charge covering the cost of performing such distribution such as the ...

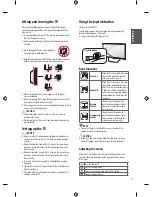
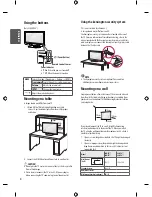
Page 7: ... screen from scratches If you don t fasten the screw tightly TV will fall down and get damaged Tighten the screws firmly to prevent theTV from tilting forward Do not over tighten Lift up the latch at the bottom of the stand base and detach the stand base from theTV Using the joystick button Only 22 24 28 29MT47 You can simply operate theTV functions pressing or moving the joystick button up down l...

Page 8: ... security system or visit http www kensington com Connect the Kensington security system cable between theTV and a table NOTE The Kensington security system is optional You can obtain additional accessories from most electronics stores Mounting on a wall For proper ventilation allow a clearance of 10 cm on each side and from the wall Detailed installation instructions are available from your deale...

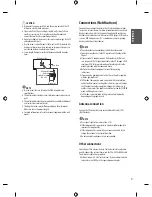
Page 9: ...ers or cameras gaming devices and other external devices NOTE The external device connection may differ from the model Connect external devices to theTV regardless of the order of the TV port If you record aTV programme on a DVD recorder orVCR make sure to connect theTV signal input cable to theTV through a DVD recorder orVCR For more information of recording refer to the manual provided with the ...

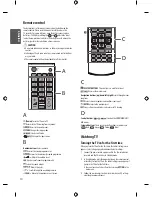
Page 10: ...s the sound output Mutes all sounds Scrolls through the saved programmes Moves to the previous or next screen P FAV TEXT C D C TELETEXT BUTTONS These buttons are used for teletext Accesses the main menus Navigation buttons up down left right Scrolls through menus or options Selects menus or options and confirms your input Returns to the previous level Clears all on screen displays and returns toTV...

Page 11: ...he Navigation buttons and then select the desired programme number with the Navigation buttons or Number buttons 11 Press the Navigation buttons to scroll to Search 12 Press the Navigation buttons to scroll and start Searching 13 Press the OK to store it 14 When you return to the previous menu press BACK NOTE To store another programme repeat steps 3 to 13 Assigning a station name You can assign a...

Page 12: ...on to scroll to one of the Input sources and press OK AV Watch video from aVCR or other external devices RGB PC View a PC display on the screen HDMI Watch video from a HTS or other high definition devices Antenna WatchTV over the air and cable broadcast Entertainment Image shown may differ from yourTV Connecting USB storage devices CAUTION Do not turn theTV off or remove a USB storage device while...

Page 13: ...4 2 6 MOVIE LIST Page1 1 No Marked Top Folder DriveA DriveA 4 folders s 2 file s Up Folder ꔂ Move ꔉ PopUp Menu ꔵ Move Page ꘂ Mark Exit No Description 1 Moves to the upper level folder 2 Preview Displays the thumbnail folder name of the file in the selected folder 3 Current page Total pages 4 Total number of marked files 5 Contents under the folder focused on 1 6 Available buttons on the remote con...

Page 14: ... photo if the resolution of the rotated width is larger than the supported resolution size Hide Hides the option window To display the options press OK Q MENU options for photo list 1 Press Q MENU A pop up window will appears 2 Press the Navigation buttons to scroll to Set photo view and press OK 3 Press the Navigation buttons to scroll to one of the following options and press OK Set photo view S...

Page 15: ...he playback Scans backward in a file Scans forward in a file Show the Option menu Hide the menu on the full sized screen Return to normalTV viewing Skips to specific points in a file during playback The time of a specific point will appear on the status bar In some files this function may not work properly Tips for using playing video files Some user created subtitles may not work properly Some sp...

Page 16: ...e Size by pressing Q MENU or accessing Aspect Ratio in the PICTURE menu When you select the SetVideo 1 Press the Navigation buttons to scroll to make appropriate adjustments When you select the Set audio 1 Press the Navigation buttons to scroll to show the Sound Mode AutoVolume Balance 2 Press the Navigation buttons to scroll to make appropriate adjustments DivX VOD Guide DivX VOD Registration In ...

Page 17: ...en the picture is not clear especially when characters are shaky after the auto configuration Reset Restores the options to the default setting Basic image options Backlight Adjusts the brightness of the screen by controlling the LCD backlight If you decrease the brightness level the screen becomes darker and the power consumption will be reduced without any video signal loss Contrast Increases or...

Page 18: ...to the loudspeakers DUAL I I Sends the secondary broadcast language to the loudspeakers DUAL I I I Sends a separate language to each loudspeaker Nicam Reception If theTV is equipped with a receiver for NICAM reception high quality NICAM Near Instantaneous Companding Audio Multiplex digital sound can be received Sound output can be selected according to the type of broadcast received 1 When NICAM m...

Page 19: ... button to switch off teletext The previous mode reappears SimpleText Page selection 1 Enter the desired page number as a three digit number with the NUMBER buttons If during selection you press a wrong number you must complete the three digit number and then re enter the correct page number 2 The ꕌPꕍ button can be used to select the preceding or following page Programming a colour button in LIST ...

Page 20: ...r LCD to prevent image burn Troubleshooting General Cannot control theTV with the remote control Check the remote control sensor on the product and try again Check if there is any obstacle between the product and the remote control Check if the batteries are still working and properly installed to to No image display and no sound is produced Check if the product is turned on Check if the power cor...

Page 21: ...on and frequency are supported by the product If the frequency is out of range set to the recommended resolution using the display settings on the external device Thin lines appear in the background of the screen Check the video cable connections The reception on some programme is poor Scroll to other programme There may a problem with the broadcast The station signal may be weak Aim the antenna t...

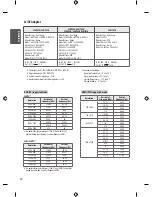
Page 22: ...33 75 60 00 56 25 50 00 67 432 59 94 67 5 60 00 27 24 00 33 75 30 00 26 97 23 97 33 716 29 976 AC DC Adapter 22MT47A 24MT47A 22MT48A 24MT48A 22MT48N 24MT48N 28MT47A 29MT47A Manufacturer Lien Chang Model LCAP16A E LCAP16A A LCAP21A Manufacturer Honor Model ADS 40FSG 19 19032GPG ADS 40FSG 19 19032GPCU ADS 45EI 19 19032GPI ADS 40LSI 19 2 19032GPI ADS 40SG 19 3 19032G Manufacturer APD Model WA 32C19FI...

Page 23: ...policies http www lg com global sustainability environment take back recycling jsp Disposal of your old appliance 1 When this crossed out wheeled bin symbol is attached to a product it means the product is covered by the e waste Management and Han dling Rules 2011 2 All electrical and electronic products should be disposed of separately fromthemunicipalwastestreamviadesignatedcollectionfacilitiesa...

Page 24: ... before using the product Keep the Owner s Manual in an accessible place for future reference The model and serial numbers of the TV are located on the back and on one side of the TV Record them below should you ever need service MODEL SERIAL ...

Reviews: