background image

SMART FUNCTIONS

24

ENGLISH

Smart Diagnosis

This feature is only available on models with 

the 

 logo.

Use this feature to help you diagnose and 

solve problems with your appliance.

NOTE


For reasons not attributable to LGE’s 

negligence, the service may not operate 

due to external factors such as, but not 

limited to, Wi- Fi unavailability, Wi-Fi 

disconnection, local app store policy, or 

app unavailability.


The feature may be subject to change 

without prior notice and may have a 

different form depending on where you are 

located.

Using LG ThinQ to Diagnose 

Issues

If you experience a problem with your Wi-

Fi equipped appliance, it can transmit 

troubleshooting data to a smartphone using 

the 

LG ThinQ

 application.


Launch the 

LG ThinQ

 application and 

select the 

Smart Diagnosis

 feature in the 

menu. Follow the instructions provided in 

the 

LG ThinQ

 application.

Using Audible Diagnosis to 

Diagnose Issues

Follow the instructions below to use the 

audible diagnosis method.


Launch the 

LG ThinQ

 application and 

select the Smart Diagnosis feature in the 

menu. Follow the instructions for audible 

diagnosis provided in the 

LG ThinQ


application.

1

Press and hold the 

Off Timer

 button 

for 5 seconds or more to execute the 

Smart Diagnosis function.

2

Hold the phone on the   logo on the 

back of the appliance.

3

After the data transfer is complete, 

the diagnosis will be displayed in the 

application.

NOTE


For best results, do not move the phone 

while the tones are being transmitted.

Summary of Contents for MD16GQSA1

Page 1: ...018 2021 LG Electronics Inc All Rights Reserved MFL68026038 Rev 01_011421 OWNER S MANUAL DEHUMIDIFIER Please read this manual carefully before operating your set and retain it for future reference MD19GQGA1 MD16GQSA1 ENGLISH ...

Page 2: ...oduct Doing so could result in fire or electric shock Do not store or use flammable gases or materials near the dehumidifier Doing so could result in fire or product malfunction This appliance is not intended for use by persons including children with reduced physical sensory or mental capabilities or lack of experience and knowledge unless they have been given supervision or instruction concernin...

Page 3: ...entilated especially if you are using a combustion appliance as well Inad equate ventilation reduces the oxygen level in the air Always hold the plug head when pulling the power plug Failure to do so could result in electric shock or injury Do not use excessive force when pulling the extension hose Doing so could result in damage to or deformation of the hose Do not use the product in places where...

Page 4: ...or rain The product could overheat causing fire or electric shock Do not touch the product with wet hands Doing so could result in electric shock Position the product on a firm stable surface If the product is on an unstable surface it may vibrate and make noise If the product is tilted or laid down the dehumidified water could overflow and the product could malfunction Do not keep the power cord ...

Page 5: ... Drying 15 Ionizer 15 Defrost Operation 15 Auto Clean 16 Bucket full 17 OFF Timer 17 Timer function 18 Lock Function 19 How to empty water tank 20 How to Continuous Drainage Setup 21 Product registration through Wi Fi func tion 22 SMART FUNCTIONS 22 LG ThinQ Application 25 HOW TO CLEAN 25 How to clean the exterior and inlet of the dehumidifier 25 How to clean water tank 26 How to clean Pre Filter ...

Page 6: ...eze At 32 C or higher the dehumidifier may stop running automatically to protect itself from over heating The room temperature increases while the dehumidifier is running This dehumidifier does not have temperature control functions The dehumidifier generates heat while operating raising the room temperature by about 2 C or 3 C depending on the usage conditions room air pressure and room size The ...

Page 7: ...nd Pre Filter Wheels for moving Power plug hanging part Inlet Hose cover Power plug Rubber Cap It absorbs the air and moisture in the room The components are at the top part of the product packaging box The form of water container may differ in each product Extension hose Shoes drying kit Laundry drying kit Back side Components NAME OF EACH PART Front side ...

Page 8: ... the button for 3 seconds Wi Fi pairing is operated Buttons to turn off Wi Fi Register to the app pressing and holding the Start Stop button and the Wind strength control button at the same time for more than 3 seconds turns off Wi Fi After finishing product registration and while Wi Fi is off pressing and holding the button for more than 3 seconds turns on Wi Fi and you can control the product fr...

Page 9: ...oes not have a cooling heating function Heat is generated during the operation so the temperature may be increased by about 2 C 3 C according to the usage conditions indoor temperature size of the room Operation will restart after 3 minutes If it is restarted right after the stop the compressor will start about 3 minutes after to protect the product It automatically protects the product during the...

Page 10: ...ode The selected operation indicator lamp is lighted The selected operation mode starts after 3 seconds Press Humidity Control button to change humidity Desired humidity can be set to 30 35 40 45 50 55 60 65 70 Humidity can be set with the units of 5 During the humidity setting desired humidity is displayed on the humidity display part and the current humidity is displayed after about 5 seconds Cu...

Page 11: ...he product stops Smart Dehumidification To maintain pleasant indoor condition If you press Operation Mode button to select Smart dehumidification mode and set the desired humidity it maintains the humidity set by the user Once the humidity level reaches the desired humidity the compressor stops and only the fan operates If relative humidity goes up it will operate dehumidification again The wind s...

Page 12: ...cation When you want to remove indoor moisture quickly Press Operation Mode button to select Jet dehumidification mode Under Jet dehumidification mode it will change to Smart dehumidification mode after 60 minutes Even if it is under power wind Po operation high wind indicator lamp is lighted When it is in Jet dehumidification mode if you select Humidity control button or Speed button it switches ...

Page 13: ...ing direction Connect shoes drying kit or laundry drying kit to the extension hose Extension hose Spot Drying When you need spot drying of shoes closet etc Press Operation Mode button to select Spot drying mode In Spot drying mode the louver is closed Wind amount is set to high wind and humidity control the wind amount is not operational The current humidity is displayed in the humidity display wi...

Page 14: ...AUTION When drying laundry be careful not to have laundry water drop on to the dehumidifier Laundry Drying When you want to dry laundry continously regardless of the ambient humidity Press Operation Mode button to select Laundry drying mode The wind strength is set to high at default and you can change the wind strength You cannot set desired humidity Louver operates up and down h The form of wate...

Page 15: ...ll run the fan for a certain period in order to remove moisture inside the product Duration about 5 minutes Defrost Operation If there is frost in the heat exchanger due to low indoor temperature it automatically re moves the frost During the operation if dF is displayed on the display it automatically runs the defrost in the heat exchanger inside the product Compressor is stopped during the autom...

Page 16: ... When you move the product or shock is imposed to the product Bucket full lamp may be lighted Drain the water inside the water tank and reassemble the water tank Bucket full When the water tank is full operation automatically stops bucket full lamp is lighted and warning buzzer sounds Warning buzzer will sound one more time after 1 minute When the full water is detected the dehumidification functi...

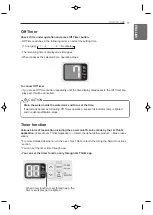
Page 17: ...de by the LG ThinQ application Execute LG ThinQ Application Select the dehumidifier product Make reser vation For more detailed description on the use of LG ThinQ refer to the Using the Smart Functions section You can set the timer time through app You can set the timer function only through LG ThinQ app Off Timer Check if it is under operation and press Off Timer button Off Timer switches in the ...

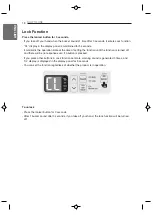
Page 18: ...ting the function until the function is turned off and there will be no response even if a button is pressed If you press other buttons in Lock function set state warning sound is generated 3 times and CL display is displayed in the display panel for 5 seconds You can set the function regardless of whether the product is in operation To unlock Press the Ionizer button for 3 seconds After 1 buzzer ...

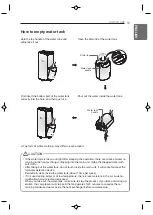
Page 19: ...s moisture in the air so dehu midification amount is also decreased When you take out the water tank make sure to stop the product If you take out during op eration the compressor will stop and the fan operates for 5 minutes to vaporize the re maining condensed water inside the heat exchanger before complete stop Hold the top handle of the water tank and softly take it out Open the drain lid of th...

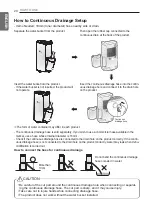
Page 20: ...o the contin uous drainage hole and connect it to the drain hole on the product The form of water container may differ in each product The continuous drainage hose is sold separately If you wish to use a commercial hose available in the market use a hose whose internal diameter is 16 mm Check if the continuous drainage hose is connected to the drain hole on the product correctly If the contin uous...

Page 21: ... the information Wi Fi network name password of AP at the place where the de humidifier is installed 3 Proceed with the product registration after log in through the smart phone s LG ThinQ app For Wi Fi function registration according to app guide press Speed button for 3 or more sec e d i u g n o i t c e n n o c p p A Q n i h T o LG t r e f e r s l i a t e d r o F s d n o Check if the product dis...

Page 22: ...n the appliance and the wireless router is too far the signal strength becomes weak It may take a long time to register or installation may fail 2 Turn off the Mobile data or Cellular Data on your smartphone 3 Connect your smartphone to the wireless router NOTE To verify the Wi Fi connection check that Wi Fi icon on the control panel is lit The appliance supports 2 4 GHz Wi Fi networks only To che...

Page 23: ...earch for the LG ThinQ application from the Google Play Store or Apple App Store on a smartphone Follow instructions to download and install the application Open Source Software Notice Information To obtain the source code under GPL LGPL MPL and other open source licenses that is contained in this product please visit http opensource lge com In addition to the source code all referred license term...

Page 24: ...ransmit troubleshooting data to a smartphone using the LG ThinQ application Launch the LG ThinQ application and select the Smart Diagnosis feature in the menu Follow the instructions provided in the LG ThinQ application Using Audible Diagnosis to Diagnose Issues Follow the instructions below to use the audible diagnosis method Launch the LG ThinQ application and select the Smart Diagnosis feature ...

Page 25: ...ove dust using vacuum cleaner or soft brush How to clean water tank Press the fixing part on both sides of the water tank to take out the lid Wipe the water inside the water tank Soft cloth Do not open the lid There is a float to detect full water inside CAUTION Do not use the following material It may damage the exterior thinner ben zene acid sponge etc CAUTION If the float is fallen off or assem...

Page 26: ...ght to take it out Completely dry in shade and push to the left until the Pre Filter is not pushed any more Clean the Pre Filter with vacuum cleaner or soft brush If the contamination is severe wash with water using neutral detergent Do not use hot water of 40 C or higher The cleaning period for Pre Filter is 1 month How to clean Pre Filter The form of water container may differ in each product HO...

Page 27: ...ilter If it is dried under sunlight it may be deformed During the drying avoid fire or direct sunlight but dry in shadow After drying at a place without direct sunlight and with good ventilation for about half a day make sure to store with covering it up and have it stand straight up to prevent dust entering A separate cover for product storage is not provided The form of water container may diffe...

Page 28: ... for less dehumidification to take place in the winter and in dry areas Remove the obstruction Clean the filter Humidity does not seem to decrease much even though the product is run ning in dehumidifi cation mode Is the door window open Is the room too big Is there an object generating steam nearby Close the door window Use the dehumidifier in an adequately sized room Do not use the dehumidifier ...

Page 29: ...ations may change to enhance the quality of the product PRODUCT SPECIFICATIONS Height Height Height Depth Width Width Depth Height Model MD16GQSA1 MD19GQGA1 Power AC 220 240V 50 Hz AC 220 240V 50 Hz External Dimensions Height x Width x Depth 715 mm X 382 mm X 296 mm 715 mm X 415 mm X 296 mm ...

Page 30: ......

Reviews: