


5-4
Copyright ©
LG Electronics Inc. All rights reserved.
Only training and service purposes
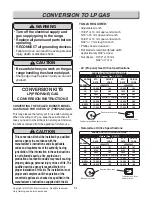
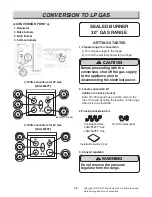
CONVERSION TO LP GAS
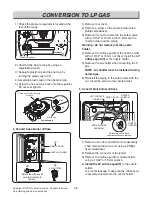
6. Convert cooktop burner orifices
GRATE
BURNER CAP
BURNER HEAD
COOK TOP
BURNER
BODY
ORIFICE (NOZZLE)
VENT GRILLE
1) Remove grates, burner caps and burner heads.
2) Remove the nozzle cover on the Dual burner
body. (Applied model : LSGL6337F)
3) Remove the brass orifice spud in the chimney
of each burner using a 9/32” or 7 mm nut driver.
4) Install the LP orifice spuds into their correct
positions as described previously.
5) To prevent leakage, make sure the orifice spuds
are securely screwed into the gas supply tubes.
6) Put the old orifice spuds into conversion kits
and place back on the range for possible future
conversion.
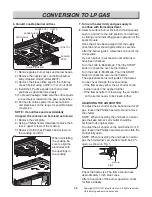
NOTE : If an orifice spud is accidentally
dropped, the cooktop can be raised as follows:
1) Remove the vent grille.
2) Using a Phillips head screwdriver remove the 5
rear, 2 upper screws of the cooktop.
3) Remove (13 EA) hex-Phillips head screws on
the cooktop and lift it.
When reinstalling
the cooktop be
sure to align the
electrodes with
the openings in
the cooktop.
7. Turn on the electricity and gas supply to
continue with flame adjustment.
8. Select a surface burner knob and simultaneously
push in and turn to the Lite position. You will hear
a clicking sound indicating proper operation of the
spark module.
Once the air has been purged from the supply
lines the burner should ignite within 4 seconds.
After the burner ignites, rotate the knob out of the
Lite position.
Try each burner in succession until all burners
have been checked.
Turn the knob to Bake Mode, Then the START
button to check the oven burner flames.
Turn the knob to Broil Mode, Then the START
button to check the oven burner flames.
The appropriate burner will ignite so the flames
can be check through the oven window.
– If the flames are yellow, the air shutter on the
burner needs to be opened further.
– I f the flames flutter or blow away, the air shutter
on the burner needs to be closed further.
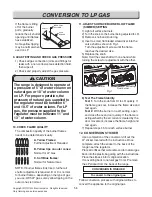
ADJUSTING THE AIR SHUTTER
To adjust the air shutter on the bake burner for LP
gas, loosen the Phillips head screw and remove
the shutter.
NOTE: When converting the unit back to natural
gas the bake burner’s air shutter should be
restored to its original state.
To adjust the air shutter on the broil burner for LP
gas, loosen the Phillips head screw and rotate the
shutter fully open.
NOTE: When converting the unit back to natural
gas the broil burner’s air shutter should be 50 %
open, as shown in Fig. 1.
Fig.1
Screw
Air Shutter
Check the flame size. The flame should have
approximately 1-inch blue cones.
After 30 seconds of the burner operation, check
for flame stability.
Summary of Contents for LSGL6337D
Page 88: ......


