


5-3
Copyright ©
LG Electronics Inc. All rights reserved.
Only training and service purposes
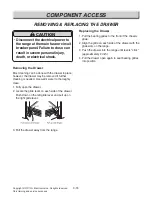
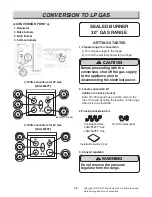
CONVERSION TO LP GAS
1) Remove rear cover.
2) Remove a screw on the nozzle holder with a
phillips screwdriver.
3) Remove the nut connected to the safety valve
with a 13/32” or 10 mm wrench. Remove the
nozzle holder and the piping.
Warning : Do not remove just the nozzle
holder.
4) Remove the orifice spud from the nozzle holder
with a 13/32” or 10 mm nut driver. Install the LP
orifices spud (Y) to the nozzle holder.
5) Remove the air shutter when converting to LP
gas.
NOTE : Air shutter must be installed if using
natural gas.
6) Reinstall the piping to the safety valve with the
nut. Insert the screw in the nozzle holder.
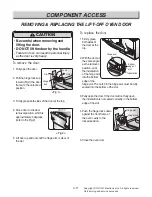
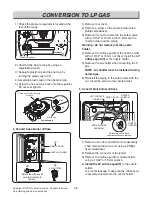
5. Convert broil burner orifices
BROIL BURNER
ASSEMBLY
Rotate the orifice spud
counterclockwise to remove
NOZZLE
HOLDER
WIRE COVER
ORIFICE
(NOZZLE)
HOT SURFACE
IGNITER
1) Remove oven door and broil burner assembly.
Then remove the wire cover using a Phillips
head screwdriver.
2) Release the connector of the igniter.
3) Remove the orifice spud from nozzle holder
using a 13/32” or 10 mm wrench.
4) Install the LP orifices spud(F) to the nozzle
holder.
To prevent leakage, make sure the orifice spud
is securely screwed into the nozzle holder.
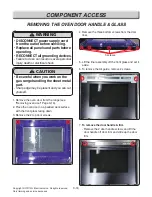
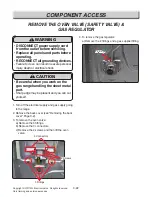
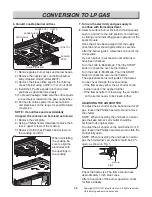
1) Check the pressure regulator is located at the
rear of the range.
Pressure Regulator
2) Unscrew the hex-nut cap by using an
adjustable wrench.
3) Separate plastic cap and hex-nut cap by
turning the plastic cap to 90°.
4) Assemble plastic cap on the opposite side.
5) Screw the hex-nut cap back onto the regulator.
Do not over tighten.
Rotate cap counterclockwise
to remove.
Plastic Cap
Cap Assembly
NAT
LP
4. Convert bake burner orifices
④
⑤
②
③
Rotate the orifice spud
counterclockwise to
remove.
REAR COVER
NOZZLE HOLDER
AIR SHUTTER
①
Summary of Contents for LSGL6337D
Page 88: ......


