background image

ENGLISH

Owner’s Manual  9

Electrical Safety

Electrical Safety

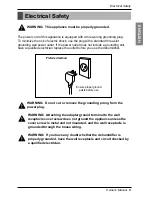
WARNING:  This appliance must be properly grounded.

The power cord of this appliance is equipped with a three-prong grounding plug.
To minimize the risk of electric shock, use the plug with a standard three-slot
grounding wall power outlet. If the power outlet does not include a grounding slot,
have a qualified electrician replace the outlet before you use the dehumidifier.

WARNING:  Do not cut or remove the grounding prong from the

power plug.  

WARNING:  Attaching the adapter ground terminal to the wall
receptacle cover screw does not ground the appliance unless the
cover screw is metal and not insulated, and the wall receptacle is
grounded through the house wiring.

WARNING:  If you have any doubt whether the dehumidifier is
properly grounded, have the wall receptacle and circuit checked by
a qualified electrician.

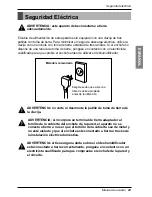
Preferred method

Ensure proper ground

exists before use

Summary of Contents for LHD459EL

Page 1: ...this owner s manual for future reference after reading it thoroughly DESHUMIDIFICADOR MANUAL DEL PROPIETARIO Le rogamos que guarde este manual del usuario para futura refer encia después de leerlo completamente MODELS MODELOS LHD45EL LHD65EL H S I L G N E L O Ñ A P S E LHD65EBL ...

Page 2: ... answers to common problems in the chart of troubleshooting tips If you review our chart of Troubleshooting Tips first you may not need to call for service at all PRECAUTION Contact the authorized service technician for repair or maintenance of this unit Contact the installer for installation of this unit The dehumidifier is not intended for use by young children or invalids without supervision Yo...

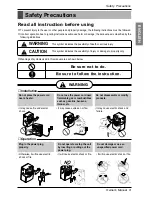
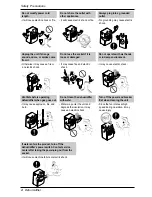
Page 3: ...e to property only Be sure not to do Be sure not to do Be sure to f Be sure to follo ollow the instruction w the instruction W WARNING ARNING Plug in the power plug properly Otherwise it will cause electric shock or fire Do not operate or stop the unit by inserting or pulling out the power plug It will cause electric shock or fire Do not damage or use an unspecified power cord It will cause electr...

Page 4: ...and electric shock Do not operate with wet hands or in damp environment It may cause electric shock Ventilate before operating defumidifier when gas goes out It may cause explosion fire and burn Do not clean the dehumidifier with water Water may enter the unit and degrade the insulation It may cause an electric shock Turn off the power and breaker first when cleaning the unit Since the fan rotates...

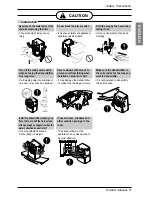
Page 5: ...n and it may cause an accident Secure wheels with blocks to prevent unit from falling when installed on a table or shelf It may damage the dehumidifier or cause other damage or injury Make sure the dehumidifier is the correct size for the area you want to dehumidify It is not designed to dehumidify the entire house ENERGY STAR ENERGY STAR Install the dehumidifier properly on a floor table or shelf...

Page 6: ...ure model will continuously cycle up down temperature 42 F 6 C Low temperatures could cause coils to frost Wax Thinner Do not put a pet or house plant where it will be exposed to direct air flow This could injure the pet or plant Do not use this appliance for special purposes such as pets foods precision machinery or art objects It is a general use appliance not precision equipment Do not use the ...

Page 7: ...xygen supply may be inadequate 3 Do not use this dehumidifier for non specified special purposes e g preserving precision devices food pets plants and art objects Such usage could damage the items 1 Do not touch the metal parts of the unit when removing the filter Injuries can occur when handling sharp metal edges 2 Do not use water to clean inside the dehumidifier Exposure to water can destroy th...

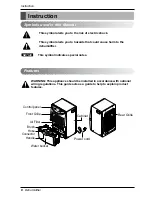
Page 8: ...TICE WARNING This appliance should be installed in accordance with national wiring regulations This guide acts as a guide to help to explain product features Features Symbols used in this Manual Fan Spe ed Au to Restart Tim er Hig h Low 4 hr On Of f 2 hr On Of f Hu mid ity Co ntr ol Bu cke t ful l Power cord Cabinet Control panel Water bucket Front Grille Air Filter Handle Brush Hose Connector Rea...

Page 9: ...ified electrician replace the outlet before you use the dehumidifier WARNING Do not cut or remove the grounding prong from the power plug WARNING Attaching the adapter ground terminal to the wall receptacle cover screw does not ground the appliance unless the cover screw is metal and not insulated and the wall receptacle is grounded through the house wiring WARNING If you have any doubt whether th...

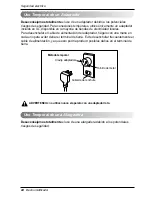
Page 10: ...es To disconnect the power cord from the adapter use one hand on each to avoid damaging the ground terminal Avoid frequently unplugging the power cord as this can lead to eventual ground terminal damage WARNING Never use the appliance with a broken adapter We strongly discourage the use of an extension cord due to potential safety hazards Temporary Use of an Extension Cord Temporary method Adapter...

Page 11: ...2 or 4 hours The cycle will repeat until you change the setting When TIMER key is pressed the TIMER indicator lights shift from 2hr On Off to 4hr On Off 6 BUCKET FULL Indicator This light glows when the bucket is full and needs to be emptied It also glows when the bucket is not properly positioned When bucket full indicator light glows the compressor and fan will turn OFF 7 AUTO RESTART Once the p...

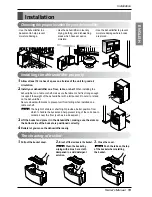
Page 12: ...ter to drop on the base pan or the floor Empty the bucket when the indicator light turns on It is advisable to carry the bucket by supporting it from the bottom as well as by the handle Carrying by only the handle may cause the handle or bucket cover to break 1 Remove the drain hole cover 2 Connect a garden hose to the threaded drain hose connector 3 Push hose connector tightly to the drain hole o...

Page 13: ... dehumidifier on a table or shelf make sure the table or shelf is strong enough to support the weight of the dehumidifier with a full bucket Do not sit or stand on the dehumidifier Secure wheels with blocks to prevent unit from falling when installed on a table or shelf The height of a table or shelf might provide a better position from which to handle the bucket and help prevent icing of the coil...

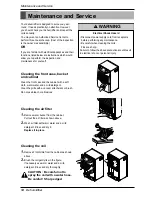
Page 14: ... case bucket and cabinet Clean the front case and the cabinet with a soft cloth warm water and a mild detergent Clean the grille with a vacuum attachment or brush Do not use bleach or abrasives Cleaning the air filter 1 Remove water bucket from the cabinet Pull out the air filter as shown above 2 Wash air filter with warm water and a mild detergent Rinse and dry it Replace it in place Cleaning the...

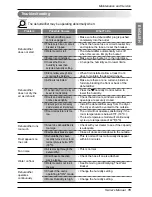
Page 15: ... and windows to the outside This is normal Frost will usually disappear within 60 minutes This is normal Check the hose if one is attached See Removing and Emptying The Water Bucket Problem Possible Causes What To Do Dehumidifier does not start Dehumidifier does not dry the air as it should Dehumidifier runs too much Frost appears on the coils Fan noise Water on floor In case the Room humidity is ...

Page 16: ...os para la solución de problemas Si en primer lugar revisa nuestro cuadro de consejos para la solución de problemas es posible que no tenga necesidad de llamar al servicio técnico PRECAUCIÓN Póngase en contacto con un técnico del servicio autorizado para las reparaciones o el mantenimiento de esta unidad Póngase en contacto con un instalador para la instalación de esta unidad El deshumidificador n...

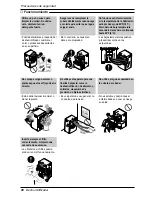
Page 17: ...años sólo materiales No lo haga Siga las instrucciones AD ADVER VERTENCIA TENCIA Enchufe la clavija correctamente De lo contrario puede ocasionar un incendio o una descarga electrica No encienda ni apague la unidad insertando o retirando la clavija Causará una descarga eléctrica o incendio No dañe el cable ni utilice un cable de alimentación no especificado Podría producirse una descarga eléctrica...

Page 18: ...e la unidad con las manos mojadas o en un entorno húmedo Puede causar una descarga eléctrica o incendio Si observa que entra agua en el producto apague el interruptor de contacto del deshumidificador Después de retirar la clavija del enchufe póngase en contacto con el centro de servicio técnico Causara fallo de la maquina o descarga electrica Si hay una fuga de gas ventile la habitación antes de u...

Page 19: ...identes Asegure las ruedas con bloques para evitar que la unidad se caiga cuando esta instalada sobre una mesa o estanteria Podría dañarse el deshumidificador o producir otros daños o lesiones Asegúrese de que el deshumidificador tiene la capacidad adecuada para la zona que desea deshumidificar No está diseñado para enfriar la casa entera ENERGY STAR ENERGY STAR Instale el deshumidificador correct...

Page 20: ...peratura ascenderá de manera continuada hasta 42 F 6 C Las bajas temperaturas podrían producir escarcha en los serpentines Wax Thinner No coloque ningún animal o planta expuestos al flujo de aire directo Esto podria lesionar al animal o danar la planta No utilice este aparato para una finalidad especial como la deshumidificación de alimentos animales maquinaróa de precisión u objetos artisticos Es...

Page 21: ...shumidificador para finalidades no especificadas p ej preservar dispositivos de precisión alimentos animales plantas y objetos de arte Tal uso podría dañar estos elementos 1 No toque las partes metálicas de la unidad cuando retire el filtro Podrían producirse lesiones con los bordes metálicos afilados 2 No utilice agua para limpiar el interior del deshumidificador La exposición al agua puede destr...

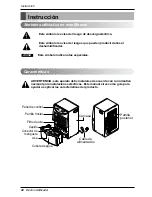
Page 22: ...uerdo con la normativa nacional para instalaciones eléctricas Este manual sirve como guía para ayudar a explicar las características del producto Cable de alimentación Carcasa Panel de control Parrilla frontal Filtro de aire Parrilla posterior Fan Spe ed Au to Restart Tim er Hig h Low 4 hr On Of f 2 hr On Of f Hu mid ity Co ntr ol Bu cke t ful l Asa Cepillo Conector de manguera Cubeta de agua Inst...

Page 23: ...dificador ADVERTENCIA no corte ni desmonte la patilla de toma de tierra de la clavija ADVERTENCIA si incorpora un terminal de tierra adaptador al tornillo de la cubierta del enchufe de la pared el aparato no se conecta a tierra a no ser que el tornillo de la cubierta sea de metal y no esté aislado y que el enchufe esté conectado a tierra a través de la instalación eléctrica doméstica ADVERTENCIA s...

Page 24: ...ión del adaptador hágalo con una mano en cada uno para evitar dañar el terminal de tierra Evite desenchufar frecuentemente el cable de alimentación ya que esto podría producir posibles daños en el terminal de tierra ADVERTENCIA no utilice nunca el aparato con un adaptador roto Desaconsejamos totalmente el uso de una alargadera debido a los potenciales riesgos de seguridad Método temporal Clavija a...

Page 25: ...nte durante 2 ó 4 horas El ciclo se repetirá hasta que cambie el ajuste Cuando se pulsa la tecla TIMER el piloto indicador TIMER cambia de 2hr On Off a 4hr On Off 6 Indicador BUCKET FULL este piloto se ilumina cuando la cubeta está llena y es necesario vaciarla También se ilumina cuando la cubeta no está colocada correctamente Cuando el piloto de cubeta llena se ilumina se apaga el compresor y el ...

Page 26: ... la cubeta cuando la luz se encienda Se aconseja llevar la cubeta apoyandola desde abajo ademas de ayudarse del asa Llevarlo solo del asa puede provocar que esta o la cubeta se rompan 1 Retire la cubierta del orificio de drenaje 2 Conecte una manguera de jardinería al conector roscado de la manguera de drenaje 3 Empuje firmemente el conector de la manguera hacia el orificio de drenaje de la parril...

Page 27: ...a es suficientemente resistente para soportar el peso del deshumidificador con la cubeta llena de agua No se siente ni se apoye sobre el deshumidificador Asegure las ruedas con bloques para evitar que la unidad se caiga cuando esta instalada sobre una mesa o estanteria La altura de la mesa o estantería debe proporcionar una mejor posición para coger la cubeta y ayudar a prevenir la congelación de ...

Page 28: ...ie el panel frontal y la carcasa con un paño suave agua tibia y detergente suave Limpie la parrilla con un aspirador o cepillo No utilice blanqueadores ni abrasivos Limpieza del filtro de aire 1 Saque la cubeta de agua de la carcasa Retire el filtro de aire como se muestra arriba 2 Limpie el filtro de aire con agua tibia y un detergente suave Enjuáguelo y séquelo Vuelva a colocarlo en su sitio Lim...

Page 29: ... deshumidificar es demasiado grande Consulte con su distribuidor para comprobar si la capacidad es adecuada El aire está circulando por el deshumidificador Es normal Compruebe si la unidad está funcionando en modo ON Cambie el ajuste de humedad Cambie el ajuste de humedad Cierre todas las puertas y ventanas comunicadas con el exterior Es posible que la secadora de ropa esté expulsando aire cargado...

Page 30: ...30 Deshumidificador Nota ...

Page 31: ... accidente fuego inundaciones instalación inadecuada fuerza mayor modificaciones o alteraciones no autorizadas corriente eléctrica o tensión incorrecta o uso comercial o usos distintos a aquellos para los que fue diseñado 3 Por lo tanto los costes de reparación o sustitución de un producto defectuoso deberá correr por cuenta del consumidor Conserve su ticket y recibo de compra para probar la fecha...

Page 32: ...uide accident vermin fire flood improper installation acts of God unauthorized modification or alteration incorrect electrical current or voltage or commercial use or use for other than intended purpose 3 Therefore the cost of repair or replacement of such a defective product shall be borne by the consumer Retain your Sales Receipt to prove date of purchase A copy of your Sales Receipt must be sub...

Reviews: