6
2.2 S/W Features
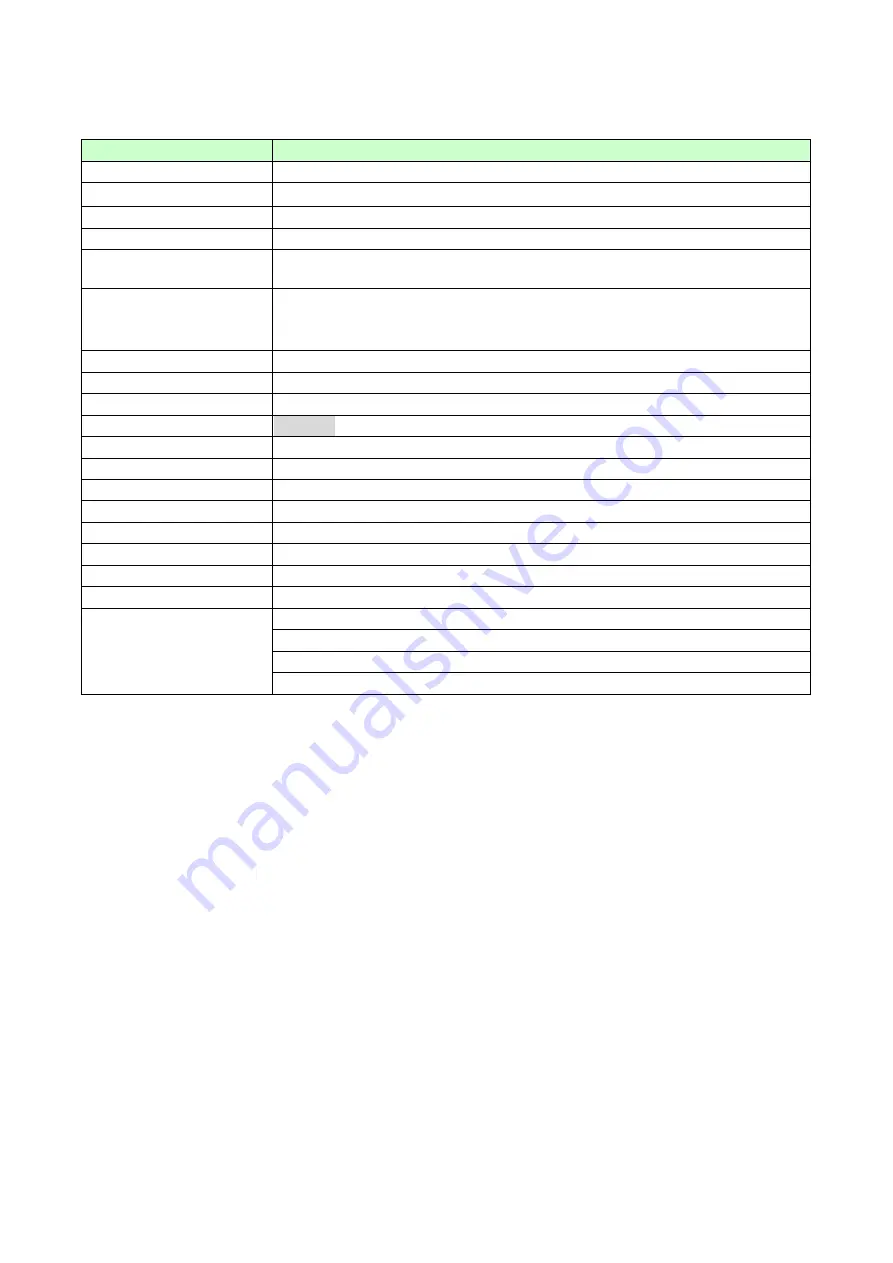
2-2-1 System Specification
Item
Target Specification
Form Factor
Bar Type
Size
110*48.6*14mm
Weight
(TBD)
Battery
3.7V, 950mAh
Talk Time
5.5hrs@ 950mAh (GSM900 PCL10)
7.5hrs @ 950mAh (DCS1800 PCL10)
Standby Time
330 hrs @ 950mAh (GSM900 P.P.: 2)
470 hrs @ 950mAh (GSM900 P.P.: 5)
560 hrs
@ 950mAh (GSM900 P.P.: 9)
Antenna
Embedded type (GSM, BT, FM antenna)
LCD
262K color, 128x160 TFT
FM Radio
Yes, EU/US band only
Camera
<1.3M> Fixed Focus
Back Light
White LED
Keypad Backlight Color White LED
Vibrator
Yes
Loud Speaker
Yes
Microphone
Yes
Earphone Jack
No
SIM Socket
Yes, 1.8/3.0V
Volume Key
Side key
Travel Adaptor
Battery (950mAh, Li-Ion)
Stereo Headset w/ button
Basic Accessory
Micro USB Data Cable
Summary of Contents for GS205
Page 1: ...1 GS205 Service Manual LG Electronics ...
Page 25: ...25 3 TECHNICAL BRIEF 3 1 Digital Main Processor Figure 3 1 1 MT6226M FUNCTIONAL BLOCK DIAGRAM ...
Page 32: ...32 Figure 3 1 2 MT6226M BLOCK DIAGRAM ...
Page 45: ...45 ...
Page 46: ...46 3 8 Antenna Switch Module ESHS A085DC ...
Page 48: ...48 Figure 3 9 2 IM200BBN3A Block Diagram ...
Page 49: ...49 ...
Page 56: ...56 3 15 Camera Interface Figure 3 15 1Camera Interface ...
Page 57: ...57 3 15 1 Pin Description ...
Page 59: ...59 ...
Page 60: ...60 4 1 2 Circuit Diagram ...
Page 62: ...62 4 2 SIM Card Trouble 4 2 1 Test Point 4 2 2 Circuit Diagram ...
Page 64: ...64 4 3 Vibrator Trouble 4 3 1 Test Point 4 3 2 Circuit Diagram TP1 ...
Page 68: ...68 4 5 RTC Trouble 4 5 1 Test Point 4 5 2 Circuit Diagram TP1 TP2 ...
Page 71: ...71 4 7 LCM Trouble 4 7 1 Test Point 4 7 2 Circuit Diagram ...
Page 73: ...73 4 8 Microphone Trouble 4 8 1 Test Point 4 8 2 Circuit Diagram ...
Page 75: ...75 4 9 Receiver Trouble 4 9 1 Test Point 4 9 2 Circuit Diagram ...
Page 77: ...77 4 10 Speaker Trouble 4 10 1 Test Point 4 10 2 Circuit Diagram ...
Page 79: ...79 4 11 Headphone Trouble 4 11 1 Test Point ...
Page 84: ...84 C312 B302 2 8 0 2V C301 C302 1 8 0 2V C306 or C309 32MHz C307 32kHz ...
Page 86: ...86 FM Radio Trouble Test Point ...
Page 87: ...87 Circuit Diagram ...
Page 95: ... 95 5 DOWNLOAD 5 1 Download setup ...
Page 104: ... 104 6 BLOCK DIAGRAM ...
Page 105: ... 105 7 CIRCUIT DIAGRMA ...
Page 106: ... 106 ...
Page 107: ... 107 ...
Page 108: ... 108 ...
Page 109: ... 109 ...
Page 110: ... 110 ...
Page 111: ... 111 ...
Page 112: ... 112 ...
Page 113: ... 113 ...
Page 114: ... 114 ...
Page 115: ... 115 ...
Page 116: ... 116 ...
Page 117: ... 117 ...
Page 118: ... 118 ...
Page 119: ... 119 ...
Page 120: ... 120 ...
Page 122: ... 122 8 2 BGA PIN Check of Memory K5L5563CAA D770 K5L5563CAA D770 U502 BGA use BGA non use ...
Page 123: ... 123 8 3 BGA PIN Check of Bluetooth MT6601 MT6601 U301 BGA use BGA non use ...
Page 124: ... 124 8 4 BGA PIN Check of PMIC MT6318 MT6318 U601 BGA use BGA non use ...
Page 125: ... 125 9 PCB LAYOUT TOP ...
Page 141: ... 141 11 CALIBRATION 11 1 Test Equipment set up ...
Page 145: ... 145 ...
Page 147: ... 147 Execute Measurement Automation to check equipment address Choose Devices and Interfaces ...
Page 149: ... 149 Setup your CMU Base GPIB address and power supply address ...
Page 150: ... 150 ATE Tool system setting Execute MTK _ ate demo Press Report System button ...
Page 151: ... 151 Setting your equipment Setting your power supply type Choose your Power Supply Type ...
Page 156: ... 156 How to setup your test report location Choose my computer Choose C disk ...
Page 157: ... 157 Choose program files Choose Program Files ATE Tools KP199_KP320_KM330_KM335_KC530 file ...
Page 158: ... 158 Setup new file and leave the window Execute MTK _ ate demo ...
Page 159: ... 159 Press Report System button Press select test report location ...
Page 160: ... 160 Choose your setup report Press Done ...
Page 161: ... 161 Setup finish When you finish the setup then you press save change icon ...
Page 162: ... 162 Press Configuration choose Cal Setting Setting your cable loss ...
Page 163: ... 163 Press Done to save Press Configuration choose Final setting ...
Page 165: ... 165 If you want calibration you can press initial calibration Press Calibration Test ...
Page 166: ... 166 Key in your phone bar Code Press your phone of power on key and Start calibration ...
Page 167: ... 167 Calibration is ok and will show PASS You can see the test report ...
Page 168: ... 168 If you want final test you can press initial final test Press RF Final test ...
Page 169: ... 169 1 Handset to insert SIM card 2 Key in bar code or IMEI number 3 Power on handset ...
Page 170: ... 170 ATE start final test ...
Page 171: ... 171 If ATE test finish ATE will show pass ...
Page 172: ... 172 You can see the test report ...
Page 173: ... 173 If you want initial cal and final test you can press initial cal and final test ...
Page 174: ... 174 Press Cal Final ...
Page 175: ... 175 1 Handset to insert SIM card 2 Key in bar code or IMEI number 3 Power on handset ...
Page 176: ... 176 Start calibration ...
Page 177: ... 177 Calibration finish and power on handset again ...
Page 178: ... 178 Start final test ...
Page 179: ... 179 Finish Cal Final test ...
Page 180: ... 180 Ate show the test report ...
Page 183: ... 183 4 Install Process press Next 5 Install Process press Next 6 Install Process ...
Page 184: ... 184 7 Install Process press Finish ...
Page 185: ... 185 12 3 RF RX Check 1 Open Meta_RF_Tool 2 Pull in UART cable 3 Inset RF Cable AG8960 ...


