background image

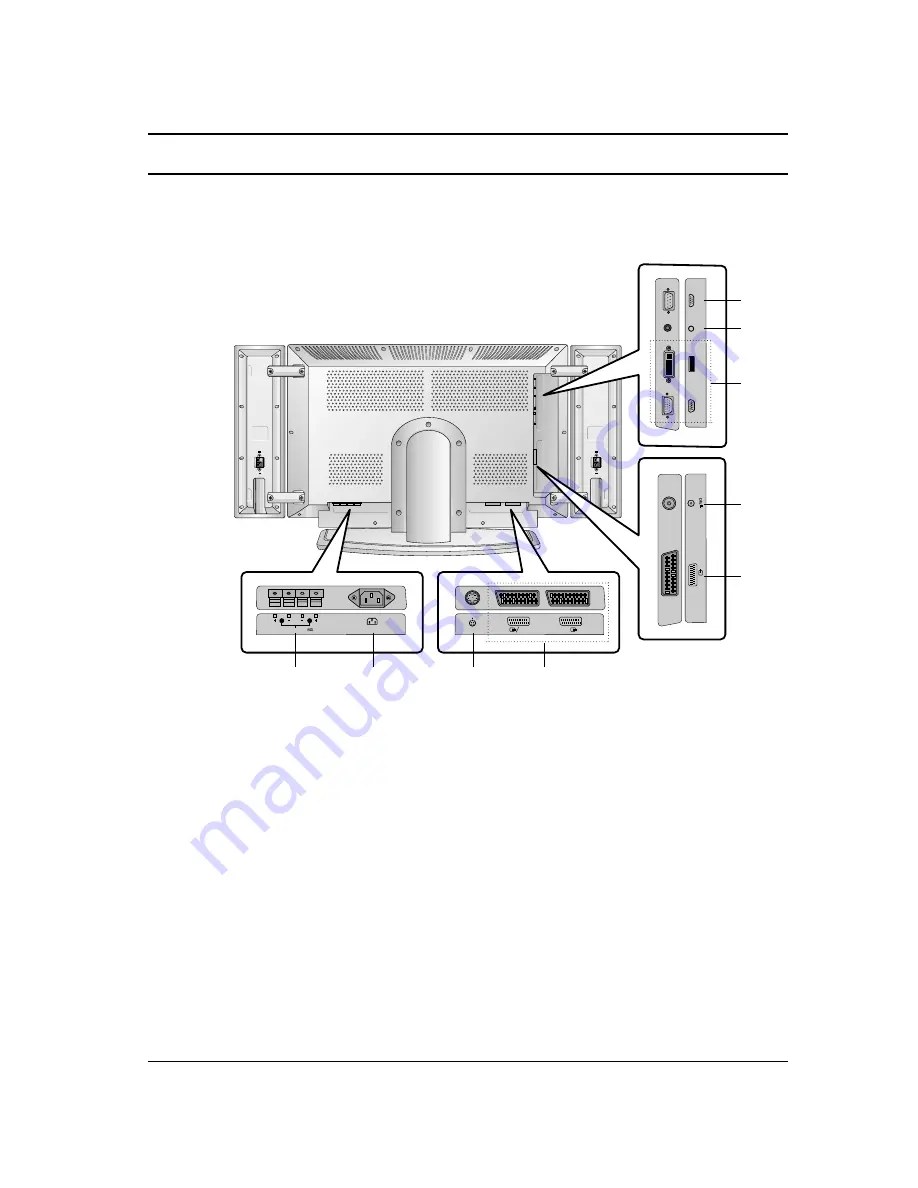
Location and function of controls

1. EXTERNAL SPEAKER (6 ohm output)

connect to optional external speaker(s).

2. POWER CORD SOCKET

3. S-VIDEO INPUT

connect video out from an S-VIDEO VCR to
the S-VIDEO input.

4. EURO SCART SOCKET

connect the euro scart socket of the VCR to
these sockets.

5. AERIAL SOCKET

connect the RF socket of the VCR to the aer-
ial socket.

6. RGB INPUT / DVI (Digital Visual Interface)

INPUT
connect the set output socket of the PER-
SONAL COMPUTER to this socket.
Note : This set is only provided the DVI-D
function although DVI jack drawing is DVI-I
jack for connection convenience.

7. AUDIO INPUT 

connect audio out from external equipment to
these jack.

8. RS-232C INPUT (CONTROL/SERVICE)

PORT
connect to the RS-232C port on a PC.

EXTERNAL SPEAKER

AC INPUT

(  )

(  )

(  )

(  )

S-VIDEO

AV1

AV2

S-VIDEO  L/R

AV

3

ANT

. IN

RGB INPUT

DVI INPUT

AUDIO INPUT

RS-232C INPUT

(CONTROL/SER

VICE)

R

L

7

Back panel

1

2

4

3

4

5

8

7

6

Summary of Contents for BZ03

Page 1: ...ual carefully before operating your set Retain it for future reference Record model number and serial number of the set See the label attached on the back cover and quote this information to your dealer when you require service Model number Serial number BZ03 ...

Page 2: ...Picture format Picture Size Zoom Screen Position RGB PC mode only Manual Configure RGB PC mode only Screen adjustments Initializing Reset to original factory value Selecting Wide XGA mode RGB PC mode only YNR Y signal Noise Reduction Split Zoom PIP DW operation 26 Main Picture Source Selection Auto AV switching Main Picture Size Adjustment On and Off Input mode selection for sub picture Sub Pictur...

Page 3: ...erate proper ly unplug it and call your dealer Aerial Connect the aerial cable to the socket marked 75 Ω on the back For the best reception an outdoor aerial should be used Location Position your set so that no bright light or sunlight falls directly onto the screen Care should be taken not to expose the set to any unnecessary vibration moisture dust or heat Also ensure that the set is placed in a...

Page 4: ...POSITION moves the sub picture to D E or F G direction 5 SWAP returns to the previously viewed programme 6 MENU selects a menu 7 D E Programme Up Down selects a programme or a menu item switches the set on from standby F G Volume Up Down adjusts the volume adjusts menu settings OK accepts your selection or displays the current mode 8 NUMBER BUTTONS switches the set on from standby or directly sele...

Page 5: ...UT buttons are used for teletext function Battery installation The remote control handset is powered by two AAA type batteries To load the batteries turn the remote control handset over and open the battery compartment Install two batteries as indicated by the polarity symbols and marked inside the compartment Note To avoid damage from possible battery leakage remove the batteries if you do not pl...

Page 6: ... selects a menu 4 F G Volume Down Up adjusts the volume adjusts menu settings D E Program Up Down selects a program or a menu item switches the set on from standby 5 POWER r r I switches the set on from standby or off to standby 6 POWER STANDBY INDICATOR r r illuminates red in standby mode illuminates green when the set is switched on 7 REMOTE CONTROL SENSOR Front panel 1 2 3 5 6 7 4 ...

Page 7: ...ocket 6 RGB INPUT DVI Digital Visual Interface INPUT connect the set output socket of the PER SONAL COMPUTER to this socket Note This set is only provided the DVI D function although DVI jack drawing is DVI I jack for connection convenience 7 AUDIO INPUT connect audio out from external equipment to these jack 8 RS 232C INPUT CONTROL SERVICE PORT connect to the RS 232C port on a PC EXTERNAL SPEAKER...

Page 8: ...uttons Volume adjustment Press the F G button to adjust the volume Quick view Press the SWAP button to view the last programme you were watching Mute function Press the MUTE button The sound is switched off and the display appears You can cancel it by pressing the MUTE F G I II or SSM button On screen language selection option The menu can be displayed on the screen in your desired lan guage First...

Page 9: ...menus are not displayed c On some models the Language will not be displayed CHANNEL menu PICTURE menu MENU PR PR VOL Auto Programme Manual Programme Programme Edit CHANNEL PSM CSM Colour Temp Contrast 100 Brightness 50 Colour 55 Sharpness 70 PICTURE PIP DW menu SCREEN menu Input DW PIP PIP Input Win Size Win Position PIP ARC PIP DW Auto Configure ARC Zoom In Out Position Manual Config Screen Adj R...

Page 10: ...the beginning programme number with the F G button or NUMBER buttons on the Storage menu 5 Press the E button to select Start 6 Press the G button to begin auto programming All receivable stations are stored The station name is stored for stations which broadcast VPS Video Programme Service PDC Programme Delivery Control or TELETEXT data If no station name can be assigned to a station the channel ...

Page 11: ... BG PAL B G SECAM B G Europe East Europe I PAL I II U K Ireland DK PAL D K SECAM D K East Europe 6 Press the E button to select CH 7 Press the F G button to select V UHF or Cable as required You can select the desired channel number with the NUMBER buttons If possible select the channel number 1 to 69 directly with the number buttons 8 Press the E button to select Search 9 Press the F G button to ...

Page 12: ...iewing Fine tuning Normally fine tuning is only necessary if reception is poor 1 Repeat the Manual programme tuning steps 1 to 2 2 Press the G button and then D E button to select Fine 3 Press the F G button to fine tune for the best picture and sound 4 Press the OK button 5 Repeatedly press the MENU button to return to normal TV viewing The finely tuned programme will be indicated by yellow numbe...

Page 13: ...elect a programme to be moved with the D E or F G button 2 Press the YELLOW button 3 Move the programme to the desired programme number with the D E or F G button 4 Press the YELLOW button again to release this function Skipping a programme number 1 Select a programme number to be skipped with the D E or F G button 2 Press the BLUE button The skipped programme turns to blue 3 Press the BLUE button...

Page 14: ... channel number shown in the pro gram table indicate there is no station name assigned Selecting a programme in the programme table Select a programme with the D E or F G button Then press the OK button The set switches to the chosen programme number Paging through a programme table There are 10 programme table pages in which contain 100 pro grammes Pressing the D E or F G button repeatedly turns ...

Page 15: ...values reset to default settings select the Normal option When adjusting color temperature options red green or blue manually CSM is automatically changed to User 1 Press the MENU button and then D E button to select the PICTURE menu 2 Press the G button and then D E button to select CSM 3 Press the G button and then D E button to select the desired colour temperature 4 Press the MENU button to sa...

Page 16: ...100 Picture adjustment You can adjust picture contrast brightness colour intensity sharp ness and tint NTSC AV only to the levels you prefer 1 Press the MENU button and then D E button to select the PICTURE menu 2 Press the G button and then D E button to select the desired picture option 3 Press the G button and then F G button to make appropriate adjustments 4 Press the MENU button to save MENU ...

Page 17: ... automatically appears even though you have already set a factory preset setting Flat Speech Movie or Music AVL Auto Volume Leveler If you select AVL On the set automatically keeps on an equal vol ume level even if you change programmes 1 Press the MENU button and then D E button to select the SOUND menu 2 Press the G button and then D E button to select AVL 3 Press the G button and then D E butto...

Page 18: ...CAM Near Instantaneous Companding Audio Multiplex digital sound can be received Sound output can be selected according to the type of received broadcast as follows by pressing the I II button repeatedly 1 When NICAM mono is received you can select NICAM MONO or FM MONO 2 When NICAM stereo is received you can select NICAM STEREO or FM MONO If the stereo signal is weak switch to FM mono 3 When NICAM...

Page 19: ...utton and then D E button to adjust the hour 5 Press the G button and then D E button to adjust the minute 6 Only On Time function Press the G button and then D E button to adjust volume level 7 Press the MENU button to save Note a In the event of power interruption disconnection or power fail ure the clock must be reset b Two hours after the set is switched on by the on time function it will auto...

Page 20: ...o sleep The sleep timer automatically switches the set to standby after the preset time has elapsed Press the SLEEP button to select the number of minutes The dis play Min will appear on the screen followed by 10 20 30 60 90 120 180 and 240 The timer begins to count down from the number of minutes selected Note a To view the remaining sleep time press the SLEEP button once b To cancel the sleep ti...

Page 21: ...sed while displaying the menus Orbiter Orbiter may help prevent ghost images image sticking However it is best not to allow any fixed image to remain on the screen To avoid a prolonged image on the screen the screen will move every 10 minutes 1 Press the MENU button and then D E button to select the SPECIAL menu 2 Press the G button and then D E button to select Orbiter 3 Press the G button and th...

Page 22: ...button to save You can also select Auto 4 3 Wide 14 9 or Zoom with the ARC button on the remote control Auto When your set receives the wide screen signal it will be automati cally changed to the picture format to be sent 4 3 This picture format is 4 to 3 of general TV Wide You can enjoy the cinema the picture format of 16 9 or general TV programme through the 16 9 mode The screen 16 9 is viewed j...

Page 23: ...t the position 4 Press the MENU button to save Manual Configure RGB PC mode only If the picture isn t clear after auto adjustment and especially that characters are still trembling adjust the picture phase manually To correct the screen size adjust Clock 1 Press the MENU button and then D E button to select the SCREEN menu 2 Press the G button and then D E button to select Manual Config 3 Press th...

Page 24: ...m In Out Position Manual Config Split zoom PIP size PIP position and sub picture size for twin picture 1 Press the MENU button and then D E button to select the SCREEN menu 2 Press the G button and then D E button to select Reset 3 Press the G button to start Reset The display OK will appear 4 Repeatedly press the MENU button to return to normal TV viewing Note This function operates in every mode...

Page 25: ... save Split Zoom This is the function to enlarge the screen with regular ration Press the SPLIT ZOOM button Each press of SPLIT ZOOM button changes the screen display as shown below In case of 9 Split Zoom a Press the number button to select the section you enlarge If you choose No 5 the 5 section is enlarged and also can move the enlarged screen with using the D D E E or F F G G button b To retur...

Page 26: ...o the Euro scart socket 3 on the set S Video S VIDEO VCR connected to the S VIDEO sockets on the set RGB PC connected to the RGB socket on the set DVI Digital PC connected to the DVI socket on the set 4 Press the MENU button to save You can select the TV AV1 AV2 AV3 S Video RGB or DVI mode by pressing the INPUT SELECT button In AV1 AV2 AV3 S Video RGB or DVI mode press the D E or NUMBER buttons to...

Page 27: ...You can also select PIP DW1 DW2 or Off with the PIP DW button on the remote control Input mode selection for sub picture Press the PIP INPUT button to select the input mode for the sub picture You can also adjust this function in PIP DW menu Sub Picture Size 1 Press the MENU button and then D E button to select the PIP DW menu 2 Press the G button and then D E button to select Win Size 3 Press the...

Page 28: ...tton and then D E button to select PIP ARC 3 Press the G button and then D E button to select 4 3 or 16 9 4 Press the MENU button to save Swapping between main and sub pictures Press the SWAP button to exchange the main and sub pictures Program selection for sub picture The sub picture program selection is available when the sub picture is TV mode Press the PR buttons to select a program for the s...

Page 29: ...icates your selec tion while the second shows the current page displayed Press the TEXT button to switch off teletext The previous mode reappears SIMPLE text Page selection 1 Enter the desired page number as a three digit number with the NUMBER buttons If during selection you press a wrong num ber you must complete the three digit number and then re enter the correct page number 2 The D E button c...

Page 30: ...to previous selection Alternatively the E button can be used Direct page selection Corresponding to the SIMPLE teletext mode you can select a page by entering it as a three digit number using the NUMBER buttons in TOP mode FASTEXT The teletext pages are colour coded along the bottom of the screen and are selected by pressing the corresponding coloured button Page selection 1 Press the button to se...

Page 31: ...ge which will occur if a tele text page consists of 2 or more sub pages The number of sub pages and the sub page displayed is usually shown on the screen below the time When this button is pressed the stop symbol is displayed at the top left hand corner of the screen and the automatic page change is inhibited To continue press this button again MIX Displays the teletext pages superimposed on the T...

Page 32: ...itching voltage connect to Euro scart socket 1 2 or 3 the set will switch to AV 1 AV 2 or AV 3 mode automatically But if you want to keep on watching TV mode press the D E button Otherwise press the INPUT SELECT button on the remote con trol handset to select AV 1 AV 2 or AV 3 The VCR playback picture appears on the screen You can also record programmes received by the TV on video tape Note a Sign...

Page 33: ...ect the signal cable from the TV output socket of the PER SONAL COMPUTER to the RGB INPUT or DVI INPUT socket of the set 2 Connect the audio cable from the PC to the AUDIO INPUT sockets of the set 3 Press the MULTIMEDIA or INPUT SELECT button to select RGB or DVI 4 Switch on the PC and the PC screen appears on the set The set can be operated as the PC monitor Note a If you have an Apple macintosh ...

Page 34: ... provided 3 Be sure to connect the positive wire to the input and the negative wire to the input When connecting match the colors of connecting jacks 4 Any extra speaker wire length remaining can be bunched into the wire holders provided see 1 above to install wire holders Note Once installed the speaker wire holders lock into position and can t be removed EXTERNAL SPEAKER 6 R L ...

Page 35: ...ry distortion effects on the screen e When the PC screen appears on the set a message may appear on the screen and the message will differ according to the Window system version Win98 2000 If a message appears click Next until the message finish es f If the message Not accepted appears on the screen adjust the PC as in the Displayable Monitor Specification section Resolution MODE Horizontal Freque...

Page 36: ...x1024 SXGA 832x624 MAC 1280x768 WXGA CVT 720x400 DOS 640x480 VGA 800x600 SVGA 31 468 37 861 31 469 37 927 31 469 37 861 37 500 43 269 35 156 37 879 48 077 46 875 53 674 85 06 70 09 85 08 70 08 85 03 59 94 72 80 75 00 85 00 56 25 60 31 72 18 75 00 48 363 56 476 60 023 68 677 54 348 67 500 77 487 47 7 60 15 68 596 60 000 75 000 63 981 49 725 74 55 60 00 70 06 75 02 84 99 60 05 75 00 85 05 60 00 75 0...

Page 37: ... to Real Data Mapping 1 See page 41 1 Press the MENU button and then use the D E button to select the SPECIAL menu 2 Press the G button and then use D E button to select Set ID 3 Press the G button and then use F G button to adjust Set ID to choose the desired monitor ID number Note The adjustment range of Set ID is 1 99 Communication Parameters Baud rate 115200 bps UART Data length 8 bits Parity ...

Page 38: ...PC computer Error Acknowledgement The Monitor transmits ACK acknowledgement based on this format when receiving abnormal data from non viable functions or communication errors Data 1 illegal code 2 not support function 3 wait more time External Control Device Setup 38 01 Power k a 0 1 02 Input Select k b 0 6 03 Aspect Ratio k c 0 2 04 Screen Mute k d 0 1 05 Volume Mute k e 0 1 06 Volume Control k ...

Page 39: ... To select screen mute on off Transmission Data 0 Screen mute off Picture on 1 Screen mute on Picture off Ack 05 Volume Mute Command e G To control volume mute on off You can also adjust mute using the MUTE button on remote control Transmission Data 0 Volume mute on Volume off 1 Volume mute off Volume on Ack 06 Volume Control Command f G To adjust volume You can also adjust volume with the volume ...

Page 40: ... Mode Command m G To lock the front panel controls on the set and remote control When setting this mode only con trol the monitor with RS 232C Transmission Data 0 off 1 on Ack If you re not using the remote control use this mode When main power is on off external con trol lock is released 14 PIP DW Command n G To control the PIP Picture In picture DW Double Window picture You can also control the ...

Page 41: ...ion Data Min 0 Max 64 Refer to Real data mapping1 See page 42 Ack 19 Bass Command s G To adjust bass You can also adjust bass in the SOUND menu Transmission Data Min 0 Max 64 Refer to Real data mapping1 See page 42 Ack 20 Balance Command t G To adjust balance You can also adjust balance in the SOUND menu Transmission Data Min 0 Max 64 Refer to Real data mapping 1 See page 42 Ack 21 Colour Temperat...

Page 42: ...simultaneously 26 SSM Mode Command x G To select sound mode Transmission Ack 27 Orbiter Command 1 j Command 2 p G To control the ISM method You can also adjust ISM Method in SPECIAL menu Transmission Data 0 off 1 on Ack External Control Device Setup Data 0 TV 1 AV1 2 AV2 3 AV3 4 S Video 5 RGB 6 DVI Data 0 Flat 1 Speech 2 Movie 3 Music 4 User k y Set ID Data Cr y Set ID OK Data x k x Set ID Data Cr...

Page 43: ... appears The mains plug plugged in and switched on Is the TV switched on Try another channel weak signal Check aerial plugged into TV Check aerial broken lead Check aerial Check for local interference Adjust contrast Adjust brightness Adjust colour Adjust volume Check the batteries in remote control Check Audio Video sockets VCR only Auto configure or adjust the H V position Auto configure or adju...

Page 44: ......

Reviews: