background image

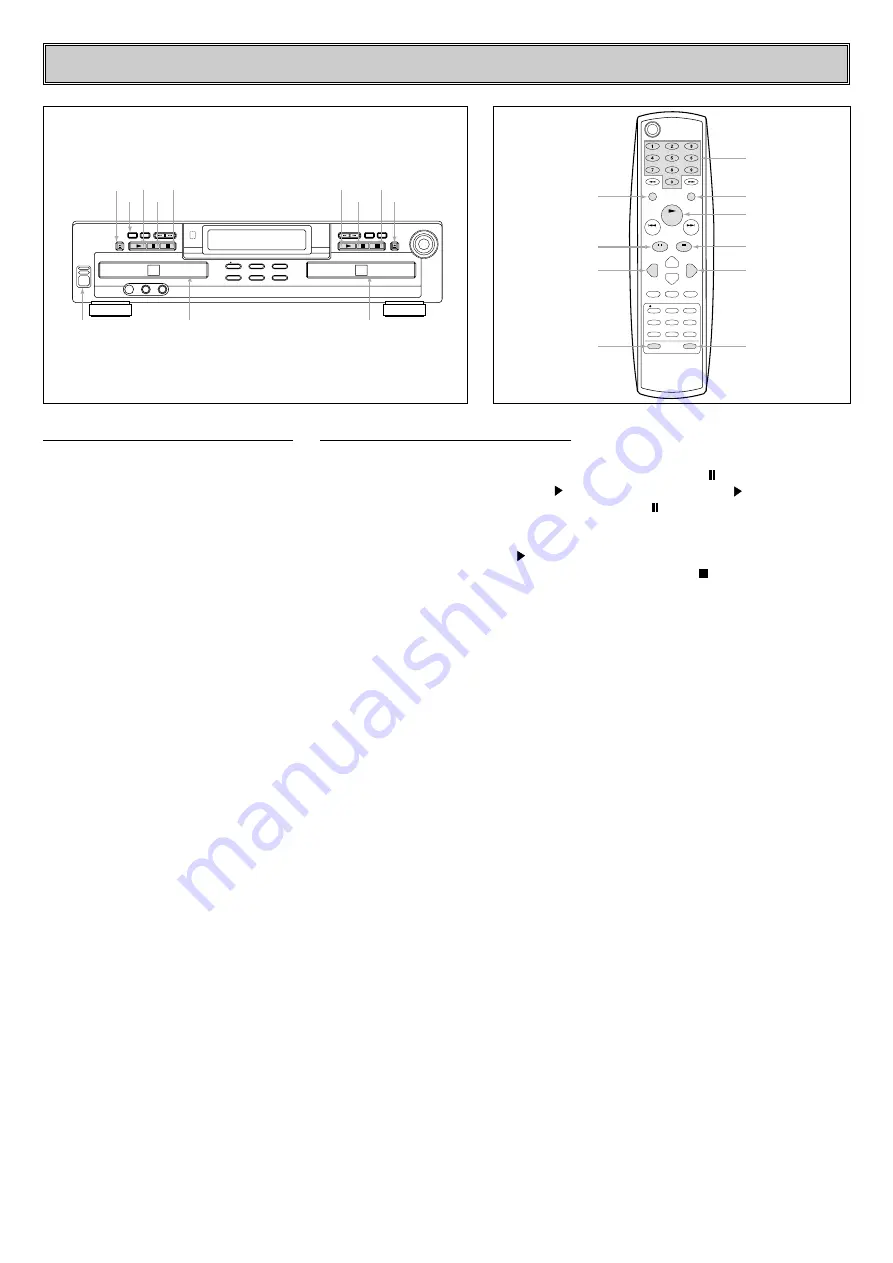
PLAYBACK BASICS

- 16 -

1. Connect the Power cord and power-up

the unit by pressing the Main 

POWER

Switch

until it latches.

2. Press the 

OPEN/CLOSE

button to open

the disc tray.

3. Load a disc in the tray with the

printed(label) side facing up.

4. Gently push the front of the tray or press

OPEN/CLOSE

button.

If the disc is standard CD or a finalized CD-
RW disc, TOC will flash while the unit reads
the disc’s Table of Contents  Information .
Once that data is read, the 

Information

Display

will show the total number of tracks

and the total time of all tracks on the disc.
The 

CD Indicator

will also light to indicate

that a standard CD is in use.

When an unfinalized CD-R or CD-RW disc
is placed in the 

Record Deck

, the letters

OPC will flash once the Table of Contents
has been read. This indicates that the unit is
optimizing its circuit for maximum
compatibility with the specific recordable
disc in use . The number and total running
time of any tracks that have already been
recorded will appear in the 

Information

Display

, and the appropriate indicator will

light to tell you if a CD-R or CD-RW disc is
in use.

If a computer data disc is placed in the
machine, a DATA DISC message will
appear to alert you to the error.
Data discs will not play and may not be
recorded or dubbed in the unit.

1. Turn on the Power.
2. Insert a disc.
3. To start the playback, press the PLAY[ ]

button on the front  panel for the
appropriate deck or press the CDP or
CDR button on the remote for the desired
deck and then press the  PLAY[ ] button
on the remote. 

The 

Information Display

will show the

track number being played and running time
of the track. As each new track begins to
play, the track time will reset to 00:00 and
begin to count up for the new track.

NOTE

: Remember that unfinalized CD-R or

CD-RW discs will only play in the 

Record

Deck

. If you attempt to play an unfinalized

disc in the 

Play Deck

, a DISC ERROR

message will appear to remind you to play
the disc in the other deck.

To go directly to a specific track on a
disc

Enter the track number using the 

Numeric

Keys.

Note that when selecting a two digit track
number, the second digit must be entered
within two seconds after the first Numeric
Key is pressed.

To play all of the tracks on a disc in
random order

Press the 

CDP

or 

CDR

button for the

desired deck, and then press the 

RANDOM

button. 
The unit will briefly examine all of the tracks
on the disc and 

RANDOM Indicator

will

illuminate. Each track will be played in a
random order until all tracks on the disc
have been played. Note that there will be
brief pause in between each track as the
unit searches for the next track to play.

To momentarily stop the disc at any time

Press the 

PAUSE

[ ] button.

Press either the 

PLAY

[ ] button or the

PAUSE

[ ] button to resume playback at

the point where the disc was paused.

To stop playback at any time

Press the STOP[ ] button for the deck in
use.
When there is only one disc in the unit, it will
automatically stop when all tracks on a disc
have played through.

When there is a disc in each deck, the
player will respond in one of two ways,
depending on which way the dual-play
setting is activated. In normal operation,
when the disc in one drawer finishes, the
disc in the other drawer will begin to play.
When the 

DUAL

button is pressed so that

the 

DUAL-Play Indicator

is lit, each deck

will operate as a separate, single-play CD
unit without regard to the status of the other
deck.

1

10

4

5

6

7

3

2

8

9

PLAY

STOP

INPUT

DISPLAY

NEXT

REC/PLAY

ADR 620 AUDIO CD RECORDER

PREV.

PAUSE

OPEN/CLOSE

REC LEVEL

  REC

PLAY

PHONES

PHONE LEVEL

DIGITAL IN

STOP

DUAL

DISPLAY

NEXT

PREV.

PAUSE

OPEN/CLOSE

POWER

PLAYBACK

SPEED

CD SYNC

ERASE

DUBBING

FINALIZE

PLAY

OPEN/CLOSE

PAUSE

STOP

DUAL

PLAY

RECORD DECK

PLAY DECK

POWER

PAUSE

STOP

OPEN/CLOSE

Numeric Keys

RANDOM

PLAY

STOP

CDR

CDR OPEN/CLOSE

CDP OPEN/CLOSE

CDP

PAUSE

DUAL

DISPLAY

SERCH

DUAL

PLAY/

SELECT

PREV.

NEXT

PAUSE

CDP

REPEAT

REC

FINALIZE ERASE

DUBBING SPEED CD SYNC.

INPUT AUTO/MANU. TR INCR.

CDP

OPEN/CLOSE

CDR

CLEAR

REPEAT

A-B

CDR

PROG.

PROG.

CHECK

STOP

RANDOM

SEARCH

Loading Discs

Normal Play

Summary of Contents for ADR-620

Page 1: ...NER S MANUAL MODEL ADR 620 Please read this manual carefully before operating your set Retain it for future reference Designs and specifications are subject to change without notice for improvement P NO 3828R D007L ENGLISH ...

Page 2: ...t is in strict accordance with the manufacturer s instructions may cause interference to radio and television reception It has been type tested and found to comply with the limits for a class B computing device in accordance with the specifications in subparts J of Part 15 of FCC Rules which are designed to provide reasonable protection against such interference in a residential installation Howev...

Page 3: ... product on a bed sofa rug or other similar surface This product should not be placed in a built in installation such as a bookcase or rack unless proper ventilation is provided or the manufacturer s instructions have been followed Power Source This product should be operated only from the type of power source indicated on the marking label If you are not sure of the type of power supply to your h...

Page 4: ...f other controls may result in damage and will often require extensive work by a qualified technician to restore the product to its normal operation e If the product has been dropped or damaged in any way f When the product exhibits a distinct change in performance this indicates a need for service Replacement Parts When replacement parts are required be sure the service technician has used replac...

Page 5: ...ce Copyright Warning Notice This product is equipped with the Serial Copy Management System SCMS to protect the rights of copyright owners As a part of this system it is possible to make a copy of most CDs for your own personal use However it is not possible to make a digital copy from another digital copy It is possible to make an analog copy of a digital copy RECORDINGS MAY BE MADE FOR PERSONAL ...

Page 6: ...eed for internal dubs CD Sync Press this button once to begin an automated recording of a single track from an external CD player when a digital connection is used Press it twice to begin automated recording of an entire disc Erase Press this button to erase one or more tracks or the entire contents of an unfinalized CD RW disc When a CD RW disc has already been finalized you may erase the entire ...

Page 7: ...ered it may be played by simply pressing the Play button on the Record Deck or remote control Record Deck Play Select This button has two functions It may be pressed when a standard CD is in the Record Deck to put the machine in play or it may be used to enter a selection or start certain record functions Information Display The indicators in the information Display provide status reports on the o...

Page 8: ... CD Decks to act as playback decks at the same time Information Display This display serves two functions showing the time displays for discs playing as well as displaying messages about discs or recordings Important Note Since the unit is a dual deck player recorder there are two separate sets of indicators for the Random Program Repeat Repeat Status Time Total Time and Track Time In addition the...

Page 9: ... This indicator lights when the Sample Rate Converter is in use to change the digital sample rate when the incoming signal is not the standard 44 1kHz used by standard CDs This is an automatic function and does not require any user intervention CD Indicator This indicator lights when a standard CD is playing in the Record Deck Record Indicator This indicator lights when the unit is making a record...

Page 10: ...rectly to a digital player or to a coaxial digital output on a CD or DVD player or an A V receiver or processor IMPORTANT NOTE The coaxial digital inputs should only be connected to digital input or output jacks Even though they use the same RCA type connector as standard analog audio connections DO NOT connect them to conventional analog input or output jacks Record CDR Deck Optical Digital Input...

Page 11: ...NOTE Some of the remote s functions including Play Pause Stop Search Next and Previous Track are shared between the two decks Always remember the press the CDP Select button to use the remote to control the Play Deck or press the CDR Select button to control the Record Deck 1 2 3 4 5 6 7 8 9 10 11 12 13 14 15 16 17 18 19 20 21 22 23 24 25 26 27 28 29 1 2 3 4 5 6 7 8 9 10 11 13 14 15 12 16 17 19 25...

Page 12: ...ct the input source analog digital coaxial or digital optical for recording Play CDP Deck Open Press this button to open the Play Deck Record CDR Deck Open Press this button to open the Record Deck Automatic Manual Track Increment Selector Press this button to select between automatic and manual track increments during a recording session Track Increment When the Manual mode for track increment is...

Page 13: ...contain chemical substances and we recommend that you dispose of them properly and in compliance with any local regulations Power Connections Connet the AC Power Cord to an AC power source If the rear panel AC outlet on a receiver or other product is used make certain that it provides at least 48 watts and that the total power of all products connected does not exceed the maximum rated output of t...

Page 14: ...er or processor to link the digital input to the Tape button or the specific input selector associated with the digital inputs Consult the owner s manual on your receiver or processor for details as this configuration may vary from unit to unit To make recordings from external digital sources such as a CD DVD or MD player con nect the CDR Coaxial In or CDR Optical In jacks on the CDR to the digita...

Page 15: ...ack of consumer audio discs and cannot be used to copy data discs DVD discs or other optical discs used by video or computer game systems CDR Terminology and Display Messages Compact disc recording has its own terminology and some of the messages you will see when using the unit may be new to you Before using the unit you may wish to familiarize yourself with some of the terms used by the unit Add...

Page 16: ...o play the disc in the other deck To go directly to a specific track on a disc Enter the track number using the Numeric Keys Note that when selecting a two digit track number the second digit must be entered within two seconds after the first Numeric Key is pressed To play all of the tracks on a disc in random order Press the CDP or CDR button for the desired deck and then press the RANDOM button ...

Page 17: ...ote When the DUAL Play Indicator is lit you may play a different disc in both decks at the same time The output of each deck will be sent to the its appropriate output jacks and you will need to select the deck you wish to listen to using the input selectors on your receiver preamp or processor You may also use the output of one deck to feed your main room system while the second deck is used to f...

Page 18: ...e total number of tracks and the total running time of the disc will be displayed Headphone Listening You may listen to the output of the unit through headphones at any time by simply plugging the headphones into the Front Panel Headphone Jack The volume of the headphone output may be adjusted with the Headphones Level Control Note that changes to the headphone level will not alter the output sett...

Page 19: ... complete list of tracks has been entered press the PLAY button The tracks will then play in the order they have been entered Note that a programmed list of tracks may also be recorded if the disc being programmed is in the Play Deck Follow the instructions of the explanation for recording and dubbing Checking Editing and Clearing Programmed Play Lists Once you have entered a program list it will ...

Page 20: ... by pressing the REPEAT button once until both the REPEAT Indicator and ALL Repeat Status Indicators go out The Repeat All Function is also canceled when the disc drawer is opened Repeat A B The unit may be programmed to repeat any section within a track or a complete passage that includes material form a series of consecutive tracks To program the unit for A B Repeat play first play the disc and ...

Page 21: ... discs CD based computer or video game discs or digital audio discs with a sample rate that is not compatible with the range of the unit s sample rate converter Recordings on the unit may be made in a number of ways Discs may be dubbed using the playback deck on the unit as a source These copies may be made in real time at twice normal speed or at four times normal playback speed Recordings may be...

Page 22: ...rtain that there is a fresh disc in the Record Drawer for the recording 3 Press the CD SYNC button and note that the SYNC Indicator will light and the RECORD Indicator will flash 4 Select the type of recording to be made To record only the first track from the source player press the CD SYNC Button so that 1 TRK appears in the Record Deck Information Display To record the entire disc or tape press...

Page 23: ...pressing the PLAY SELECT button Note that the RECORD Indicator will stop flashing and Information display will begin to show the running time of the recording and the track data Depending on which mode of track increment has been selected as described above track numbers must be increased manually or they will be added automatically Regardless of which mode has been selected a track may by added a...

Page 24: ...th recordable and rewritable This means that you may use them over again like a cassette tape However the process of reusing a CD RW disc is slightly different from that used with tapes Unfinalizing a CD RW Disc To keep the material that is already recorded on a CD RW disc but to add an additional track and erase single tracks you must first unfinalize the disc 1 Place the CD RW disc in the Record...

Page 25: ... display a total of six tracks will be erased counting back from the last track on the disc 3 Press the SELECT button within three seconds of making the track selection and note that the ERASE Indicator will stop flashing When the ERASE Indicator goes out the Information Display will show the total number of tracks that now remain on the disc Important Note Tracks at the beginning or in the middle...

Page 26: ... pressed when a finalized disc is in the Record Deck A record related button has been pressed when a standard CD is in the Record Deck A non audio CD ROM or a CD Video disc has been placed in the machine An Unfinalized disc has been placed in the Play Deck A DVD disc has been placed in the unit There is not enough time left on the disc to complete a planned recording The disc is not seated properl...

Page 27: ...gital Inputs Direct Recording General Power Requirement Power Consumption Dimensions Width Height Depth Weight Æ Æ Signal Format 44 1 kHz 96 kHz Multi Bit Delta Sigma Conversion 128 Times Æ Æ Playback Specifications 20Hz 20 050Hz 105dB 100dB 0 01 80dB 2V RMS 0 15V 0 5Vpp 75Ω 1V RMS 32Ω Load Æ Æ General 32kHz 96kHz 88dB Equal to Source 95dB 90dB 0 01 0 02 330mV RMS 44 1kHz 100 ppm min Æ Æ General R...

Page 28: ...P NO 3828R D007L ...

Reviews: