background image

58

ENGLISH

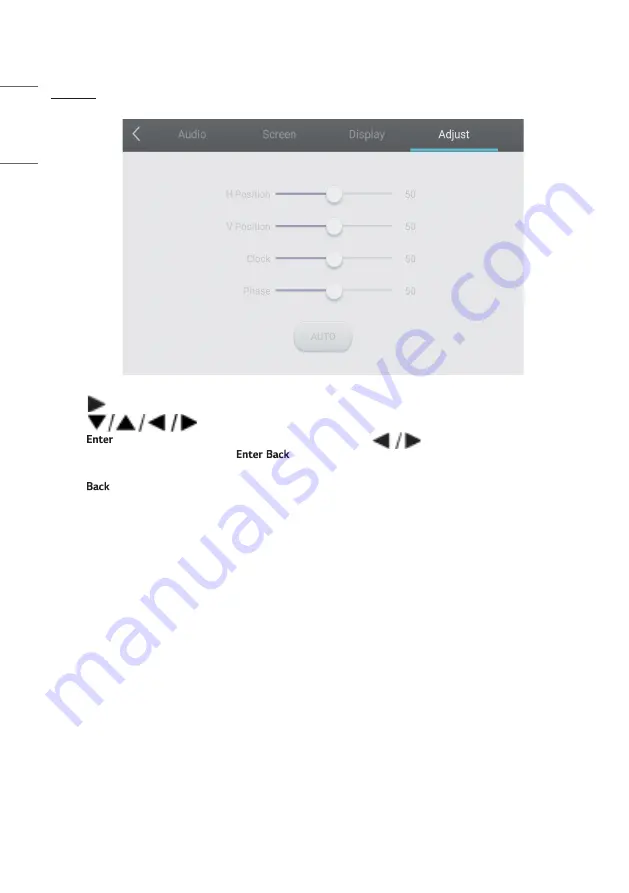
[Adjust]


Press 

 button on remote control to select [Adjust] setting menu.


Press 

 button on remote control or directly click with touch pen to select the option.


Press 

 on remote control to enter adjustment mode, and press 

 button or directly click with 

touch pen to adjust each option. Press 

/

 to exit adjustment. You can also click the [Auto] icon to adjust 

automatically.


Press 

 on remote control or click blank area outside menu with touch pen to exit menu.

Summary of Contents for 65TR3BF-B

Page 1: ...igital Signage MONITOR SIGNAGE 65TR3BF B 75TR3BF B 86TR3BF B www lg com Copyright 2019 LG Electronics Inc All Rights Reserved Please read this manual carefully before operating your set and retain it for future reference ...

Page 2: ...ecautions for Using Cleaning the Product 7 Product Disposal Only Hg lamp used LCD Monitor 7 ASSEMBLY AND PREPARATION 8 Precaution When Using the Touch Pen 8 Parts and Buttons 9 Installing on a Wall 10 REMOTE CONTROL 12 MAKING CONNECTIONS 14 Connecting to a PC 14 External Device Connection 14 Using the Input List 16 TROUBLESHOOTING 17 PRODUCT SPECIFICATIONS 21 LICENSES 25 ...

Page 3: ...ed or injured Or the product might be damaged Do not use a damaged or loose plug This may cause electrical shock or fire Operate the display only from a power source i e voltage indicated in the product specification Otherwise the product can be damaged fire can occur or you may be electrocuted If you are not sure what type of power supply you have consult a certified electrician In the presence o...

Page 4: ...d The power line can be damaged which may cause electric shock or fire Do not insert metal or other conductive materials into the product openings Additionally do not touch the power cable right after plugging into the wall input terminal You may be electrocuted Use an appliance coupler as a disconnect device Please make sure the device is installed near the wall outlet to which it is connected an...

Page 5: ... is broken turn off the product and unplug the power cord If you continue to use without taking proper measures electrical shock or fire can occur Contact LG Customer Service Do not drop an object on or apply impact to the product Do not throw any toys or objects at the product It can cause injury to humans problems to the product and damage the display Keep out of reach of children and do not pla...

Page 6: ...ifting or moving the product do not hold it upside down while holding only the stand This may cause the product to fall resulting in damage or injury Do not shock the product when moving it You may be electrocuted or the product can be damaged Make sure the panel faces forward and hold it with both hands to move If you drop the product the damaged product can cause electric shock or fire Do not pl...

Page 7: ...e a scratch on it Keep proper distance from the product and rest from time to time Your vision may be impaired if you look at the product too closely or for too long Set the appropriate resolution by referring to the User s Guide Keep small accessories out of the reach of children Displaying a still image for long time on the monitor may leave persistent image or stain on the monitor screen To avo...

Page 8: ... NOTE The accessories provided with your product may vary depending on the model or region Product specifications or contents in this manual may be changed without prior notice due to upgrade of product functions The warranty will not cover any damage caused by using the product in an excessively dusty environment Precaution When Using the Touch Pen When the touch pen is worn as shown in the figur...

Page 9: ...9 ENGLISH Parts and Buttons The image may be different according to the model Power Turns the power on or off ...

Page 10: ...e sure that the wall mounting bracket is securely fixed to the monitor and to the wall 1 Use only screws and wall mounting brackets that conform to VESA standards 2 Screws which are longer than standard length may damage the inside of the monitor 3 A non VESA standard screw may damage the product and cause the monitor to fall LG Electronics is not liable for any accidents related to the use of non...

Page 11: ...age the monitor and void your warranty Use only screws and wall mounting brackets that meet the VESA standard Any damage or injuries caused by misuse or use of improper accessories are not covered by the warranty NOTE The wall mount kit includes the installation guide and all necessary parts The wall mounting bracket is optional You can obtain additional accessories from your local dealer The leng...

Page 12: ...control may not be supported in certain models POWER Turns the monitor on or off MUTE Mutes all sounds Built in computer Works the same way as the Window key Built in computer Works the same way as the Space key Built in computer Works the same way as the Alt Tab key Built in computer Works the same way as the Alt F4 key Number buttons Enters numerical characters depending upon the setting Display...

Page 13: ... options Selects menus or options and confirms your input Turns the note feature on Allows you to move back one step in the user interaction function Scrolls through the saved program channels Moves to the top of the screen Moves to the bottom of the screen Adjusts the volume Function Keys Built in computer Works the same way as the Function key ...

Page 14: ...C Some of the cables are not provided This monitor supports the feature a feature that enables a PC to recognize devices attached by the user without device configuration or user intervention when powering up External Device Connection Some of the cables are not provided Connect a HD receiver DVD or VCR player to the monitor and select an appropriate input mode For the best picture and sound quali...

Page 15: ... you cannot hear any sound in HDMI mode please check your PC settings Some PCs require you to manually change the default audio output to HDMI You may experience compatibility issues if you use HDMI PC mode Make sure the power cable is disconnected If you connect a gaming device to the monitor use the cable provided with the gaming device The contents from the HDMI INPUT port cannot be transferred...

Page 16: ...16 ENGLISH Using the Input List For the PC input it is enabled only when a built in computer is connected ...

Page 17: ...unstable Check the signal cable Access the input menu to check the input signal The signal from the PC Graphics card is out of the vertical or horizontal frequency range of the product Adjust the frequency range by referring to the Specifications in this manual The position of the screen is incorrect Check if the graphics card resolution and frequency are supported by the product If the frequency ...

Page 18: ...l This is not a malfunction of the product Issues Related to Sound The audio doesn t work See if the audio cable is connected properly Adjust the volume of the product or external device See if the sound is set properly Sound is too dull Select the appropriate equalizer sound Sound is too low Adjust the volume of the external device For some models you will need to purchase external speakers separ...

Page 19: ... or fingertip If holding the touch pen or near the tip of the touch pen If using the touch pen while pressing it with strong force on the screen The location of a touch does not correspond to the touch coordinates This may occur when the touch screen is not calibrated properly Change your tablet PC settings A touch is applied to a monitor other than the one I intended This may occur if the monitor...

Page 20: ...ains visible This phenomenon is referred to as image sticking Image sticking does not occur when using constantly changing images but may occur when using a fixed image for an extended period of time Therefore it is recommended that you use the instructions below to decrease the likelihood of image sticking occurring when using a fixed image It is recommended that you change the screen at least on...

Page 21: ...es Horizontal frequency HDMI1 HDMI2 HDMI3 30 kHz 135 kHz VGA 30 kHz 80 kHz Vertical frequency HDMI1 HDMI2 HDMI3 30 Hz 76 Hz VGA 50 Hz 76 Hz Synchronization Separate Sync Digital Input Output ports Embedded battery Applied Environmental Conditions Operating Temperature 0 C to 40 C 32 F to 104 F Operating Humidity 10 to 80 Storage Temperature 20 C to 60 C 4 F to 140 F Storage Humidity 5 to 85 Audio ...

Page 22: ...m H x 0 4296 mm V Power Rated Voltage AC 100 240 V 50 60 Hz 4 0 A Power Consumption On Mode 175 W Typ Stand By Mode 0 5 W Dimensions Width x Height x Depth Weight 1709 4 mm x 1020 1 mm x 85 8 mm 53 kg 67 2 inches x 40 1 inches x 3 3 inches 116 8 lbs 86TR3BF B LCD Panel Pixel Pitch 0 4935 mm H x 0 4935 mm V Power Rated Voltage AC 100 240 V 50 60 Hz 5 5 A Power Consumption On Mode 365 W Typ Stand By...

Page 23: ... kHz Vertical frequency Hz Remark 640 x 480 31 469 59 94 800 x 600 37 879 60 317 1024 x 768 48 363 60 004 1280 x 768 47 396 59 99 1280 x 960 60 60 1280 x 1024 63 981 60 002 1366 x 768 47 712 59 79 1440 x 900 55 469 59 9 1680 x 1050 65 29 59 954 1920 x 1080 67 5 60 ...

Page 24: ...16 29 97 1080p 30 Hz 33 75 30 3840 x 2160 24 Hz 54 23 982 3840 x 2160 25 Hz 56 25 25 3840 x 2160 30 Hz 67 5 30 3840 x 2160 50 Hz 112 5 50 3840 x 2160 60 Hz 135 60 NOTE Vertical frequency The product display functions by the screen image changing dozens of times every second like a fluorescent lamp The vertical frequency or refresh rate is the number of image displays per second The unit is Hz Hori...

Page 25: ...model For more information of the licenses visit www lg com The terms HDMI and HDMI High Definition Multimedia Interface and the HDMI Logo are trademarks or registered trademarks of HDMI Licensing Administrator Inc in the United States and other countries ...

Page 26: ...re located on the back and on one side of the product Record them below in case you ever need service MODEL SERIAL NO Supplier s Declaration of Conformity Trade Name LG Responsible Party LG Electronics USA Inc Address 111 Sylvan Avenue North Building Englewood Cliffs NJ 07632 E mail lg environmental lge com ...

Page 27: ...USER GUIDE LG Digital Signage MONITOR SIGNAGE www lg com Android 8 0 Please read this manual carefully before operating your set and retain it for future reference ...

Page 28: ... 20 Pagination 20 Next Page 20 FINDER 20 Browsing according to Category 21 Resource operation 21 Ordering menu 23 Exit 25 SETTINGS 25 Wireless networks 25 Device 25 Personal 26 System 26 BROWSER 26 KEEPER 27 TOUCH MENU 29 CLOUD DRIVE 29 SCREEN SHARE PRO MANUAL 30 Software Introduction 30 Installations 30 Operating Environment Server Installation Client Download Installation Server Introduction 33 ...

Page 29: ...urce lge com In addition to the source code all referred license terms warranty disclaimers and copyright notices are available for download LG Electronics will also provide open source code to you on CD ROM for a charge covering the cost of performing such distribution such as the cost of media shipping and handling upon email request to opensource lge com This offer is valid for a period of thre...

Page 30: ...g system for intelligent tablet computers You can instantly access the Launcher interface by opening the machine as shown in Fig 1 1 Figure 1 1 Launcher interface Click the button on the bottom right to access the apps as shown in Fig 1 2 Figure 1 2 APPS ...

Page 31: ...ent Tasks Quick Note Annotation Tools Screen Freezing and Small Tools A valid path can be set for the sidebar on the Settings Figure 2 1 Sidebar button Back Key Click to return to the last operating interface Home Key Click to return to the desktop Recent Tasks Click to pop out the window and display the recently operated tasks You can delete all the progresses by one key or delete progresses by d...

Page 32: ...ode completely and you can directly write and note on the interface You can switch the pen color by clicking it Clean Click to clean the whole screen Screenshot saving Click to save the current screenshot Exit Click to exit the annotation mode Screen Freezing Click the button to pop out the screen freezing tools You can freeze the screen and at the same time zoom in or out the current screen Figur...

Page 33: ... to emphasize Drag in the black area to move the location emphasized by the spotlight Figure 2 7 1 1 Spotlight interface Settings Click to pop out the window as shown in Fig 2 7 1 2 Scale Drag the slider to adjust the range of the spotlight You also can adjust the range of the spotlight by two fingers Alpha Drag the slider to set the transparency of the part sheltered by the spotlight Turn off the...

Page 34: ...utton to reset the count down to the initial status Figure 2 7 2 1 Initial interface of the countdown Figure 2 7 2 2 Countdown interface Stop Watch Click the button to start the stop watch as shown in Fig 2 7 3 1 Such functions as stop watch pausing the stop watch continuing the stop watch and reset are included When you touch the other area the Stop watch will move to the bottom of the window Fig...

Page 35: ...me LAN with the IFP Fig 2 7 4 1 QR code Fig 2 7 4 2 Menu bar Voter Judge Click the button or button and the answer bar appears on the lowest corner of the teaching interface Click Single choice or Multiple choice to select the question type Fig 2 7 4 1 1 Voter Answer Click Begin to start answering question After students answer the question their names turn blue ...

Page 36: ...ig 2 7 4 1 1 Voter Answers statistics Click Finish to finish answering questions and you can access the answers statistics page Fig 2 7 4 1 3 Answers statistics Choose the right answer s and calculate the accuracy ...

Page 37: ... 2 7 4 1 4 Answers statistics Explain Click the Explain button on the answers statistics to access the teaching page Users can view the question explanation while checking the answers situation Fig 2 7 4 1 5 Explain ...

Page 38: ...sponder Click the button to access the responder part Students can responder by pressing the OK key Fig 2 7 4 2 1 Responder Selector Fig 2 7 4 2 1 Selector Click the button to choose students to answer the questions ...

Page 39: ...sh the message comments on the mobile phone The message comments are updated on the tablet computer in real time Fig 2 7 4 4 1 Message Manager Click the Manager button to pop out the QR code for ease of students in the class to join in the class Fig 2 7 4 5 1 Manager ...

Page 40: ...14 ENGLISH Touch Menu Click to access the Touch Menu Fig 2 8 1 General Setting NOTE Click to open the Note as shown in Fig 3 1 Fig 3 1 Note ...

Page 41: ... file Open Click the button to pop out the file selection window You can open the local enb or iwb format file Save Click the button to save the current document to the file browsing in enb format Import Click the button to import the IMG PDF SVG file to the whiteboard courseware Export Click the button to export the current whiteboard courseware in IMG PDF SVG or IWB format Fig 3 1 2 Export ...

Page 42: ...ck to activate the automatic brightness adjustment which is disabled by default Fig 3 1 3 Color Background Fig 3 1 4 Texture Background Fig 3 1 5 Custom Background Exit Click the close button to return to the main interface If the current document is not saved the saving prompt window is popped out and users can enter the file name and save the current document if the current document is saved the...

Page 43: ...re is selection function users can directly write by using the SmartPen on the Note without switching the toolbar to the writing state Fig 3 3 1 Selection 1 Move Select by circling and drag the selected object to move the current object to any location 2 Zoom in or out a Select by circling and operate the selected object by two points to zoom in or out the current object and change the color of th...

Page 44: ... is set by default Handwriting size Slide the handwriting size slide bar to change the handwriting size Handwriting color Click the color of the color disk on the right side to change the handwriting color as required Eraser Click to select the eraser Select by circling the object you need to erase Clean Click to clean the whole screen Shape Click the shape button to pop out the shape window We pr...

Page 45: ...ng Color picker Click to activate the color picker and the round color picker appears on the drawing board area Drag it to the color you want and click to finish the color picking In this case the pen color is the selected color Color disk Users can change the color of the color circle by changing the color of the color disk Withdrawing Click the withdrawing button to withdraw the previous operati...

Page 46: ...mbnail to display Next Page When the current page is not the last page click the button to switch to the next page of the current page FINDER Click to pop out the file browsing as shown in Fig 4 1 It can browse the files saved in the system such as document whiteboard writing video picture and audio In addition it can automatically identify external USB device browse files according to category se...

Page 47: ...ng bmp and gif are supported Media Click Media to browse the stored videos Formats like avi mp4 vob mkv mov mpeg are supported Search In the input box on the right upper corner of the interface enter the resource name you want to search and click to search for the resources For example by entering word you can find resources whose name is word Resource operation Users can edit the resources stored...

Page 48: ...n select all resources under the current directory Fig 4 2 2 Selecting all interface Cancelling selecting Click to cancel all resources that have been selected currently Creating Click to create new folders under the current directory Fig 4 2 3 New Folder ...

Page 49: ...the selected file to the target folder Click a certain resource the resource operation menu will pop out at the bottom of the window You can perform operations such as deleting copying cutting pasting and renaming on the current resource Ordering menu Click the ordering button to pop out the menu as shown in Fig 4 3 1 You can order the resources including ordering according to the name type size a...

Page 50: ...n the form of icon The resources are displayed in the form of icon by default as shown in Fig 4 3 2 Fig 4 3 2 Tile display List Click to switch to display the resources in the form of detailed information as shown in Fig 4 3 3 Fig 4 3 3 List display ...

Page 51: ...an tap to click and select the setting option including Wireless networks Device and Personal Fig 5 1 Setting menu Wireless networks You can set whether to enable the network and view the network including the MAC address IP address mask and gateway Wi Fi Direct and Bluetooth are not supported Device Display setting wallpaper and Pixel shift ...

Page 52: ...down Set Startup channel Standby after startup Input Setting Path renaming Other Setting Setting the Slide Toolbar and FloatBar setting the single finger and multi finger of Note writing System Setting Date time and About Device BROWSER When the network is normally connected click the button and enter the website to access the web page ...

Page 53: ...an perform memory optimization garbage clean and hardware checking on the intelligent tablet computer Fig 8 1 Keeper One Key Optimize Click to optimize memory clean the disk garbage and check hardware problem in one key Memory Clean Click to optimize the memory Fig 8 2 Memory Clean ...

Page 54: ... Garbage Clean Click to clean the disk garbage Fig 8 2 Garbage Clean Version information Click to view the system version information of the machine Exit Click to exit the Keeper and return to the main interface ...

Page 55: ...e Touch Menu Fig 9 1 General Setting PC Select the PC input Android Select the Android input HDMI Select the HDMI input VGA Select the VGA input AV Select the AV input DVI Select the DVI input The switching of the signal input will take a few seconds CLOUD DRIVE Click the button to connect to the Cloud Drive ...

Page 56: ... control IFP via mobile devices 3 With Screen Share Pro IFP can reversely control Windows and Mac 4 Users can cast screen on IFP via the camera on devices Installations Operating Environment Server also called receiver Android 5 0 or later designed by the manual provider Client also called sender Android 5 0 or later iOS 8 0 or later Windows 7 8 10 MacOS 10 10 or later Chrome OS only version 1 0 7...

Page 57: ...S clients instructions are as follows Scan the QR code with mobile devices or enter the address in your PC web browser to download APK application kit It will automatically recognize different types of devices and thus provide the correct APK In the case of iOS iPhone OS client after scanning the QR code it will lead to the app store where you can download the app Picture 2 3 2 Client Download ...

Page 58: ...32 ENGLISH Install the app on your mobile devices Enter the interface Picture2 3 3 Installation Completed Enter the code on receiver and start sharing screens ...

Page 59: ...ser guide to connect devices to IFP Picture 3 1 1 Server Interface 1 Download client application either by scanning QR code or 2 Entering address in web browser 3 Make sure client devices are connected to the same network as IFP 4 Enter the same code on devices to connect with IFP ...

Page 60: ...34 ENGLISH Permission Mode Click Switch mode in Menu column Picture 3 1 2 Menu Switch mode by clicking the button Please activate software before using switching to master mode Picture 3 1 3 Switch mode ...

Page 61: ... disconnected Picture 3 1 4 Switch Mode Reminder After switching to master mode you will see an added column for devices on the interface Picture 3 1 5 Master Mode Interface In master mode all clients need to be accepted by IFP server before they could share screen There are two admitting ways ...

Page 62: ...p up window Click Accept to approve or Reject to disapprove devices Picture 3 1 6 Request Pop up Window Picture 3 1 7 Click Accept or Reject 2 Click devices column to see requests Choose to accept or to reject them Picture 3 1 8 Devices List ...

Page 63: ...her operating on client devices or clicking on IFP Also server could end screen share anytime Picture 3 1 9 Devices Status Screen Share from Server All connected devices would be listed in column Click to authorize devices to approve requests from others Picture 3 2 1 Authorize Devices ...

Page 64: ...38 ENGLISH Picture 3 2 2 Authorize Devices Reminder Server Activation 1 Click Activation in Menu column Picture 3 3 1 Activation ...

Page 65: ...tivation interface input code then click Activation Picture 3 3 2 Input Code Screen Splits Four devices could share screen at the same time Picture 3 4 1 Screen Share Split Click to zoom in out click X to exit screen share ...

Page 66: ...screen mode on their devices Client Introduction Clients include mobile devices Android iOS PC and Mac Mobile Device Operation Mobile devices include Android devices and iOS devices App functions are similar for both with micro difference in UI user interface These functions include media audio video upload photo upload camera remote and desktop The following instructions are in the case of iOS mo...

Page 67: ...1 ENGLISH Start up Click to enter the interface as follows Picture 4 1 1 1 Connection Interface Enter the code on IFP to connect devices and enter the interface as follows Picture 4 1 1 2 Main Interface ...

Page 68: ...erver there would be a new column in client interface where the authorized device could see requests from other devices and to accept or reject requests Picture 4 1 1 3 Interface after Authorized Picture 4 1 1 4 Click to Accept Reject ...

Page 69: ...Screen Share Interface Audio Video Upload Click to upload audio video Picture 4 1 3 1 Audio Video Upload Click the preview image of audio video to play it on IFP Click to switch from defaulted video upload interface to audio one Click to switch from defaulted preview image display to details display ...

Page 70: ...Click the preview image of photo to play it on IFP Click to switch from defaulted camera photo preview to other albums Click to switch from defaulted preview image display to details display Files Upload Files Upload Click to enter files upload mode Picture 4 1 5 1 Files Upload Interface ...

Page 71: ...rver client devices would enter remote mode automatically as follows Instruction for this please see 4 1 7 Remote Picture 4 1 5 2 Remote Mode Camera Click to enter camera mode click so that you can cast screen onto the IFP via the camera on your devices Picture 4 1 6 1 Camera Interface ...

Page 72: ...touch mode interface Picture 4 1 7 1 Remote touch Mode Interface Switch mode Remote includes touchpad mode and motion mode Click choose Switch mode swipe to choose your desired mode Picture 4 1 7 2 Switch mode Picture 4 1 7 3 Swipe to Choose ...

Page 73: ...imulate the mouse left click button click Back to simulate the mouse right click button Move with one finger on touchpad and the mouse arrow on IFP will move simultaneously Picture 4 1 7 4 Motion Mode Motion mode As shown in picture 4 1 7 4 tilt your devices to move the mouse Click to choose Back to desktop Click to exit remote mode and go back to desktop ...

Page 74: ...on Mode Supported touchpad gestures are as follows One click to simulate mouse left click button long press to simulate mouse right click button Drag with one finger on the touchpad to move icons windows Place two fingers on the touchpad and pinch in to zoom out and stretch out to zoom in Users could write on the mobile devices and send to IFP Picture 4 1 8 2 Desktop Synchronization ...

Page 75: ...ces and go back to main interface Picture 4 1 9 1 Disconnection PC Device Operation Windows Chrome OS and MacOS have similar interface and operations The followings are in the case of Mac 1 Startup software in PC client device and enter the main interface Picture 4 2 1 PC Client Device Interface ...

Page 76: ...nt Device Mirroring Successfully Stop mirroring Click so that client devices will not mirror with IFP Disconnect Click to disconnect client devices from server and go back to main interface Adjust resolution Click to switch between different mirroring resolution Receiver operation Click to enable server devices to remotely control client Keep aspect ratio Once enabled only one client device could ...

Page 77: ...ed Connection Code Apart from six pure digits there is also a digits letters connection code mode Locate it in settings Click to switch to advanced code mode Picture 5 1 1 Menu Settings Picture 5 1 2 Advanced Code Mode ...

Page 78: ...52 ENGLISH Picture 5 1 3 Switch Connection Code Mode Reminder Picture 5 1 4 Advanced Code Mode Server ...

Page 79: ...ake sure of the operation of Screen Share Pro under different network situation we have advanced connection code Adjust the settings on client devices input new code after switching to advanced mode Step1 Step2 Step3 ...

Page 80: ...ectly click with touch pen to confirm selected input channel Press button on remote control or click blank area outside menu with touch pen to exit menu Note PC channel will only display when the equipment connects the built in computer Detail Setting Menu Press on remote control or click the icon on General Setting menu with touch pen to call up detail setting menu Detail setting menu includes Au...

Page 81: ...en to select the option Press on remote control to enter adjustment mode and press button or directly click with touch pen to adjust each option Press to exit adjustment Press on remote control or directly click with touch pen to open or close mute state Press on remote control or click blank area outside menu with touch pen to exit menu ...

Page 82: ...een setting menu Press on remote control or directly click with touch pen to select the option Press on remote control or directly click with touch pen to enter the selected mode Press on remote control or click blank area outside menu with touch pen to exit menu ...

Page 83: ...remote control or directly click with touch pen to select the option Press on remote control to enter adjustment mode and press button or directly click with touch pen to adjust each option Press to exit adjustment Press on remote control or click blank area outside menu with touch pen to exit menu ...

Page 84: ...ck with touch pen to select the option Press on remote control to enter adjustment mode and press button or directly click with touch pen to adjust each option Press to exit adjustment You can also click the Auto icon to adjust automatically Press on remote control or click blank area outside menu with touch pen to exit menu ...

Page 85: ... 30 Fps 40 Mbps H 264 Spec Max Resolution 3840 x 2160 30 Fps 160 Mbps f4v H 264 AAC Spec Max Resolution 3840 x 2160 30 Fps 160 Mbps mkv H 264 AAC Mpeg1 2 Layer3 Spec Max Resolution 3840 x 2160 30 Fps 160 Mbps H 265 Spec Max Resolution 3840 x 2160 60 Fps 160 Mbps Vc 1 Spec Max Resolution 1920 x 1088 30 Fps 45 Mbps mov H 264 AAC PCM Spec Max Resolution 3840 x 2160 30 Fps 160 Mbps H 265 Spec Max Reso...

Page 86: ... x 2160 30 Fps 160 Mbps H 265 Spec Max Resolution 3840 x 2160 60 Fps 160 Mbps MPEG 2 Spec Max Resolution 1920 x 1088 30 Fps 80 Mbps MPEG 4 Spec Max Resolution 1920 x 1088 30 Fps 50 Mbps VC 1 AP Spec Max Resolution 1920 x 1088 30 Fps 45 Mbps Licenses involved in specifications above are supposed to be obtained by customers ...

Page 87: ... FLAC FLAC Sample Rate Max 192 KHz Bit Rate max 1411 Kbps m4a ALAC ALAC Sample Rate 8K 96 KHz Bit Rate 24K 576 Kbps mp3 MPEG Audio Layer3 MPEG1 2 Layer3 Sample Rate 8K 48 KHz Bit Rate 32K 320 Kbps ogg Vorbis Vorbis Sample Rate 8K 48 KHz Bit Rate max 256 Kbps wav WAV LPCM Sample Rate 8K 192 KHz Bit Rate max320 Kbps Licenses involved in specifications above are supposed to be obtained by customers ...

Page 88: ...ll screen confirm file 5000 x 5000 OK gif GIF Max Resolution 8000 8000 Min Resolution 4 x 4 Max Resolution 8000 8000 Preview Normal Unable to play full screen confirm file max 5000 x 5000 OK jpeg jpg JPEG Max Resolution 8000 8000 Min Resolution 4 x 4 Progressive support 4000 4000 baseline support 8000 x 8000 png PNG Max Resolution 8000 8000 Min Resolution 4 x 4 ...

Page 89: ...100 05 Contrast d 000 100 06 Brightness k 000 100 07 Sharpness k 000 100 08 Sound Mode k 000 004 09 Volume k 000 100 10 Mute k 000 001 11 Video Source x See Video Source 12 Aspect Ratio f 000 002 13 Language f See Language 14 Picture Mode f 000 003 15 Hue j 000 100 16 Backlight k 000 100 17 Color Temp d 000 002 18 Remote Control k See Remote Control 19 IR k 000 001 ...

Page 90: ... the function or check the status of it Settings 0 x 53 Check 0 x 47 Command This command is to control the set Data Transmits command data Acknowledgement Set success Success reply 34 30 31 2B 0D Set fail Fail reply 34 30 31 2D 0D ACK acknowledgment is sent in this format depending on the processing status of the command inputted to the product When the Type value is sent as 0x47 to check the set...

Page 91: ...rast Command 34 Adjust the screen contrast Transmission 3A 30 31 Type 34 Data 0D Data 000 30 30 30 100 31 30 30 06 Brightness Command 35 Adjust the screen brightness Transmission 3A 30 31 Type 35 Data 0D Data 000 30 30 30 100 31 30 30 07 Sharpness Command 36 Adjust the screen sharpness Transmission 3A 30 31 Type 36 Data 0D Data 000 30 30 30 100 31 30 30 08 Sound mode Command 37 Select sound mode T...

Page 92: ...ata 0D Data 000 30 30 30 VGA 001 30 30 31 HDMI1 002 30 30 32 HDMI2 021 30 32 31 HDMI3 101 31 30 31 Android 103 31 30 33 Slot PC 12 Aspect Ratio Command 3B Adjust the aspect ratio Transmission 3A 30 31 Type 3B Data 0D Data 000 30 30 30 16 9 001 30 30 31 4 3 002 30 30 32 PTP 13 Language Command 3C Select the OSD language Transmission 3A 30 31 Type 3C Data 0D Data 000 30 30 30 English 001 30 30 31 Fr...

Page 93: ...0 30 Vol 001 30 30 31 Vol 010 30 31 30 Up 011 30 31 31 Down 012 30 31 32 Left 013 30 31 33 Right 014 30 31 34 OK 020 30 32 30 Menu 021 30 32 31 Input Source 022 30 32 32 Exit 031 30 33 31 Blank 032 30 31 32 Freeze 19 IR Command 42 Adjust the remote control IR Transmission 3A 30 31 Type 42 Data 0D Data 000 30 30 30 Enable 001 30 30 31 Disable ...

Page 94: ......

Reviews: