


- 18 -
1. Application Object
This instruction is for the application to the DLP Projection
2. Notes
1) The power source insulation of this DLP Projection is
not charging type and you may not use the
transformer for insulation. But you’d better adjust the
set after operating it with insulation transformer
between power supply cable and input part of the set
for protecting the adjusting equipment.
2) The adjustment must be performed under the correct
sequence.
3) The adjustment must be performed in the circumstance
of 25
!
5°C of temperature and 65
!
10% of relative
humidity if there is no specific designation.
4) The input voltage of the receiver must keep 220V, 60Hz
in adjusting.
5) The set must be operated for 5 minutes preliminary
before adjustment if there is no specific designation.
The preliminary operation must be performed after
receiving 100% white pattern,but reception of the
moving picture may also be possible in unavoidable
case.
3. Composition of Adjustment Mode
1) All adjustment mode by pressing down ADJ key of a
adjustment remote controller, after adjustment as they
also come out by pressing down ADJ key.
2) Adjustment mode component : When early ADJ
presses presented screen component.
3) Select menu to adjust with using (CH+(
D
D
), CH-(
E
E
)) key
above screen and press Enter key <Fig 1>.
4) After entering into ADJ Mode list, using CH+(
D
), CH-(
E
)
key, after choosing an adjustment list one more time,
adjustment value is changed by using ENTER Key.
5) Press the ADJ key to come out after adjustment.
6) Preparation for Adjustment
(1) Connect the power to TV Set and set the status of
“Power on”.
(2) Heat-Run must operate over 5 minute before
adjustment.
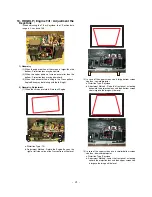
4. Adjustment the optical engine
1) After placing the optical engine on the JIG, adjust
illuminator by adjusting with automatic adjustment the
B as shown <Fig 2>
.
(1) When adjust illuminator, search the scope does not fall
in illuminator and Tilt adjustment complete with
automation equipment in that scope.
(2) After adjusting, A fix with Screw using automation
equipment.
2) In order to move the Optical system adjusted the Tilt to
center of the screen, adjust with automatic device
.
After automatically adjusting the illuminator in <Fig 3>
adjust the position. (
Refer to Automatic Adjustment
Sequence )
ADJUSTMENT INSTRUCTIONS
<Fig 1.Adjustment Mode OSD>
<Fig 2>
A
B
<Fig 3>
<Reference> Automatic Adjustment Sequence
A
Start
Check Focus
DMD Manual
NG
NG
NG
Restart
Restart
DMD Manual
Manual
Check DMD
Check DMD
Check DMD
DMD Chuck Back
End
Check Lens
Check Lens
Lens Chuck Open
Lens Screw Fix.
DMD Screw Fix.
DMD Adjustment(Tilt, Illuminator)
DMD Adjustment(X & Y & Tilt)
Lens Adjustment(X & Y)
DMD/Lens Chucking
Screw Fwd/Bwd
Summary of Contents for 44/52SZ8R
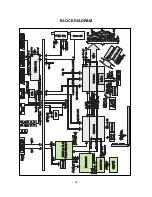
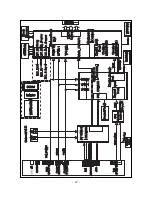
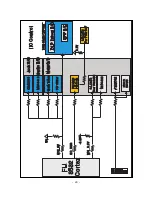
Page 26: ... 26 BLOCK DIAGRAM ...
Page 27: ... 27 ...
Page 28: ... 28 ...
Page 29: ... 29 ...
Page 30: ... 30 ...
Page 31: ... 31 ...
Page 48: ......
Page 49: ......
Page 50: ......


