background image

16

ENG

ENGLISH

ASSEMBLING AND PREPARING

y

y

To protect the screen from scratches, cover 

the surface with a soft cloth.

CAUTION

1

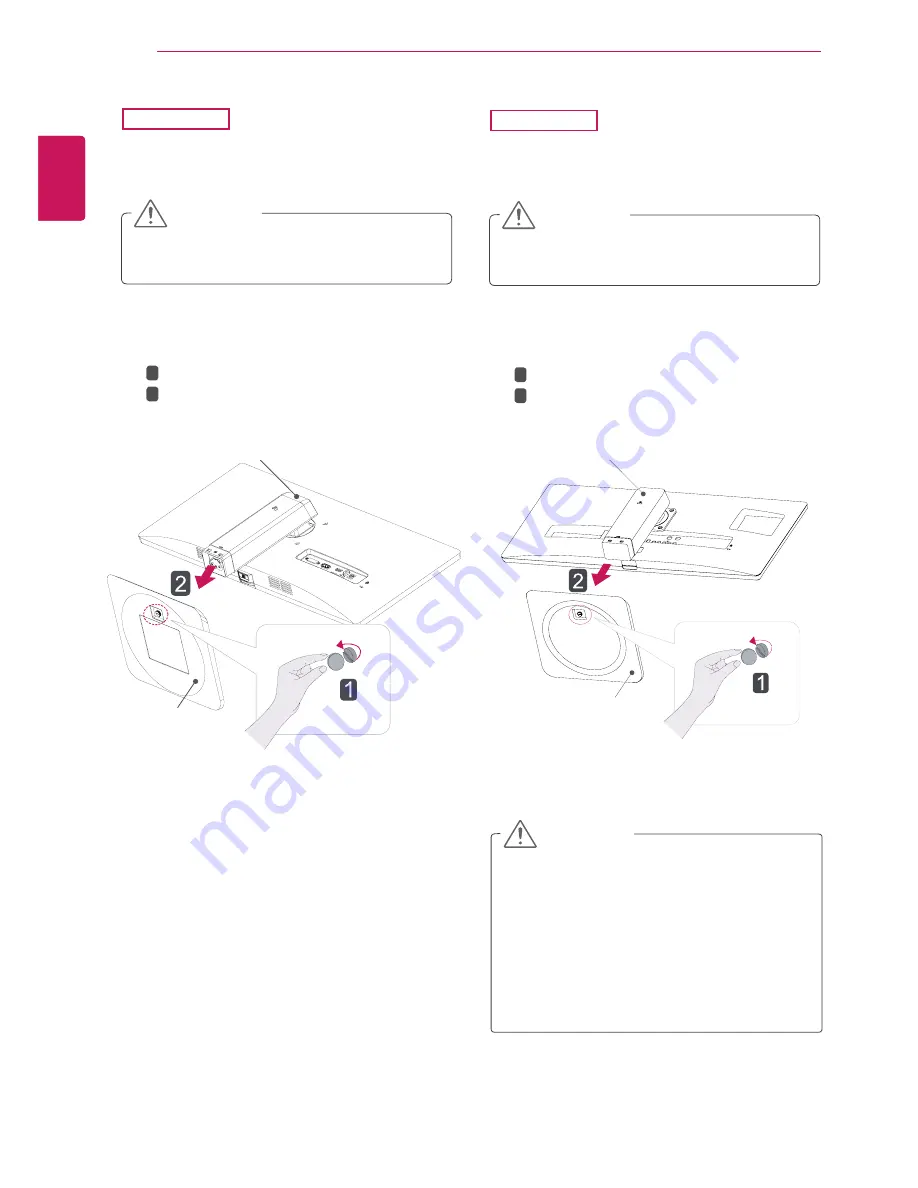
  Place the screen face down.

25UB55

2

Turn the screw to the left using a coin. 
Detach the 

stand base

.

1
2

Stand Base

Stand Body

y

y

To protect the screen from scratches, cover 

the surface with a soft cloth.

CAUTION

1

  Place the screen face down.

29UB55

y

y

The components in the illustrations may dif-

fer from the actual product.

y

y

Do not carry the monitor upside down, as this 

may cause it to fall off its stand and result in 

damage or injury.

y

y

To avoid damaging the screen when lifting 

or moving the monitor, only hold the stand or 

the plastic cover. This avoids putting unnec-

essary pressure on the screen.

CAUTION

2

Turn the screw to the left using a coin. 
Detach the 

stand base

.

1
2

Stand Base

Stand Body

Summary of Contents for 25UB55

Page 1: ...www lg com Owner s Manual IPS LED MONITOR LED MONITOR 25UM55 25UB55 29UM55 29UB55 Please read the safety information carefully before using the product IPS LED Monitor LED Monitor Model List ENGLISH ...

Page 2: ...ND PREPARING 4 Product Components 5 Component and Button Description 9 Moving and Lifting the Monitor 10 Installing the Monitor 10 Assembling the stand base 13 Using the cable holder 14 Detaching the stand base 17 Detaching the stand body 18 Installing onto a table 19 Adjusting the stand height 20 Adjusting the angle 22 Pivot feature 23 Using the Kensington lock 23 Installing the wall mount plate ...

Page 3: ...HDMI High Definition Multimedia Interface and the HDMI logo are trademarks or registered trademarks of HDMI Licensing LLC in the United States and other countries VESA VESA logo Display Port Compliance Logo and Display Port Compliance Logo for dual mode source are all registered trademarks of the Video Electronics Standards Association ...

Page 4: ...look different from those shown here y y Without prior notice all information and specifications in this manual are subject to change to im prove the performance of the product y y To purchase optional accessories visit an electronics store or online shopping site or contact the retail store where you purchased the product y y The DisplayPort cable may not be available in some areas CAUTION NOTE U...

Page 5: ...5 ENG ENGLISH ASSEMBLING AND PREPARING Component and Button Description Power Indicator y y On power is on y y Off power is off Ports Power Button ...

Page 6: ...6 ENG ENGLISH ASSEMBLING AND PREPARING 29UM55 Power Indicator y y On power is on y y Off power is off Ports Power Button ...

Page 7: ...7 ENG ENGLISH ASSEMBLING AND PREPARING 5 5 Power Indicator y y On power is on y y Off power is off Ports Power Button ...

Page 8: ...8 ENG ENGLISH ASSEMBLING AND PREPARING 29UB55 Power Indicator y y On power is on y y Off power is off Ports Power Button ...

Page 9: ...efore moving or lifting the monitor discon nect the power cord and all cables y y Hold the top and bottom of the monitor frame firmly Do not hold the panel itself y y When holding the monitor the screen should face away from you to prevent it being scratched y y When moving the monitor avoid any strong shock or vibrations to the product y y When moving the monitor keep it upright never turn the mo...

Page 10: ...loth CAUTION 2 Check the direction of the stand body front back and then mount the stand body onto the stand hinge Tighten two screws into the back of the stand body 1 Place the screen face down 25UM55 3 4 Attach the screw cover Stand Body Stand Body Stand Base Stand Hinge Attach the Stand Base to Stand Body Tighten the screw to the right 1 2 Screws Screw Cover ...

Page 11: ...nto the back of the stand body 1 Place the screen face down 29UM55 Applying excessive force when tightening the screws may cause damage to the moni tor Damage caused in this way will not be covered by the product warranty CAUTION 3 4 Attach the screw cover It may hurt your foot off the stand so be careful CAUTION Stand Body Stand Body Stand Base Stand Hinge Attach the Stand Base to Stand Body Tigh...

Page 12: ... the position at the front and rear of the stand body then mount the stand base on the stand body as shown in the figure y y To protect the screen from scratches cover the surface with a soft cloth CAUTION 1 Place the screen face down 29UB55 Stand Base Stand Body 3 Using a coin turn the screw clockwise to se cure the stand base 2 Check the position at the front and rear of the stand body then moun...

Page 13: ... Fix the Knob Cable holder to the Hole Stand Body 1 2 3 Use one screw to fix the Cable Holder and monitor set Close the Cable holder 29UB55 29UM55 Fix the Knob Cable holder to the Hole Stand Body 1 2 3 Use one screw to fix the Cable Holder and monitor set Close the Cable holder ...

Page 14: ...cratches cover the surface with a soft cloth CAUTION 1 Place the screen face down 25UM55 3 Remove the two screws on the back of stand body As shown in the illustration disconnect the stand body from the stand hinge Screw cover Stand Body Stand Base Turn the screw to the left Pull out the Stand Base 4 1 2 Screws Stand Body ...

Page 15: ...ause the monitor to fall off the stand and could result in personal injury y y When lifting or moving the monitor do not touch the monitor screen Applying force or pressure may damage the monitor screen Instead hold the stand body or the plastic frame of the product CAUTION 1 Place the screen face down 29UM55 3 Remove the two screws on the back of stand body As shown in the illustration disconnect...

Page 16: ...th a soft cloth CAUTION 1 Place the screen face down 29UB55 y y The components in the illustrations may dif fer from the actual product y y Do not carry the monitor upside down as this may cause it to fall off its stand and result in damage or injury y y To avoid damaging the screen when lifting or moving the monitor only hold the stand or the plastic cover This avoids putting unnec essary pressur...

Page 17: ...surface with a soft cloth 2 Using a screwdriver remove the four screws and detach the stand from the monitor 25UB55 Detaching the stand body 1 Place the monitor s screen face down To protect the screen from scratches cover the surface with a soft cloth 2 Using a screwdriver remove the four screws and detach the stand from the monitor ...

Page 18: ...ace it on the table in an upright position Place at least 10 cm away from the wall to ensure sufficient ventilation 2 Connect the adapter to the monitor then plug the power cord into the power outlet 25UM55 25UB55 10 cm 10 cm 10 cm 10 cm 10 cm 10 cm 10 cm 10 cm 29UM55 29UB55 29UM55 2 or or ...

Page 19: ... to 120 0 mm y y Do not put your fingers or hand between the screen and the base chassis when adjusting the screen s height Tape Locking Pin Stand Body CAUTION WARNING 1 Stand the monitor assembled with the stand base in an upright position 29UB55 130 0 mm 25UB55 29UB55 25UB55 120 0 mm 3 Press the Power button on the bottom of the monitor to turn it on y y Unplug the power cord prior to moving or ...

Page 20: ... upright position mount ed on the stand base 2 Adjust the angle of the screen The angle of the screen can be adjusted forwards or backwards for a comfortable viewing experience 29UM55 29UB55 0 2 5 Front Side Rear Side Front Side Rear Side 0 2 5 Front Side Rear Side Front Side Rear Side ...

Page 21: ...e fingers when adjusting the screen do not hold the lower part of the monitor s frame as illustrated below WARNING 29UB55 29UM55 0 2 5 0 2 5 y y Be careful not to touch or press the screen area when adjusting the angle of the monitor 0 2 5 29UM55 25UB55 25UM55 29UB55 ...

Page 22: ...90 clockwise 25UB55 1 Raise the monitor up to the maximum height 2 Adjust the angle of the monitor in the direction of the arrow as shown in the figure 3 Rotate the monitor clockwise as shown in the figure 4 Complete the installation by rotating the monitor 90 as shown below y y Take care when rotating the monitor if the cable is connected WARNING y y An image displayed on the monitor s screen doe...

Page 23: ... information on installation refer to the wall mount plate s installation guide y y Be careful not to use excessive force when mounting the wall mount plate as this can damage the monitor s screen NOTE y y Use of the Kensington lock is optional The accessories can be purchased at your local electronics store NOTE Using the Kensington lock The Kensington security system connector is locat ed at the...

Page 24: ...in the monitor falling off which could lead to injury Please use the genuine LG wall mounting bracket For more information contact your local retail store or a qualified installer y y Applying excessive force when fastening screws may cause damage to the moni tor Damage caused in this way will not be covered by the product warranty y y Use the wall mounting bracket and screws that conform to the V...

Page 25: ... that came with the product y y Connect the input signal cable and turn in the direction of the arrow To prevent disconnection secure the cable tightly y y Do not press on the screen for a prolonged period of time This may cause image distortion y y Do not display a still image on the screen for a prolonged period of time This may cause image retention If possible use the screen saver CAUTION y y ...

Page 26: ...able in some areas DisplayPort connection Transmits the digital video and audio signals from your PC to the monitor Connect your PC to the monitor using the display port cable as illustrated below Press the menu button and then select the input option from the input menu NOTE 29UM55 29UB55 sold separately sold separately 2 2 sold separately sold separately ...

Page 27: ...ices to the monitor Connect your PC and AV device to the monitor with the HDMI cable as illustrated below Press the menu button and then select the input option from the input menu y y HDMI PC may cause device compatibility issues y y Using a DVI to HDMI cable may cause com patibility issues NOTE 29UB55 29UM55 27 2 27 2 ...

Page 28: ...d audio signals from your PC and A V devices to the monitor Connect your PC and AV device to the monitor with the HDMI cable as illustrated below Press the menu button and then select the input option from the input menu y y Using a DVI to HDMI cable may cause com patibility issues NOTE 29UM55 29UB55 2 2 ...

Page 29: ...or Connect as illustrated 29UM55 y y Depending on the audio settings of the PC and external device headphone and speaker functions may be limited NOTE y y For an angle plug earphone it is difficult connect it with a peripheral device so use a straight type NOTE Angle Type Straight Type sold separately 29UB55 sold separately sold separately sold separately ...

Page 30: ...rvice Pack 1 or higher is required for Windows 7 3 Follow the instructions to proceed with the installation 4 Check I accept the terms of the agreement on the License Agreement screen and then click the Next button y y Screen Split This program automatically splits the program window as desired This program not supported Windows XP y y Auto Resolution This is a program that automatically changes t...

Page 31: ...he program you selected on the Select Features page will install automatically 8 When the installation is complete restart your system NOTE If you run Screen Split the Screen Split icon appears in the system tray at the right bottom of the PC screen Right click the Screen Split icon and select a layout you want ...

Page 32: ...he menu is disabled Adjusts the volume level of the monitor If the menu is enabled Enter to Menu OSD In no sync mode enter Input change OSD Jog the power button right If the menu is disabled Adjusts the volume level of the monitor If the menu is enabled Enter to PBP OSD Jog the power button up If the menu is disabled Enables the navigation OSD If the menu is enabled Enter to Reader OSD Jog the pow...

Page 33: ...rast Volume Adjusts the volume NOTE y y Jog Power button down in the Volume menu will enable disable the Mute function Input Selects the current input mode Ratio Adjusts the screen ratio Wide Displays the video in wide screen regardless of the video signal input Original Displays a video according to the input video signal aspect ratio Cinema 1 Enlarges the screen with an aspect ratio of 21 9 at 1...

Page 34: ... screen 6 To return to the upper menu or set other menu items Jog the Power left Menu Func Description SUPER ENERGY SAVING High Saves energy by using the high efficiency SUPER ENERGY SAVING function Low Saves energy by using the low efficiency SUPER ENERGY SAVING function Off Disables the SUPER ENERGY SAVING function Picture Mode Custom Allows the user to adjust each element The color mode of the ...

Page 35: ...he video in wide screen regardless of the video signal input Sub Displays a video according to the input video signal aspect ratio Audio Changes the audio output in PBP mode Swap Toggles between the main screen and sub screen in PBP mode Sub Full Converts the sub screen of PBP mode to the wide screen Ratio Adjusts the aspect ratio of the main screen or sub screen Main Wide Displays the video to fi...

Page 36: ...ay cause image sticking High Sets the response time to High Middle Sets the response time to Middle Low Sets the response time to Low Off Sets the response time to Off Color Gamma Custom gamma setting When using the gamma 0 gamma 1 and gamma 2 monitor set tings higher gamma settings mean a brighter image is displayed and vice versa Color Temp Custom Red Green Blue You can customize the picture col...

Page 37: ...ain Audio Main audio have three options HDMI1 HDMI2 DisplayPort 25UM55 29UM55 Main audio have four options HDMI1 HDMI2 DisplayPort Audio In 25UB55 29UB55 Language Sets the menu screen to the desired language Power LED Turns the power indicator on the front side of the monitor on off On The power indicator is automatically turned on Off The power indicator is turned off Automatic Standby The monito...

Page 38: ...to Reset 4 Press Power button center or Jog Power button right to select Reset 5 Set the options follow up the instruction appear on right bottom of the screen 6 To return to the upper menu or set other menu items Jog the Power left Each option is described below Menu Reset Description Do you want to reset your settings Reset Returns to the default settings Cancel Cancel the select ...

Page 39: ... of the screen Reader Mode Description Reader 1 It is a mode that the screen is adjusted to the best for the newspaper If you want screen more bright you can control brightness in Menu OSD Reader 2 It is a mode that the screen is adjusted to the best for the cartoon If you want screen more bright you can control brightness in Menu OSD Reader Off It is a mode that reader mode is off Each option is ...

Page 40: ...PC and the moni tor is missing or disconnected Check the cable and reconnect The screen retains an image Does image sticking occur even when the monitor is turned off y y Displaying a still image for a prolonged time may cause damage to the screen resulting in the retention of the image y y Use a screen saver to protect the screen when using the monitor for a prolonged period of time y y Vertical ...

Page 41: ...urer of the computer or video card for assistance y y Some video cards may not support the 2560x1080 resolution If the resolution cannot be displayed contact the manufacturer of your video card NOTE The display color is abnormal Does the display appear discolored 16 color y y Set the color to 24 bit true color or higher In Windows go to Control Panel Display Settings Color Quality Does the display...

Page 42: ...oduction OrADS 40FSG 19 19032GPCU 1 type SHENZHEN HONOR ELECTRONIC CO LTD production Or LCAP21Atype LIEN CHANG ELECTRONIC ENTERPRISE production Or LCAP26A Atype LIEN CHANG ELECTRONIC ENTERPRISE production Or LCAP26A E type LIEN CHANG ELECTRONIC ENTERPRISE production Or LCAP26A I type LIEN CHANG ELECTRONIC ENTERPRISE production Or LCAP26A B type LIEN CHANG ELECTRONIC ENTERPRISE production Output 19...

Page 43: ...C CO LTD production OrADS 40FSG 19 19032GPCU 1 type SHENZHEN HONOR ELECTRONIC CO LTD production Or LCAP21Atype LIEN CHANG ELECTRONIC ENTERPRISE production Or LCAP26A Atype LIEN CHANG ELECTRONIC ENTERPRISE production Or LCAP26A E type LIEN CHANG ELECTRONIC ENTERPRISE production Or LCAP26A I type LIEN CHANG ELECTRONIC ENTERPRISE production Or LCAP26A B type LIEN CHANG ELECTRONIC ENTERPRISE productio...

Page 44: ...0G type SHENZHEN HONOR ELECTRONIC CO LTD produc tion Or LCAP21B type LIEN CHANG ELECTRONIC ENTERPRISE production Output 19 V 2 1 A Environmental Conditions Operating Condition Temperature 10 C to 35 C Humidity 10 to 80 Storing Condition Temperature 20 C to 60 C Humidity 5 to 90 Stand Angle Adjustment Forwards Backwards 5 to 20 Head Dimension Monitor Size Width x Height x Depth With Stand 70 3 cm x...

Page 45: ...S 45SN 19 3 19040G type SHENZHEN HONOR ELECTRONIC CO LTD produc tion Or LCAP21B type LIEN CHANG ELECTRONIC ENTERPRISE production Output 19 V 2 1 A Environmental Conditions Operating Condition Temperature 10 C to 35 C Humidity 10 to 80 Storing Condition Temperature 20 C to 60 C Humidity 5 to 90 Speaker Wattage 5 W 5 W Stand Angle Adjustment Forwards Backwards 5 to 20 Head Dimension Monitor Size Wid...

Page 46: ...5 75 1024 x 768 48 363 60 1024 x 768 60 123 75 029 1152 x 864 67 5 75 1280 x 720 45 60 1280 x 1024 63 981 60 02 1280 x 1024 79 976 75 025 1600 x 900 60 60 1680 x 1050 65 290 59 954 1920 x 1080 67 5 60 2560 x 1080 66 7 60 HDMI Timing Video Preset Mode Horizontal Frequency kHz Vertical Frequency Hz Remarks 480P 31 50 60 576P 31 25 50 720P 37 50 50 720P 45 00 60 1080P 56 25 50 1080P 67 50 60 Power In...

Page 47: ...our to reduce any fatigue caused by long time usage y y The stand of the touch monitor allows the product to be used in the optimum position Adjust the stand angle to obtain the best view of the screen You should be looking slightly down at the screen Place your hands gently on the keyboard keeping your arms bent at the elbows and extended horizontally in front of you Adjust the angle So that ther...

Page 48: ...number of the SET is located on the back and one side of the SET Record it below should you ever need service MODEL SERIAL Declaration of Conformity Trade Name LG Model 25UM55D 25UB55D 29UM55D 29UB55D Responsible Party LG Electronics Inc Address 1000 Sylvan Ave Englewood Cliffs NJ 07632 U S A TEL 201 266 2534 above information is only for USA FCC Regulatory ...

Reviews: