background image

47

ENG

ENGLISH

MAKING CONNECTIONS

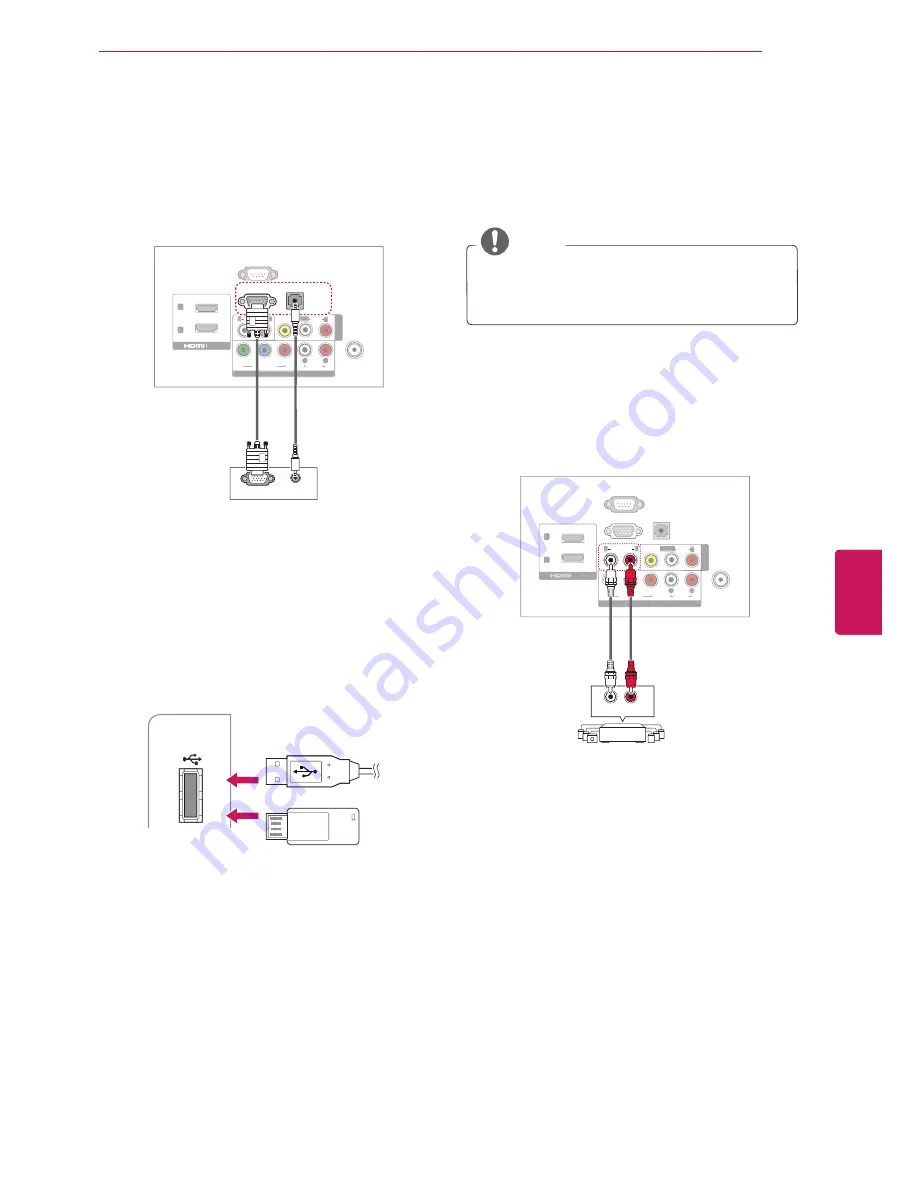
RGB connection

Transmits the analog video signal from your PC to 
the TV. Connect the PC and the TV with the D-sub 
15 pin signal cable as shown in the following 
illustrations.

COMPONENT IN

AUDIO

VIDEO

Y

P

B

P

R

L

R

AUDIO

VIDEO

L/MONO

R

RGB IN (PC)

RS-232C IN

(CONTROL)

AUDIO IN

(RGB/DVI)

AV

IN

1

AUDIO OUT

ANTENNA

IN

/DVI IN

2

1

L

R

RGB OUT (PC)

AUDIO OUT

RGB IN (PC)

AUDIO IN

(RGB/DVI)

Connecting to a USB

Connect a USB storage device such as a USB 
flash memory, external hard drive, MP3 player or a 
USB memory card reader to the TV and access the 
My media menu to use various multimedia files. 
See "Connecting USB storage devices" on p.27 and 
"Browsing files" on p.28.

US

B I

N

AV IN 2

AUDI

O

VIDE

O

L/

M

O

NO

R

or

USB IN

Connecting to an audio 

system

Use an optional external audio system instead of 
the built-in speaker.

 NOTE

y

y

If you use an potional external audio device 
instead of the built-in speaker, set the TV 
speaker feature to off (see p.39).

Analog stereo audio connection

Transmits the analog audio signal from the TV to 
an external device. Connect the external device 
and the TV with the audio cable as shown in the 
following illustration.

COMPONENT IN

AUDIO

VIDEO

Y

P

B

P

R

L

R

AUDIO

VIDEO

L/MONO

R

RGB IN (PC)

RS-232C IN

(CONTROL)

AUDIO IN

(RGB/DVI)

AV

 IN

1

AUDIO OUT

ANTENNA

IN

/DVI IN

2

1

L

R

AUDIO IN

R

L

L

R

AUDIO OUT


Summary of Contents for 22LK310

Page 1: ...O SAC35093801 1109 REV04 OWNER S MANUAL LCD TV Please read this manual carefully before operating the set and retain it for future reference 22LK310 26LK310 32LK310 22LK311 26LK311 32LK311 22LK311C 26LK311C 32LK311C ...

Page 2: ...fied device that plays DivX video Visit divx com for more information and software tools to convert your files into DivX video ABOUT DIVX VIDEO ON DEMAND This DivX Certified device must be registered in order to play purchased DivX Video on Demand VOD movies To obtain your registration code locate the DivX VOD section in your device setup menu Go to vod divx com for more information on how to comp...

Page 3: ...ns in the literature accompanying the appliance TO REDUCE THE RISK OF FIRE AND ELECTRIC SHOCK DO NOT EXPOSE THIS PRODUCT TO RAIN OR MOISTURE WARNING CAUTION Read these instructions Keep these instructions Heed all warning Follow all instruction y y Do not use this apparatus near water y y Clean only with dry cloth y y Do not block any ventilation openings Install in accordance with the manufacture...

Page 4: ...ed that appliances be placed upon a dedicated circuit that is a single outlet circuit which powers only that appliance and has no additional outlets or branch circuits Check the specification page of this owner s manual to be certain Do not connect too many appliances to the same AC power outlet as this could result in fire or electric shock Do not overload wall outlets Overloaded wall outlets loo...

Page 5: ...rovide some protection against voltage surges and built up static charges Section 810 of the National Electrical Code NEC in the U S A provides information with respect to proper grounding of the mast and supporting structure grounding of the lead in wire to an antenna discharge unit size of grounding conductors location of antenna discharge unit connection to grounding electrodes and requirements...

Page 6: ...ated sound does not affect the performance and reliability of the product y y Take care not to touch the ventilation openings When watching the TV for a long period the ventilation openings may become hot This does not affect the performance of the product or cause defects in the product y y If the TV feels cold to the touch there may be a small flicker when it is turned on This is normal there is...

Page 7: ...nput list 26 Locking the buttons on the TV Child Lock 26 Using the quick menu 27 ENTERTAINMENT 27 Connecting USB storage devices 28 Browsing files 29 Viewing photos 30 Listening to music 31 Viewing movies 32 DivX VOD Guide 34 CUSTOMIZING TV SETTINGS 34 Accessing Main Menus 35 Customizing Settings 35 CHANNEL Settings 36 PICTURE Settings 39 AUDIO Settings 40 TIME Settings 41 OPTION Settings 42 USB S...

Page 8: ...NTS 49 MAINTENANCE 49 Cleaning your TV 49 Screen and frame 49 Cabinet and stand 49 Power cord 49 Preventing Image burn or Burn in on your TV screen 50 TROUBLESHOOTING 52 SPECIFICATIONS 55 IR CODES 56 EXTERNAL CONTROL DEVICE SETUP ...

Page 9: ...del 1 Gently wipe the spots on the cabinet with the polishing cloth 22LK310 22LK311 22LK311C Cable tie Protection cover 26 32LK310 26 32LK311 26 32LK311C Screw for assembly Screw for fixing Protection cover M4 x 20 x 8 CAUTION y y Do not use any unapproved items to ensure the safety and product life span y y Any damages or injuries by using unapproved items are not covered by the warranty NOTE y y...

Page 10: ...hted menu option or confirms an input VOL Adjusts the volume level v CH Scrolls through the saved channels USB IN COMPONENT IN AUDIO VIDEO Y PB PR L R AUDIO VIDEO L MONO R RGB IN PC RS 232C IN CONTROL AUDIO IN RGB DVI AV IN AUDIO OUT ANTENNA IN DVI IN 2 INPUT HOME CH VOL ENTER R L Remote control sensors Power indicator USB Input Screen Speakers Rear Connection Panel see p 43 Buttons Side Connectio...

Page 11: ...Adjusts the volume level v CH Scrolls through the saved channels USB IN COMPONENT IN AUDIO VIDEO Y PB PR L R AUDIO VIDEO L MONO R RGB IN PC RS 232C IN CONTROL AUDIO IN RGB DVI AV IN1 AUDIO OUT ANTENNA IN DVI IN 2 1 AV IN 2 AUDIO VIDEO L MONO R CH VOL ENTER INPUT HOME L R Remote control sensors Power indicator USB Input AV Audio and Video input Screen Speakers Rear Connection Panel see p 43 Buttons...

Page 12: ...aker or speaker grill area y y When transporting a large TV there should be at least 2 people y y When transporting the TV by hand hold the TV as shown in the following illustration y y When transporting the TV do not expose the TV to jolts or excessive vibration y y When transporting the TV keep the TV upright never turn the TV on its side or tilt towards the left or right Setting up the TV Put y...

Page 13: ...otection cover Protection cover 26 32LK310 26 32LK311 26 32LK311C 1 Lay the TV with the screen side down on a flat surface CAUTION y y Lay a foam mat or soft protective cloth on the surface to protect the screen from damage Make sure not objects press against the screen 2 Assemble the parts of the STAND BODY with the STAND BASE of the TV Screw for assembly Number of screws M4 x 20 4 Stand Body Sta...

Page 14: ...crews and pull the stand away from the TV Screw for assembly Number of screws M4 x 20 4 3 Push the supplied protection cover into the opening at the bottom of the TV until it locks in place This will protect the opening from accumulating dust and dirt When installing the wall mounting bracket use the Protection cover Protection cover ...

Page 15: ... adjust the angle of the TV to suit your view Except 22LK310 22LK311 22LK311C 20 20 y y Adjust the position of the panel in various ways for maximum comfort For 22LK310 22LK311 22LK311C Securing the TV to a table For 26 32LK310 26 32LK311 26 32LK311C Fix the TV to a table to prevent from tilting forward damage and potential injury Mount the TV on a table and then insert and tighten the supplied sc...

Page 16: ...y Make sure that children do not climb on or hang on the TV NOTE y y Use a platform or cabinet that is strong and large enough to support the TV securely y y Brackets bolts and ropes are optional You can obtain additional accessories from your local dealer Using the Kensington security system optional The Kensington security system connector is located at the rear of the TV For more information of...

Page 17: ...power first and then move or install the TV Otherwise electric shock may occur y y If you install the TV on a ceiling or slanted wall it may fall and result in severe injury Use an authorized LG wall mount and contact the local dealer or qualified personnel y y Do not over tighten the screws as this may cause damage to the TV and void your warranty y y Use the screws and wall mounts that meet the ...

Page 18: ...tie Cable tie 26 32LK310 26 32LK311 26 32LK311C 1 Gather and bind the cables with the cable management clip 2 Fix the cable management clip firmly to the TV Cable Management Clip NOTE y y Do not move the TV by holding the cable management clip as the cable management clip may break and injuries and damage to the TV may occur ...

Page 19: ... 26 Accesses the quick menu Navigation buttons Up Down Left Right ENTER Navigates the on screen menus and adjusts the system settings to your preference BACK Allows the user to move back one step in an interactive application or other user interaction function SIMPLINK see p 48 Accesses the AV devices connected to the TV Opens the SIMPLINK menu EXIT Clears all on screen displays and returns to TV ...

Page 20: ... RF cable 75 Ω ANTENNA IN NOTE y y To improve the picture quality in a poor signal area please purchase a signal amplifier and install properly y y If the antenna needs to be split for two TV s install a 2 Way Signal Splitter y y If the antenna is not installed properly contact your dealer for assistance CAUTION y y Make sure not to bend the copper wire of the RF cable Copper wire y y Complete all...

Page 21: ...your preferences Language Selects a language to display Mode Setting Selects Home Use for the home environment Auto Tuning Scans and saves available channels automatically NOTE y y To display images in the best quality for your home environment select Home Use y y Store Demo is suitable for the retail environment y y If you select Store Demo the previously customized settings will switch to the de...

Page 22: ...e remote control The TV switches to Standby mode Managing channels Setting up channels Storing channels To store channels automatically 1 Press Home to access the main menus 2 Press the Navigation buttons to scroll to CHANNEL and press ENTER 3 Press the Navigation buttons to scroll to Auto Tuning and press ENTER 4 Select Yes to start automatic tuning The TV scans and saves available channels autom...

Page 23: ...u are finished press EXIT When you return to the previous menu press BACK Selecting a channel on the channel list 1 Press LIST to access the channel list To move to the previous or next page press CH v 2 Select a channel you want and press ENTER Using favorite channels Add the channels that you watch frequently to the favorite list Setting up your favorite list 1 Select a channel to add to the fav...

Page 24: ...ithout disappearing parts at the edge of the image NOTE y y If you select Just Scan you may see image noises at the edge of the original signal y y The input sources Component HDMI DVI 720p 1080i 1080p support Just Scan 4 3 Resizes images at the standard 4 3 without distortion Zoom Formats an image to fit the screen width The top and bottom of the image may not appear Cinema Zoom Formats an image ...

Page 25: ... Press the Navigation buttons to scroll to one of the input sources and press ENTER Input List TV AV1 AV2 Component RGB PC Input source Description TV Watch TV over the air and cable AV Watch the contents in a VCR or other external devices Component Watch the contents in a DVD or other external devices or through a digital set top box RGB PC Use the TV as a computer monitor HDMI Watches contents i...

Page 26: ...quently using menus 1 Press Q MENU to access the quick menus 2 Press the Navigation buttons to scroll through the following menus CH Aspect Ratio 16 9 Zoom Setting CH Picture Mode Vivid CH Sound Mode Standard CH Caption Text Off CH SAP MONO CH Sleep Timer Off CH Del Add Fav Add CH USB Device Eject Q Menu Close 1 2 3 4 8 7 6 5 Menu Description 1 Aspect Ratio Changes the image size 16 9 Just Scan 4 ...

Page 27: ...er up to four memory cards are concurrently recognizable y y The recognition speed of a USB storage device may depend on each device y y Please do not turn off the TV or unplug the USB device when the connected USB storage device is working When such device is suddenly separated or unplugged the stored files or the USB storage device may be damaged y y Please connect power to a USB storage device ...

Page 28: ...ctric power source Browsing files Access the photo music or movie lists and browse files 1 Connect a USB storage device 2 Press Home to access the Home menu 3 Press the Navigation buttons to scroll to USB and press ENTER 4 Press Navigation buttons to scroll to Photo List Music List or Movie List and press ENTER 5 Press Navigation buttons to select a folder or file you want Option Move É Page 1 1 N...

Page 29: ...ns to select a folder or file you want and press ENTER A pop up window will appears Page 1 1 No Marked Photo List Up Folder 1366x768 125KB Up Folder Drive1 butterfly t i x E k r a M e g n a h C e g a P Move CH MARK Option 1366x768 125KB View Mark All Delete Close 5 View photos by using the following menus Menu Description View Display the selected photo Mark All or Unmark All Selects all files or ...

Page 30: ... file stops the playback or plays the selected music file y y When music is playing is displayed in front of the music play time Play with Photo Start playing the selected music and then move to the Photo List Mark All or Unmark All Selects all files or clears all of your selections Delete Delete the selected music file Close Closes the pop up menu 6 Control playback by using the following buttons...

Page 31: ...ific point will appear on the status bar In some files this function may not work properly Tips for playing video files y y The video file and the subtitle file must be located in the same folder y y The name of the video file and the subtitle file must be the same to view the subtitles normally y y Time information in an external subtitle file should be arranged in ascending order to be played y ...

Page 32: ...andic and Lappish Latin 5 English Trukish Cyrillic Bulgarian Byelorussian Macedonian Russian Serbian and pre 1990 no ghewith upturn Ukrainian Greek English Modern Greek Hebrew English Modern Hebrew Chinese Chinese Thai Thai Arabic English Arabic Sync When the video is not synchronized with the captions it can be adjusted by 0 5 second Position Move the location of the subtitles DivX VOD Guide DivX...

Page 33: ...NTER 3 Press the Navigation buttons to scroll to Deactivation and press ENTER 4 Select Yes to confirm Yes No Div X R Video On Demand Do you want to deactivate your device i 5 Select ENTER Close Div X R Video On Demand This device is deactivated Your deactivation code is XXXXXXXX To learn more visit www divx com vod i 6 When you are finished press EXIT NOTE y y Once the deregistration is executed y...

Page 34: ...to scroll to the setting or option you want and press ENTER 4 When you are finished press EXIT CHANNEL PICTURE AUDIO TIME OPTION USB CHANNEL see p 35 Sets up and edit channels PICTURE see p 36 Adjusts the image size quality or effect AUDIO see p 39 Adjusts the sound quality effect or volume level USB see p 42 Connecting USB storage devices TIME see p 40 Sets the time date or Timer feature OPTION s...

Page 35: ...press ENTER To return to the previous level press BACK 4 When you are finished press EXIT The available channel settings are described in the following Setting Description Auto Tuning Tunes and stores all available channels through antennas or cable inputs see p 22 Manual Tuning Tunes and stores the channels you want manually see p 22 Channel Edit Adds or deletes channels on the channel see p 23 C...

Page 36: ...en again Picture Mode Selects one of the preset image or customizes options in each mode for the best TV screen performance You are also able to customize advanced options of each mode The available preset picture modes vary depending on the TV Mode Vivid Adjusts the video image for the retail environment by enhancing the contrast brightness color and sharpness Standard Adjusts the image for the n...

Page 37: ...D backlight If you decrease the brightness level the screen becomes darker and the power consumption will be reduced without any video signal loss NOTE y y When adjusting Energy Saving Backlight function is disabled Contrast Increases or decreases the gradient of the video signal You may use Contrast when the bright part of the picture is saturated Brightness Adjusts the base level of the signal i...

Page 38: ...e screen from being too bright Dims extremely bright pictures This feature is disabled in Picture Mode Standard Sport Game Film Mode Makes video clips recorded in film look more natural by eliminating judder effect DVD and Blu ray movies are filmed at 24 frames per second fps Color Gamut Maximizess the utilization of color to increase color quality Standard Displays standard set of colors Wide Inc...

Page 39: ...listen to music Cinema Select when you watch movies Sport Select when you watch sports events Game Select when you play games NOTE y y If sound quality or volume is not at the level you want it is recommended to use a separate home theater system or amplifier to cope with different user environments y y If the Clear Voice II feature is on Infinite Surround will not be activated Option Infinite Sur...

Page 40: ...signal which includes time information provided by the broadcasting station If not set the time and date manually Off Time On Time Sets the time to turn on or off the TV automatically To use this function you should set the current time and date in advance NOTE y y If you do not press any button within 2 hours after the TV turns on by the On Time feature the TV enters the Standby mode automaticall...

Page 41: ... in use Text 1 2 Set ID Adds an ID to the connected devices see p 57 Power Indicator Sets to turn on off the indicator light on the TV Option Standby Light Sets to turn on off the indicator light in Standby mode Power Light Sets to turn on off the indicator light when you turn on the power Demo Mode Sets to show special features of the TV Mode Setting Default selection is Home Use We recommend set...

Page 42: ... level press BACK 4 When you are finished press EXIT The available general settings are described in the following Setting Description Photo List Use it for viewing photos see p 29 Music List Use it for listening to music see p 30 Movie List Use it for viewing movies see p 31 DivX Reg Code Registers your TV to play DivX protected videos see p 32 Deactivation Deactivates your TV see p 33 USB ꔂ Move...

Page 43: ... receivers DVD players VCRs audio systems USB storage devices PC gaming devices and other external devices NOTE y y If you record a TV program on a DVD recorder or VCR make sure to connect the TV signal input cable to the TV through a DVD recorder or VCR For more information on recording refer to the manual provided with the connected device y y The external device connection may differ from the m...

Page 44: ...on type of the external device 3 Go to the appropriate illustration and check the connection details NOTE y y If you connect a gaming device to the TV use the cable supplied with the gaming device y y Refer to the external equipment s manual for operating instructions HDMI see p 45 DVI see p 45 Component see p 46 Composite see p 46 RGB see p 47 Memory storage see p 47 Memory card reader see p 47 H...

Page 45: ... Cables are tested to carry an HD signal up to 1080p and higher COMPONENT IN AUDIO VIDEO Y PB PR L R AUDIO VIDEO L MONO R RGB IN PC RS 232C IN CONTROL AUDIO IN RGB DVI AV IN1 AUDIO OUT ANTENNA IN DVI IN 2 1 L R HDMI DVI IN 2 1 DVI to HDMI connection Transmits the digital video signal from an external device to the TV Connect the external device and the TV with the DVI HDMI cable as shown in the fo...

Page 46: ...IN AUDIO VIDEO Y PB PR L R AUDIO VIDEO L MONO R RGB IN PC RS 232C IN CONTROL AUDIO IN RGB DVI AV IN1 AUDIO OUT ANTENNA IN DVI IN 2 1 L R MONO AUDIO L R VIDEO AUDIO VIDEO L MONO R AV IN1 Connecting to a PC NOTE y y It is recommended to use the TV set with the HDMI connection for the best image quality HDMI Connection Transmits the digital video and audio signals from your PC to the TV Connect the P...

Page 47: ... My media menu to use various multimedia files See Connecting USB storage devices on p 27 and Browsing files on p 28 USB IN AV IN 2 AUDIO VIDEO L MONO R or USB IN Connecting to an audio system Use an optional external audio system instead of the built in speaker NOTE y y If you use an potional external audio device instead of the built in speaker set the TV speaker feature to off see p 39 Analog s...

Page 48: ...isc appears at the bottom of the screen 3 Controls the connected VCR 4 HDD recordings playback Controls the recording stored in HDD 5 Audio out to home theater speaker or Audio out to TV Changes the audio output between Home theater speaker and TV speaker A check mark appears in front of the selected device Available devices display in a bright color Unavailable devices display in grey 3 Control t...

Page 49: ...may damage the screen s finish and cause discoloration Cabinet and stand To remove dust or light dirt wipe the cabinet with a dry clean and soft cloth To remove major dirt wipe the cabinet with a soft cloth dampened in a clean water or water containing a small amount of mild detergent Then wipe immediately with a dry cloth CAUTION y y Do not spray liquid onto the surface If water enters the TV it ...

Page 50: ... not appear contact the authorized service center in your local area Cannot connect external devices y y Refer to the Connection overview and connect an external device The TV turns off suddenly y y Check the power control settings The power supply may be interrupted y y Check if the Auto sleep feature is activated in the Time settings Refer to the Sleep Timer y y If there is no signal while the T...

Page 51: ...in the background of the screen y y Check the video cable connections Horizontal noises appear or characters blur y y Adjust the Phase setting in the menu option Refer to the SCREEN RGB PC The reception on some channels is poor y y Scroll to other channels There may a problem with the broadcast y y The station signal may be weak Aim the antenna to the proper direction y y Check if there is local i...

Page 52: ...alue Power consumption 0 9 A 90 W 1 0 A 100 W MODELS 32LK310 32LK310 MA 32LK311 32LK311 MB 32LK311C 32LK311C MA Dimensions W x H x D With stand 800 0 mm x 565 0 mm x 206 8 mm 31 4 inch x 22 2 inch x 8 1 inch Without stand 800 0 mm x 509 0 mm x 73 8 mm 31 4 inch x 20 0 inch x 2 9 inch Weight With stand 9 2 kg 20 2 lbs Without stand 8 2 kg 18 0 lbs Current Value Power consumption 1 2 A 120 W Power r...

Page 53: ... 37 50 59 94 60 00 50 00 1920x1080i 33 72 33 75 28 125 59 94 60 00 50 00 1920x1080p 67 432 67 50 56 25 27 00 33 75 59 94 60 00 50 00 24 00 30 00 Component supported mode Resolution Horizontal Frequency KHz Vertical Frequency Hz 720x480i 15 73 15 75 59 94 60 00 720x480p 31 47 31 50 59 94 60 00 720x576i 15 625 50 00 720x576p 31 25 50 00 1280x720p 44 96 45 00 37 50 59 94 60 00 50 00 1920x1080i 28 125...

Page 54: ...ivX 5 xx DivX VOD DRM XviD DivX 6 xx Playback Mpeg Mp3 PCM Dolby D AC3 smi srt sub MicroDVD SubViewer 2 0 ass ssa txt DVD Subtitle System File Extension Name Video Decoder Audio Codec Max Resolution mpg mpeg mpe vob dat MPEG1 MPEG2 AC3 MPEG MP3 PCM 720 x 576 25p 720 x 480 30p Avi divx m4v MPEG4 SP MPEG4 ASP DviX 3 xx DviX 4 xx DviX 5 xx DviX 6 xx playback Xvid AC3 MPEG MP3 PCM ...

Page 55: ...09 MUTE Remote control Button 00 CH Remote control Button 01 CH v Remote control Button 7C X STUDIO Remote control Button 43 Home Remote control Button 45 Q MENU Remote control Button 40 Remote control Button 41 v Remote control Button 07 Remote control Button 06 Remote control Button 44 ENTER Remote control Button 28 BACK Remote control Button 7E SIMPLINK Remote control Button 5B EXIT Remote cont...

Page 56: ...32C IN CONTROL SERVICE NOTE y y RS 232C on this unit is intended to be used with third party RS 232C control hardware and software The instructions below are provided to help with programming software or to test functionality using telenet software RS 232C connection cables are not supplied with the product Type of connector D Sub 9 Pin Male 1 5 6 9 RS 232C IN CONTROL SERVICE No Pin name 1 No conn...

Page 57: ... 7 8 CTS CTS 8 7 RTS D Sub 9 D Sub 9 Set ID Set ID number 1 Press Home to access the main menus 2 Press the Navigation buttons to scroll to OPTION and press ENTER 3 Press the Navigation buttons to scroll to Set ID and press ENTER 4 Scroll left or right to select a set ID number and select CLOSE The adjustment range is 1 99 5 When you are finished press EXIT OPTION ꔂ Move ꔉ Enter ꔀ ꔉ Menu Language ...

Page 58: ...Mute k d 00 01 17 Color Temperature k u 00 02 05 Volume Mute k e 00 01 18 Abnormal State k z FF 06 Volume Control k f 00 64 19 Energy Saving j q see p 61 07 Contrast k g 00 64 20 Auto Configuration j u see p 61 08 Brightness k h 00 64 22 Channel Add Del m b 00 01 09 Color k i 00 64 23 Key m c see p 62 10 Tint k j 00 64 24 Backlight m g 00 64 11 Sharpness k k 00 64 12 OSD Select k l 00 01 13 Remote...

Page 59: ...t based on this format when receiving normal data At this time if the data is data read mode it indicates present status data If the data is data write mode it returns the data of the PC computer In this model set will not send the status during the standby mode Data Format Command 2 Use as command Set ID Use the small character if set ID is 10 it will send the 0 a DATA Use the small character if ...

Page 60: ...re off Data 10 Video Mute on Acknowledgement d Set ID OK NG Data x In case of Video out Mute on only TV will display On Screen Display OSD But in case of screen mute on TV will not display On Screen Display OSD 05 Volume Mute Command k e To control volume mute on off You can also adjust mute using the MUTE button on remote control Transmission k e Set ID Data Cr Data 00 Volume mute on Volume off D...

Page 61: ...g Acknowledgement t Set ID OK NG Data x 17 Color Temperature Command k u To adjust color temperature You can also adjust color temperature in the PICTURE menu Transmission k u Set ID Data Cr Data 00 Medium 01 Cool 02 Warm Acknowledgement u Set ID OK NG Data x 18 Abnormal State Command k z To recognize an abnormal state Transmission j p Set ID Data Cr Data FF Read Acknowledgement z Set ID OK NG Dat...

Page 62: ...ata0 Data1 Data2 Data3 Data4 Data5 x a Set ID NG Data0 x Two One part Channel 6th bit This bit is used in a cable ready system Using physical Channel 5th bit If the channel band is NTSC air or NTSC cable channel tuning can be done by only physical channel In this case using physical channel bit must be low 0 22 Channel Add Del Command m b To add and delete the channels Transmission m b Set ID Data...

Page 63: ...guns codecs de vídeo listados no manual podem não ser suportados dependendo da região país POL Niektóre kodeki wideo wymienione w instrukcji mogą nie być obsługiwane w zależności od regionu kraju SPA Algunos códecs de vídeo que figuran en el manual pueden no ser compatibles dependiendo de la región país THA ...

Page 64: ...The model and serial numbers of the TV is located on the back of the TV Record it below should you ever need service MODEL SERIAL ...

Reviews: