background image

W

A

TCHING 

TV 

CHANNEL 

CONTR

OL

41

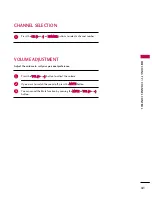
Press the 

C

CH

H ((+

+  

or 

--))

or 

N

NU

UM

MB

BE

ER

R

buttons to select a channel number.

1

VOLUME ADJUSTMENT

CHANNEL SELECTION

Press the 

V

VO

OLL ((+

+  

or 

--))

button to adjust the volume.

If you want to switch the sound off, press the

M

MU

UT

TE

E

button. 

You can cancel the Mute function by pressing the

M

MU

UT

TE

E

or 

V

VO

OLL ((+

+  

or 

--))

button.

Adjust the volume to suit your personal preference.

1

2

3

Summary of Contents for 22LG3DCH

Page 1: ...en you require service Note All features shown within this guide may not be available on all models LCD TV OWNER S MANUAL Hospital Grade Models 22LG3DCH 26LG3DCH 32LG3DCH Lodging Grade Model 32LG3DC Installer Reference for Commercial Mode Commercial Mode Setup see pages 91 110 Channel Banks Setup see pages 87 90 Pillow Speaker Setup see page 29 MPI PPV Card Setup see page 20 P NO SAC30708037 0810 ...

Page 2: ......

Page 3: ... modifications not expressly approved by the party responsible for compliance could void the user s authority to operate the equipment CAUTION Do not attempt to modify this product in any way without written authorization from LG Electronics Unauthorized modification could void the user s authority to operate this product The lightning flash with arrowhead symbol within an equilateral triangle is ...

Page 4: ...t of the obsolete outlet Protect the power cord from being walked on or pinched particularly at plugs convenience receptacles and the point where they exit from the apparatus Only use attachments accessories specified by the manufacturer Use only with the cart stand tripod bracket or table specified by the manufacturer or sold with the apparatus When a cart is used use caution when moving the cart...

Page 5: ...sted kinked pinched closed in a door or walked upon Pay particular attention to plugs wall outlets and the point where the cord exits the appliance Do not make the TV with the power cord plugged in Do not use a damaged or loose power cord Be sure do grasp the plug when unplugging the power cord Do not pull on the power cord to unplug the TV WARNING To reduce the risk of fire or electrical shock do...

Page 6: ...AN NS SI I N NF FP PA A 7 70 0 Cleaning When cleaning unplug the power cord and scrub gentlywithasoftclothtopreventscratching Donot spray water or other liquids directly on the TV as electric shock may occur Do not clean with chemi cals such as alcohol thinners or benzene Moving Make sure the product is turned off unplugged and all cables have been removed It may take 2 or more people to carry lar...

Page 7: ... Auto Tuning 43 Add Delete Channel Manual Tuning 44 Channel Editing 45 Channel Label 46 Input List 47 PICTURE CONTROL Picture Size Aspect Ratio Control 48 Preset Picture Settings Picture Mode Preset 51 Color Tone Preset 52 Manual Picture Adjustment Picture Mode User Mode 53 Picture Mode Expert Control 54 Picture Improvement Settings 55 Advanced Control Black Darkness Level 56 Advanced Control Real...

Page 8: ...ng and Teaching Setups 96 LT2002 Cloning Connections Learning Setup 97 Cloning Learning Setup 98 Cloning Connections Teaching Setup 99 Installer Menu 100 Reference Detailed Information For Making A Master TV 107 Reference Procedures for adding Channel Label Icons Custom Channel Labels 2 5 4 MENU Mode 108 Reference Clonable Menu Features 109 Reference Checking Software Version 109 TV Aux Input Conf...

Page 9: ...ome minute dot defects may be visible on the screen appearing as tiny red green or blue spots However they have no adverse effect on the monitor s performance Avoid touching the LCD screen or holding your finger s against it for long periods of time Doing so may produce some temporary distortion effects on the screen On Disposal The fluorescent lamp used in this product contains a small amount of ...

Page 10: ... Bracket RW230 Only 26LG3DCH 3 32 2L LG G3 3D DC C o on nl ly y 1 5V 1 5V Remote Control Batteries 1 2 3 4 5 6 7 8 0 9 VO L CH ENTER PO W ER M UTE M ENU ADJU ST RETU RN CC SAP FLA SHBK PICT UR E SO UND RATI O TV IN PU T TI MER Bolts for stand assembly Refer to P 12 Screw for stand fixing Refer to P 15 x 4 x 4 x 2 Torx plus Star head screw Refer to P 12 M4xL26 Machine Screw Ø4xL20 Plastic Screw Ø4x...

Page 11: ...ates blue when the set is switched on CH VOL MENU INPUT ENTER VOLUME Buttons ENTER Button MENU Button INPUT Button Remote Control Sensor CHANNEL Buttons POWER Button Power Standby Indicator Illuminates red in standby mode Illuminates green when the set is switched on Remote Control Sensor Stand 26 32LG3DCH model 32LG3DC model only 32LG3DC 22LG3DCH model POWER Button Power Standby Indicator Illumin...

Page 12: ...PILLOW SPEAKER SPEAKER SWITCH PILLOW SPEAKER NORM SPEAK PILLOW SPEAK 12 AUDIO IN RGB DVI VIDEO AUDIO AUDIO HDMI DVI IN HDMI DVI IN USB IN USB IN SERVUCEONLY SERVUCEONLY AV IN 1 VIDEO VIDEO MONO AUDIO AUDIO S VIDEO COMPONENT COMPONENT IN RGB IN PC RESET UPDATE RS 232C IN RS 232C IN SERVICE ONLY SERVICE ONLY REMOTE CONTROL OUT SPEAKER OUT 8 R PILLOW SPEAKER NORMAL NORMAL SPEAKER SPEAKER PILLOW PILLO...

Page 13: ...ower Cord Socket For operation with AC power Caution Never attempt to operate the TV on DC power ANTENNA IN Connect over the air signals to this jack M P I PILLOW SPEAKER Except 32LG3DC model Used to connect to pillow speaker SPEAKER SWITCH Except 32LG3DC model Used to select the speaker output switch Note If Pillow Speaker is selected no Sound will be heard from TV speakers NORMAL SPEAKER or PILL...

Page 14: ...DETACHMENT Only 32LG3DC Carefully place the TV screen side down on a cushioned surface to protect the screen from damage 1 Remove the four screws that hold the base on 2 Detach the stand from TV 3 After removing the stand install the included p pr ro ot te ec ct ti io on n c co ov ve er r over the hole for the stand Press the P PR RO OT TE EC CT TI IO ON N C CO OV VE ER R into the TV until you hea...

Page 15: ...RACKET This feature is not available for all models Connect the cables as necessary To connect additional equipment see the EXTERNAL EQUIPMENT SETUP section Secure the power cable with the PROTECTIVE BRACKET and the screw as shown It will help prevent the power cable from being removed by accident CABLE MANAGEMENT CLIP 1 Fit the CABLE MANAGEMENT CLIP as shown 3 G G Do not hold the CABLE MANAGEMENT...

Page 16: ...r TV This feature is not available for all models 4 inches 4 inches 4 inches 4 inches SWIVEL STAND Only 32LG3DC The TV can be conveniently swivelled on its stand 90 to the left or right to provide the optimum viewing angle G G Ensure adequate ventilation by following the clearance recommendations G G Do not mount near or above any type of heat source CAUTION ...

Page 17: ...backward direction potentially causing injury or damaging the product Use only the included screw G G To prevent TV from falling over the TV should be securely attached to the floor wall per installation instructions Tipping shaking or rocking the TV may cause injury WARNING 1 Screw provided as parts of the product Desk Stand ...

Page 18: ...s necessary for assembly are provided G G Do not use screws longer then the standard dimen sion as they may cause damage to the inside to the TV G G For wall mounts that do not comply with the VESA standard screw specifications the length of the screws may differ depending on their specifica tions G G Do not use screws that do not comply with the VESA standard screw specifications Do not tighten t...

Page 19: ...location chosen should be appropriate for drilling holes and have available the required power source as well as antenna cable and any other equipment leads as neces sary P Pe ed de es st ta al l M Mo ou un nt ts s a an nd d S St ta an nd ds s A sturdy surface on a desk or other similar flat table like furniture would be the appropriate location for mount ing a pedestal style TV stand Most stands ...

Page 20: ...olts or TV brackets bolts and tighten them securely in the upper holes Secure the wall brackets with screws sold separately to the wall Match the height of the bracket that is mounted on the wall to the holes in the product Ensure the eye bolts or brackets are tightened securely Use a sturdy rope or cord sold separately to tie the product It is safer to tie the rope so it becomes horizontal betwee...

Page 21: ... Antenna VHF UHF Cable TV Wall Jack Multi family Dwellings Apartments Connect to wall antenna socket RF Coaxial Wire 75 ohm RF Coaxial Wire 75 ohm Single family Dwellings Houses Connect to wall jack for outdoor antenna Be careful not to bend the copper wire when connecting the antenna Copper Wire To improve the picture quality in a poor signal area please purchase a signal amplifier and install pr...

Page 22: ...d from the old card 2 Detach RF cable 3 Place new PPV card into slot and slide it in far enough to reconnect RF cable 4 Reconnect RF cable 5 Insert card all the way into the slot making sure it is fully seated into back plane connector 6 Replace the two card retainer screws The MPI card is equipped with an RF jack for antenna cable signal source connection The slot is also available for installing...

Page 23: ... green PB blue and PR red Connect the audio output of the digital set top box to the C CO OM MP PO ON NE EN NT T I IN N A AU UD DI IO O jacks on the TV 2 1 2 How to use Turn on the digital set top box Refer to the owner s manual for the digital set top box Select C Co om mp po on ne en nt t input source using the I IN NP PU UT T button on the remote control AUDIO RGB D AUDIO IN RGB DVI HDMI DVI IN...

Page 24: ...he owner s manual for the digital set top box Select H HD DM MI I input source with using the I IN NP PU UT T button on the remote control 2 1 HDMI DTV Horizontal Vertical Frequency KHz Frequency Hz 15 73 59 94 15 73 60 00 31 469 59 94 31 500 60 00 44 96 59 94 45 00 60 00 33 72 59 94 33 75 60 00 67 50 60 00 Resolution 720x480p 1280x720p 1920x1080i 1920x1080p HDMI DVI IN USB IN SERVUCE ONL VIDEO MO...

Page 25: ... audio output of the digital set top box to the A AU UD DI IO O I IN N R RG GB B D DV VI I or A AV V I IN N A AU UD DI IO O jack on the TV 1 How to connect 2 How to use Turn on the digital set top box Refer to the owner s man ual for the digital set top box Select the H HD DM MI I input source on the TV using the I IN NP PU UT T button on the remote control 2 1 PILLOW SPEAKER RS 232C IN RS 232C IN...

Page 26: ...TV Match the jack colors Y green PB blue and PR red Connect the audio outputs of the DVD to the C CO OM MP PO ON NE EN NT T I IN N A AU UD DI IO O jacks on the TV 1 How to connect 2 How to use Turn on the DVD player insert a DVD Select the C Co om mp po on ne en nt t input source on the TV using the I IN NP PU UT T button on the remote control Refer to the DVD player s manual for operating instruc...

Page 27: ...R S VIDEO AUDIO HDMI DVI IN USB IN SERVUCE ONLY VIDEO MONO AUDIO AV IN 1 AV IN 1 VIDEO AUDIO COMPONENT IN S VIDEO 1 2 HDMI DVI IN USB IN SERVUCE ONLY VIDEO MONO AUDIO S VIDEO S VIDEO RE UPD UPDATE AV IN 1 AV IN 1 VIDEO AUDI COMPONENT IN HDMI OUTPUT 1 Connect the S VIDEO output of the DVD to the S S V VI ID DE EO O input on the TV Connect the audio outputs of the DVD to the A AU UD DI IO O input ja...

Page 28: ... common to all TVs and is not covered by warranty L R S VIDEO VIDEO OUTPUT SWITCH ANT IN ANT OUT ANTENNA IN M P I Wall Jack Antenna 1 2 Connect the RF antenna out socket of the VCR to the A AN NT TE EN NN NA A I IN N socket on the TV Connect the antenna cable to the RF antenna in socket of the VCR 1 How to connect 2 How to use Set VCR output switch to 3 or 4 and then tune TV to the same channel nu...

Page 29: ...utton on the remote control G G If you have a mono VCR connect the audio cable from the VCR to the A AU UD DI IO O L L M MO ON NO O jack of the TV NOTE AUDIO RGB VIDEO MONO AUDIO RGB IN P AV IN 1 AV IN 1 VIDEO AUDIO COMPONENT IN S VIDEO L R S VIDEO VIDEO OUTPUT SWITCH ANT IN ANT OUT 1 S Video Connection Except 22LG3DCH Connect the S S V VI ID DE EO O output of the VCR to the S S V VI ID DE EO O in...

Page 30: ...ng the I IN NP PU UT T button on the remote control Except 22LG3DCH If connected to A AV V I IN N or A AV V I IN N1 1 input select the A AV V or A AV V1 1 input source on the TV Operate the corresponding external equipment 1 1 PILLOW SPEAKER N RS 232C IN Y SERVICE ONLY USB IN SERVUCE ONLY EMOTE REMOTE TROLOUT CONTROLOUT RESET RESET UPDATE UPDATE N VIDEO VIDEO AUDIO AUDIO MONO MONO L R VIDEO PILLOW...

Page 31: ... speakers Pillow Speaker Interface This connector furnishes three control lines and an audio output A patient pendant remote control or entertainment audio and nurse call system may be connected here All lines are isolated from the AC power line and earth ground Optoisolators isolate the control lines and a transformer isolates the audio There are no relays or inductive components in the control l...

Page 32: ...ome permanently imprinted on the screen G G The synchronization input form for Horizontal and Vertical frequencies is separate G G Depending on the graphics card some resolution settings may not allow the image to be positioned on the screen properly NOTES Supported Display Specifications RGB PC HDMI PC Resolution 720x400 1360x768 640x350 640x480 800x600 1024x768 1366x768 1280x768 Only RGB PC mode...

Page 33: ...utput of the PC to the H HD DM MI I D DV VI I I IN N jack on the TV Connect the PC audio output to the A AU UD DI IO O I IN N R RG GB B D DV VI I or A AV V I IN N A AU UD DI IO O jack on the TV 1 How to connect 2 1 PILLOW SPEAKER RS 232C IN RS 232C IN SERVICE ONLY SERVICE ONLY USB IN USB IN SERVUCE ONLY SERVUCE ONLY REMOTE REMOTE CONTROLOUT CONTROLOUT AV IN 1 AV IN 1 AUDIO AUDIO MONO MONO UPDATE U...

Page 34: ...on Size Phase Reset Screen Move Prev MENU 1 ADJUST 3 4 2 ENTER RETURN Select R Re es so ol lu ut ti io on n Selecting Resolution You can choose the resolution in RGB mode The P Po os si it ti io on n P Ph ha as se e and S Si iz ze e can also be adjusted Press the A AD DJ JU US ST T button Return to TV viewing You can also adjust S Sc cr re ee en n R RG GB B P PC C in the P PI IC CT TU UR RE E menu...

Page 35: ...Select A Au ut to o c co on nf fi ig g Auto config G Resolution Position Size Phase Reset Screen Move Prev MENU To Set 3 2 Select Y Ye es s 4 ENTER Start Auto Configuration ENTER Press the A AD DJ JU US ST T button 1 If the position of the image is still not correct try Auto adjustment again If picture needs to be adjusted again after Auto adjustment in RGB you can adjust the P Po os si it ti io o...

Page 36: ...o os si it ti io on n This function is to adjust pic ture to left right and up down as you prefer S Si iz ze e This function is to minimize any vertical bars or stripes visible on the screen background And the horizontal screen size will also change The S Si iz ze e adjustment range is 3 30 0 3 30 0 P Ph ha as se e This function allows you to remove any horizontal noise and clear or sharpen the im...

Page 37: ... S Si iz ze e and P Ph ha as se e to the default factory settings This feature operates only in RGB mode 3 ENTER Select R Re es se et t 1 ADJUST 2 Select Y Ye es s 4 ENTER Auto config Position Resolution Size Phase Reset G Screen Move Prev MENU Initialize Settings Yes No Press the A AD DJ JU US ST T button ...

Page 38: ...nd HDMI input sources screen returns to the last TV channel External input modes rotate in regular sequence TV AV1 2 Component RGB and HDMI Selects the factory preset picture depend on the viewing environment G G p p 5 51 1 Selects the factory preset sound for type of program G G p p 6 61 1 Analog mode Selects MTS sound Mono Stereo or a SAP G G p p 6 67 7 DTV mode Changes the audio language Change...

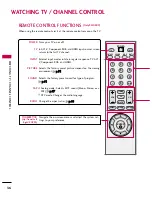
Page 39: ...such as 2 1 2 2 etc Tune to the last channel viewed VOLUME UP DOWN TIMER CC MUTE CHANNEL UP DOWN ADJUST MENU RETURN Increase decrease the sound level Select the amount of time before your TV turns off automatically G G p p 7 76 6 Select a closed caption G G p p 7 70 0 Switch the sound on or off G G p p 4 41 1 Select available channels Adjust the screen resolution position size and phase G G p p 3 ...

Page 40: ...P DOWN CHANNEL UP DOWN PAGE TIMER MUTE NUMBER Buttons 0 9 DASH FLASHBK Increases decreases the sound level Selects available channels found with Auto tuning Moves to next available page Sets the amount of time before the TV automatically turns itself Off Switches the sound on or off Use to enter a program number or channels Dash for multiple channels such as 9 1 9 2 etc Returns to the previously v...

Page 41: ...o the screen Enters or exits a Panel Menu in the TV Guide on screen menu system Selects a closed caption option Off CC1 4 Text1 4 Clears all on screen displays and returns to TV viewing from any TV menu Adjusts the picture aspect ratio Selects MTS sound Mono Stereo and SAP in Analog mode Changes the audio language in DTV mode Use to navigate on screen menus adjust the system settings to your requi...

Page 42: ...dby mode to turn TV on press the button on the TV or press the P PO OW WE ER R button on the remote control Note Only for 32LG3DCH the TV also turn on with C CH H or button on the remote Select the viewing source by using the I IN NP PU UT T button on the remote control This TV is programmed to remember which power state it was last set to even if the power cord is out When finished using the TV p...

Page 43: ...number 1 VOLUME ADJUSTMENT CHANNEL SELECTION Press the V VO OL L or button to adjust the volume If you want to switch the sound off press the M MU UT TE E button You can cancel the Mute function by pressing the M MU UT TE E or V VO OL L or button Adjust the volume to suit your personal preference 1 2 3 ...

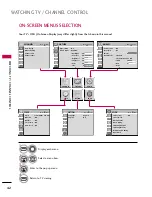
Page 44: ...cture Mode Standard Backlight 80 Contrast 90 Brightness 50 Sharpness 60 Color 60 Tint 0 PICTURE E Enter Move Auto Volume Off Clear Voice On Balance 0 Sound Mode Standard SRS TruSurround XT Off Treble 50 Bass 50 Reset AUDIO E L R Enter Move Clock Feb 21 2008 2 10 AM Off Time Off On Time Off Sleep Timer Off Auto Sleep Off TIME Enter Move Lock System Off Set Password Block Channel Movie Rating TV Rat...

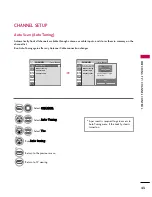
Page 45: ...N NE EL L Select A Au ut to o T Tu un ni in ng g Select Y Ye es s Run A Au ut to o t tu un ni in ng g 1 MENU 3 2 ENTER ENTER 4 ENTER A password is required to gain access to Auto Tuning menu if the Lock System is turned on 5 RETURN Return to the previous menu MENU Return to TV viewing Enter Move CHANNEL Auto Tuning Manual Tuning Channel Edit Channel Label Enter Move CHANNEL Auto Tuning Manual Tuni...

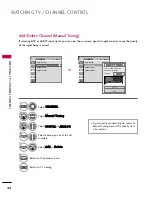
Page 46: ...A AL L or A AN NA AL LO OG G Select channel you want to add or delete 3 ENTER 4 Select A Ad dd d or D De el le et te e 5 ENTER A password is required to gain access to Manual Tuning menu if the Lock System is turned on 6 RETURN Return to the previous menu MENU Return to TV viewing Enter Move CHANNEL Enter Move CHANNEL Auto Tuning Manual Tuning Channel Edit Channel Label Channel Select channel type...

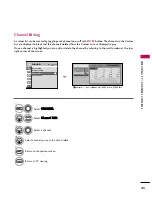
Page 47: ...from the Custom List are displayed in gray Once a channel is highlighted you can add or delete the channel by referring to the small window at the top right corner of the screen Channel Editing Select C CH HA AN NN NE EL L 1 MENU 2 ENTER Select C Ch ha an nn ne el l E Ed di it t RETURN Return to TV viewing Return to the previous menu 5 MENU Add Delete Move Page CH Move Previous RETURN EXIT MENU En...

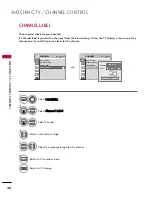
Page 48: ...bel for the channel Enter Move CHANNEL Auto Tuning Manual Tuning Channel Edit Channel Label Enter Move CHANNEL Auto Tuning Manual Tuning Channel Edit Channel Label Logo F F Disney G G Channel DIGITAL 2 1 Close Select C CH HA AN NN NE EL L Select C Ch ha an nn ne el l L La ab be el l Select Channel 1 MENU 3 2 ENTER ENTER Select the appropriate logo for the channel 5 Select a channel to set logo 4 6...

Page 49: ...ect it to watch over the air cable and digital cable broadcasts A AV V1 1 2 2 Select them to watch a VCR or other external equipment C Co om mp po on ne en nt t Select them to watch DVD or a Digital set top box R RG GB B Select it to view PC input H HD DM MI I Select them to watch high defin ition devices TV AV HDMI For 26 32LG3DCH 32LG3DC For 22LG3DCH ...

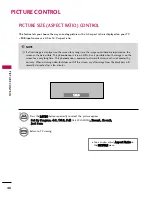
Page 50: ...he image is on the screen for a very long time This phenomenon is common to all manufacturers and is not covered by warranty When watching video that does not fill the screen any after image from the black bars will normally dissipate after a few minutes Press the R RA AT TI IO O button repeatedly to select the picture options S Se et t B By y P Pr ro og gr ra am m 4 4 3 3 1 16 6 9 9 F Fu ul ll l ...

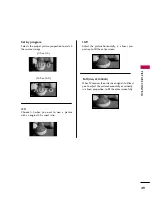
Page 51: ...view a picture with an original 4 3 aspect ratio 16 9 Adjust the picture horizontally in a linear pro portion to fill the entire screen Full Only 22LG3DCH When TV receives the wide screen signal it will lead you to adjust the picture horizontally or vertically in a linear proportion to fill the entire screen fully 4 3 4 3 16 9 16 9 ...

Page 52: ...ly extended and cropped The picture taking a halfway trade off between alteration and screen coverage Just Scan Normally the edges of video signals are cropped 1 2 Just Scan turns off this cropping and shows the complete video Notes If there is noise on the edges of the original signal it will be visible when Just Scan is activated J Ju us st t S Sc ca an n operates only with DTV CADTV HDMI DTV DV...

Page 53: ...e each setting manually 1PICTURE Press the P PI IC CT TU UR RE E button repeatedly to select the picture options V Vi iv vi id d S St ta an nd da ar rd d C Ci in ne em ma a S Sp po or rt t G Ga am me e and E Ex xp pe er rt t1 1 2 2 You can also adjust P Pi ic ct tu ur re e M Mo od de e in the P PI IC CT TU UR RE E menu Return to TV viewing 2 RETURN V Vi iv vi id d ...

Page 54: ...ed di iu um m or W Wa ar rm m 4 Select A Ad dv va an nc ce ed d C Co on nt tr ro ol l 2 ENTER 5 RETURN Return to the previous menu MENU Return to TV viewing Enter Move PICTURE E E R G Contrast 50 Brightness 50 Sharpness 50 Color 50 Tint 0 Advanced Control Reset Screen RGB PC Enter Move PICTURE E R G Contrast 50 Brightness 50 Sharpness 50 Color 50 Tint 0 Advanced Control Reset Screen RGB PC Color T...

Page 55: ... ne es ss s S Sh ha ar rp pn ne es ss s C Co ol lo or r o or r T Ti in nt t 1 MENU Select P Pi ic ct tu ur re e M Mo od de e 2 ENTER Select V Vi iv vi id d S St ta an nd da ar rd d C Ci in ne em ma a S Sp po or rt t or G Ga am me e 3 ENTER 4 ENTER 5 ENTER 6 RETURN Return to the previous menu Return to TV viewing Enter Move PICTURE E Aspect Ratio 16 9 Picture Mode Standard Backlight 90 Contrast 90 ...

Page 56: ...E Ex xp pe er rt t2 2 allow you set you own custom settings 7 RETURN Return to the previous menu Return to TV viewing Enter Move PICTURE E Aspect Ratio 16 9 Picture Mode Standard Backlight Contrast 90 Brightness 50 Sharpness 60 Color 60 Tint 0 R G Enter Move PICTURE Vivid Standard Cinema Sport Game Expert1 Expert2 E MENU Contrast 90 Brightness 50 Sharpness 60 Color 60 Tint 0 Expert Control Reset S...

Page 57: ...dv va an nc ce ed d C Co on nt tr ro ol l Select F Fr re es sh h C Co on nt tr ra as st t F Fr re es sh h C Co ol lo or r N No oi is se e R Re ed du uc ct ti io on n or G Ga am mm ma a 1 MENU 3 2 ENTER ENTER 5 RETURN Return to the previous menu Return to TV viewing Select your desired options 4 Enter Move PICTURE E R G Contrast 50 Brightness 50 Sharpness 50 Color 50 Tint 0 Advanced Control Reset S...

Page 58: ... the screen gets darker H Hi ig gh h The reflection of the screen gets brighter A Au ut to o Realizing the black level of the screen and set it to High or Low auto matically 5 RETURN Return to the previous menu MENU Return to TV viewing Enter Move PICTURE E R G Contrast 50 Brightness 50 Sharpness 50 Color 50 Tint 0 Advanced Control Reset Screen RGB PC Enter Move PICTURE E R G Contrast 50 Brightnes...

Page 59: ...E E Select A Ad dv va an nc ce ed d C Co on nt tr ro ol l Select R Re ea al l C Ci in ne em ma a 1 MENU 3 2 ENTER ENTER Select O On n or O Of ff f 4 5 RETURN Return to the previous menu MENU Return to TV viewing Enter Move PICTURE E R G Contrast 50 Brightness 50 Sharpness 50 Color 50 Tint 0 Advanced Control Reset Screen RGB PC Enter Move PICTURE E R G Contrast 50 Brightness 50 Sharpness 50 Color 5...

Page 60: ... R Re es se et t Initialize the adjusted value 1 MENU 3 2 ENTER ENTER MENU Return to TV viewing Enter Move PICTURE E R G Contrast 50 Brightness 50 Sharpness 50 Color 50 Tint 0 Advanced Control Reset Screen RGB PC Enter Move PICTURE E R G Contrast 50 Brightness 50 Sharpness 50 Color 50 Tint 0 Advanced Control Reset Screen RGB PC Resetting video configuration i i ...

Page 61: ... IO O Select A Au ut to o V Vo ol lu um me e Select O On n or O Of ff f 1 MENU 3 2 ENTER ENTER 4 RETURN Return to the previous menu MENU Return to TV viewing Enter Move AUDIO Auto Volume Off Clear Voice On Balance 0 Sound Mode Standard SRS TruSurround XT Off Treble 50 Bass 50 Reset Enter Move AUDIO Auto Volume Off Clear Voice On Balance 0 Sound Mode Standard SRS TruSurround XT Off Treble 50 Bass 5...

Page 62: ...ture will not work Select A AU UD DI IO O Select C Cl le ea ar r V Vo oi ic ce e Select O On n or O Of ff f 1 MENU 3 2 ENTER ENTER 4 RETURN Return to the previous menu MENU Return to TV viewing Enter Move AUDIO Auto Volume Off Clear Voice On Balance 0 Sound Mode Standard SRS TruSurround XT Off Treble 50 Bass 50 Reset Enter Move AUDIO Auto Volume Off Clear Voice On Balance 0 Sound Mode Standard SRS...

Page 63: ... si ic c C Ci in ne em ma a S Sp po or rt t and G Ga am me e are preset for optimum sound quality at the factory and are not adjustable 1SOUND Press the S SO OU UN ND D button repeatedly to select the sound options S St ta an nd da ar rd d M Mu us si ic c C Ci in ne em ma a S Sp po or rt t and G Ga am me e You can also adjust S So ou un nd d M Mo od de e in the A AU UD DI IO O menu Return to TV vi...

Page 64: ...u us si ic c C Ci in ne em ma a S Sp po or rt t or G Ga am me e 3 ENTER ENTER Make appropriate adjustments 5 ENTER 6 RETURN Return to the previous menu MENU Return to TV viewing Enter Move AUDIO Auto Volume Off Clear Voice On Balance 0 Sound Mode Standard SRS TruSurround XT Off Treble 50 Bass 50 Reset Enter Move AUDIO Auto Volume Off Clear Voice On Balance 0 Sound Mode Standard SRS TruSurround XT ...

Page 65: ...Voice On Balance 0 Sound Mode Standard SRS TruSurround XT Off Treble 50 Bass 50 Reset L R E E Auto Volume Off Clear Voice On Balance 0 Sound Mode Standard SRS TruSurround XT Off Treble 50 Bass 50 Reset Treble 50 Bass 50 Close SRS TruSurround XT Off F F Off G G Takes advantage of any multi channel format without needing to add extra speakers or equipment Dialog clarity bass enrichment and the addit...

Page 66: ...aker to suit your taste and room situations 4 RETURN Return to the previous menu MENU Return to TV viewing Enter Move AUDIO Auto Volume Off Clear Voice On Balance 0 Sound Mode Standard SRS TruSurround XT Off Treble 50 Bass 50 Reset Enter Move AUDIO Auto Volume Off Clear Voice On Balance 0 Sound Mode Standard SRS TruSurround XT Off Treble 50 Bass 50 Reset L R L R Close E E E E Balance 0 L R E E ...

Page 67: ...ect O On n or O Of ff f 1 MENU 3 2 ENTER ENTER 4 RETURN Return to the previous menu MENU Return to TV viewing Enter Move AUDIO Clear Voice On Balance 0 Sound Mode Standard SRS TruSurround XT Off Treble 50 Bass 50 Reset TV Speaker On Enter Move AUDIO Clear Voice On Balance 0 Sound Mode Standard SRS TruSurround XT Off Treble 50 Bass 50 Reset TV Speaker On L R L R E E Off On ...

Page 68: ...t R Re es se et t 1 MENU 2 ENTER Initialize the adjusted value 3 ENTER Enter Move AUDIO Auto Volume Off Clear Voice On Balance 0 Sound Mode Standard SRS TruSurround XT Off Treble 50 Bass 50 Reset Enter Move AUDIO Auto Volume Off Clear Voice On Balance 0 Sound Mode Standard SRS TruSurround XT Off Treble 50 Bass 50 Reset L R L R E E Resetting audio configuration i i ...

Page 69: ...ADCAST SETUP For Analog only This TV can receive MTS stereo programs and any SAP Secondary Audio Program that accom panies the stereo program if the station transmits an additional sound signal Mono sound is automatically used if the broadcast is only in Mono If other languages available on the digital signal select them with the S SA AP P button RETURN MONO SAP STEREO ...

Page 70: ...eature operates only in DTV CADTV mode Select O OP PT TI IO ON N Select L La an ng gu ua ag ge e Select A Au ud di io o 1 MENU 3 2 ENTER ENTER Select your desired language E En ng gl li is sh h S Sp pa an ni is sh h or F Fr re en nc ch h 4 5 RETURN Return to the previous menu MENU Return to TV viewing Language English Caption Off Menu English Audio F F English G G Close Language English Caption Of...

Page 71: ...t O OP PT TI IO ON N Select L La an ng gu ua ag ge e Select M Me en nu u 1 MENU 3 2 ENTER ENTER Select your desired language From this point on the on screen menus will be shown in the selected language 4 5 RETURN Return to the previous menu MENU Return to TV viewing Language English Caption Off Language English Caption Off Menu F F English G G Audio English Close ...

Page 72: ... the broadcaster would be available for both digital and analog channels on the Antenna Cable Analog Broadcasting System Captions Select O OP PT TI IO ON N Select C Ca ap pt ti io on n Select O On n 1 MENU 3 2 ENTER ENTER Select C CC C1 1 4 4 or T Te ex xt t1 1 4 4 4 C CA AP PT TI IO ON N The term for the words that scroll across the bottom of the TV screen usually the audio portion of the pro gra...

Page 73: ...is function in only available when Caption Mode is set On Enter Move OPTION Select O OP PT TI IO ON N Select C Ca ap pt ti io on n Select O On n 1 MENU 3 2 ENTER ENTER Select C CC C1 1 4 4 T Te ex xt t1 1 4 4 or S Se er rv vi ic ce e1 1 6 6 4 5 RETURN Return to the previous menu MENU Return to TV viewing Enter Move OPTION Language English Caption CC1 Language English Caption Off Mode CC1 Close Dig...

Page 74: ...al l O Op pt ti io on n 4 S Si iz ze e Set the word size F Fo on nt t Select a typeface for the text T Te ex xt t C Co ol lo or r Choose a color for the text T Te ex xt t O Op pa ac ci it ty y Specify the opacity for the text color B Bg g B Ba ac ck kg gr ro ou un nd d C Co ol lo or r Select a background color B Bg g B Ba ac ck kg gr ro ou un nd d O Op pa ac ci it ty y Select the opacity for the b...

Page 75: ...a time zone E Ea as st te er rn n C Ce en nt tr ra al l M Mo ou un nt ta ai in n P Pa ac ci if fi ic c A Al la as sk ka a or H Ha aw wa ai ii i 4 Select A Au ut to o O On n or O Of ff f depending on whether or not your viewing area observes Daylight Saving time 5 6 RETURN Return to the previous menu MENU Return to TV viewing Enter Move TIME Clock Feb 21 2008 2 10 AM Off Time Off On Time Off Sleep ...

Page 76: ...te Hour or Minute option 4 Set the Year Month Date Hour or Minute option 5 6 RETURN Return to the previous menu MENU Return to TV viewing Enter Move TIME Clock Feb 21 2008 2 10 AM Off Time Off On Time Off Sleep Timer Off Auto Sleep Off Enter Move TIME Clock Feb 21 2008 2 10 AM Off Time Off On Time Off Sleep Timer Off Auto Sleep Off Year Month 2 Date 21 Hour 2 AM 2008 Minute 10 Time Zone Eastern Da...

Page 77: ... e Select R Re ep pe ea at t 1 MENU 3 2 ENTER ENTER Select O Of ff f O On nc ce e E Ev ve er ry yd da ay y M Mo on n F Fr ri i M Mo on n S Sa at t W We ee ek ke en nd d or S Su un nd da ay y 4 Select and set H Ho ou ur r or M Mi in nu ut te e 5 6 RETURN Return to the previous menu MENU Return to TV viewing Enter Move TIME Clock Feb 21 2008 2 10 AM Off Time Off On Time Off Sleep Timer Off Auto Slee...

Page 78: ...te that this setting is cleared when the TV is turned off Press the T TI IM ME ER R button repeatedly to select the number of minutes Sleep timer options Off 10 20 30 60 90 120 180 and 240 minutes 1 TIMER 2 RETURN You can also adjust S Sl le ee ep p T Ti im me er r in the T TI IM ME E menu 10min Return to TV viewing ...

Page 79: ...n n or O Of ff f 1 MENU 3 2 ENTER ENTER 4 RETURN Return to the previous menu MENU Return to TV viewing Enter Move TIME Clock Feb 21 2008 2 10 AM Off Time Off On Time Off Sleep Timer Off Auto Sleep Off Enter Move TIME Clock Feb 21 2008 2 10 AM Off Time Off On Time Off Sleep Timer Off Auto Sleep Off Off On TV will be automatically turned off in case of No Signal for 10 minutes ...

Page 80: ... television movies can be blocked by TV Rating and or Individual Categories Movies that have been shown at the theaters or direct to video movies use the Movie Rating System MPAA only Ratings for Television programs including made for TV movies TV G General audience TV PG Parental guidance suggested TV 14 Parents strongly cautioned TV MA Mature audience only TV Y All children TV Y7 Children 7 year...

Page 81: ...le Select L LO OC CK K 1 MENU ENTER Input the password 21 4 5 6 7 8 0 9 2 3 5 RETURN Return to the previous menu MENU Return to TV viewing Enter Move LOCK Lock System Off Set Password Block Channel Movie Rating TV Rating Children TV Rating General Downloadable Rating Input Block Enter Move LOCK Lock System On Set Password Block Channel Movie Rating TV Rating Children TV Rating General Downloadable...

Page 82: ...n nf fi ir rm m 4 3 ENTER 1 4 5 6 7 8 0 9 2 3 Select L LO OC CK K 1 MENU ENTER Input the password 21 4 5 6 7 8 0 9 2 3 5 RETURN Return to the previous menu MENU Return to TV viewing Enter Move LOCK Lock System Off Set Password Block Channel Movie Rating TV Rating Children TV Rating General Downloadable Rating Input Block Enter Move LOCK Lock System Off Set Password Block Channel Movie Rating TV Ra...

Page 83: ...do not want to watch or that you do not want your children to watch Select L LO OC CK K 1 MENU ENTER Input the password 21 4 5 6 7 8 0 9 2 3 6 MENU Return to the previous menu RETURN Return to TV viewing Block Unblock Move Page CH Move Previous RETURN EXIT MENU Enter Move LOCK Lock System Off Set Password Block Channel Movie Rating TV Rating Children TV Rating General Downloadable Rating Input Blo...

Page 84: ...4 3 ENTER G General audience PG Parental guidance suggested PG 13 Parents strongly cautioned R Restricted NC 17 No one 17 and under admitted X Adult only Blocking Off Permits all programs G G If you set PG 13 G and PG movies will be available PG 13 R NC 17 and X will be blocked Select L LO OC CK K 1 MENU ENTER Input the password 21 4 5 6 7 8 0 9 2 3 5 RETURN Return to the previous menu MENU Return...

Page 85: ...children rating does not apply to other TV programs Unless you block certain TV programs intended for mature audi ences in the TV Rating sub menu your children can view those programs Select L LO OC CK K 1 MENU ENTER Input the password 21 4 5 6 7 8 0 9 2 3 Enter Move LOCK Lock System Off Set Password Block Channel Movie Rating TV Rating Children TV Rating General Downloadable Rating Input Block En...

Page 86: ...TV MA Sex sexual situations applies to TV PG TV 14 TV MA Violence applies to TV PG TV 14 TV MA Select L LO OC CK K 1 MENU ENTER Input the password 21 4 5 6 7 8 0 9 2 3 6 RETURN Return to the previous menu MENU Return to TV viewing Enter Move LOCK Lock System Off Set Password Block Channel Movie Rating TV Rating Children TV Rating General Downloadable Rating Input Block Enter Move LOCK Lock System ...

Page 87: ...sired D Do ow wn nl lo oa ad da ab bl le e R Ra at ti in ng g option 4 3 ENTER Select desired option and block it 5 ENTER Select L LO OC CK K 1 MENU ENTER Input the password 21 4 5 6 7 8 0 9 2 3 6 RETURN Return to the previous menu MENU Return to TV viewing Enter Move LOCK Lock System Off Set Password Block Channel Movie Rating TV Rating Children TV Rating General Downloadable Rating Input Block E...

Page 88: ...5 6 7 8 0 9 2 3 6 RETURN Return to the previous menu MENU Return to TV viewing Enter Move LOCK Lock System Off Set Password Block Channel Movie Rating TV Rating Children TV Rating General Downloadable Rating Input Block Enter Move LOCK Lock System Off Set Password Block Channel Movie Rating TV Rating Children TV Rating General Downloadable Rating Input Block AV1 F F Off G G AV2 Off Component Off H...

Page 89: ...the patient entertainment programming offerings plan Channel Banks Setup Operating the Channel Banks menu Note Channel banks can only be set up after the 2 5 5 Menu procedure has been completed See remote key functions for channel banks menu on the following page ChannelStatusOptionsAvailableforChannelBanks In the Ch Preview Channel Banks menu use the channel up down arrows to go to a channel and ...

Page 90: ... Normal Deleted Channel will not appear in channel scan Blank Added Channel will appear in all channel banks video will be black no picture Blank Deleted Channel will be blanked in all channel banks Bank Ch Preview Channel Up OK Enter Channel Down Selects channel banks 1 2 3 4 Selects channel banks setup menu Exits menu Selects next higher channel number Tunes in deleted channels in scan Selects n...

Page 91: ...uning channel search enters the same channel numbers in channel banks 1 2 3 and 4 Auto Tuning removes any channels previously cus tomized with ADD DEL BLANK The channels found in the channel search on your antenna cable will be included and any channels previously found but not currently available will not be included ADD and DEL not BLANK can be used independently for channel banks 1 2 3 and 4 If...

Page 92: ...er 26 27 28 29 30 31 32 33 34 35 36 37 38 39 40 41 42 43 44 45 46 47 48 49 B A N K 1 2 3 4 Purpose Channel Number 51 52 53 54 55 56 57 58 59 60 61 62 63 64 65 66 67 68 69 70 71 72 73 74 B A N K 1 2 3 4 Purpose Channel Number 76 77 78 79 80 81 82 83 84 85 86 87 88 89 90 91 92 93 94 95 96 97 98 99 100 B A N K 1 2 3 4 Purpose Channel Number 101 102 103 104 105 106 107 108 109 110 111 112 113 114 115 ...

Page 93: ...y panel s clonable features like added channel icons or channel labels are not done correctly then the cloned TVs will all have problems Refer to the TV menus for other TV features Picture Audio Option Closed captions Lock V Chip etc T TL LL L 1 11 10 00 0A A C Cl lo on ne e P Pr ro og gr ra am mm me er r The TLL 1 100A is a very simple cloner to use It can be set up to clone a master TV setup and...

Page 94: ...s for premium as well as basic entertainment packages Headphone s output jack N No ot te es s See the Installer s menus to set up the operational features of the TV The Installer s section content is intended to be used primarily by qualified TV electronics technicians Reference is made to installer remote controls used for menu operation within the manual The remote informa tion is provided for r...

Page 95: ...Menu access Channel Edit Add Delete channels per your system requirements Note Physical channel numbers are used to identify Virtual channels Add familiar Channel Trademarks Logos like ABC CBS NBC etc to the Channel Time onscreen display In the Setup menu select the Channel Label option Add identifiable labels for the end user to readily know what common networks are available 4 4 T Tr ra an ns sf...

Page 96: ... Auto Clock set on TV main menu Learn From TV Choose the name of the image file 32LG3DC_UA_ a a c c c TLL 1 Set up all Master TV features on the menus and do a Channel Search Add Channel and Aux Labels etc Tune in an analog channel 2 Plug USB memory card into the USB In port on Master TV 3 Press Menu key to open Main menu Highlight the Option icon 4 Press the Left arrow key once the Option icon on...

Page 97: ...gh pro files Select the profile that you want to install by highlighting it and pressing the Enter key 7 Teaching progress will be shown on the progress bar As soon as teaching is done a message will appear indicating that the teaching process has been com pleted Teach Current Profile Teaching the selected profile to the TV 20 Do not unplug until restart automatically On Target TV Teach Master TV ...

Page 98: ...annel all equipment is connected to power and turned on and the TLL 1 100A Cloner main menu is displayed on the TV screen see above Warning Do not use the TLL 1 100A while any PPV card is installed or clone programmer device will be damaged O On n M Ma as st te er r T TV V Set up all Master TV features on the menus and do a Channel Search Add Channel and Aux labels etc Tune in an analog channel In...

Page 99: ...ct the Clone to a Master TV display panel After learning is complete to another identical TV display panel to teach it the master TV setup See the Clone Troubleshooting section to resolve problems T Tu ur rn n t to o t th he e n ne ex xt t p pa ag ge e t to o c co on nt ti in nu ue e C Cl lo on ni in ng g S Se et tu up p QuickSet II Programmer LT2002 Ferrite Core TDK ZCAT 2035 0930 heartbeat power...

Page 100: ...ithin one minute Another reason that the Clone programmer should be equipped with fresh high quality alka line batteries is for it to keep the time as accurately as possi ble Since the Clone Programmer s time cannot be set directly the current time needs to be copied from a Zenith LG TV equipped with M P I input capability After the time is copied to the Clone programmer the current time can then ...

Page 101: ... OF TV message displayed press 2 or use either Channel key to go to the TEACH TO TV option press ON OFF POWER or ENTER Select the LT2002 memory that the new setup is in Press On Off to transfer the new setup and other information to the new TV Teaching usually takes 2 3 minutes After the TEACHING COMPLETE message is displayed press any key to return to the Clone menu then press ON OFF POWER or ENT...

Page 102: ...tile memory The Installer s menu opens with item 000 INSTALLER SEQ 000 Use the Up Down arrow keys to sequence through the available menu items Or access an item directly by keying in the line number then pressing MENU For example to access the Sleep Timer option which is item 015 press 0 1 5 then MENU To change a setting use the Left Right arrow keys Or enter a value directly U Us si in ng g t th ...

Page 103: ...1 to disable menu navigation keys on TV 012 IR BANKS EN 0 1 0 Set to 1 enables TV to respond to IR code 013 SCAN MODE 0 1 1 Typically used for Hospitals puts TV On Off event in Ch Up Down sequence 014 STRT CH IN SM 0 1 0 Set to 1 to put TV On Off below start channel number 015 SLEEP TIMER 0 1 1 Set to 1 to enable Sleep Timer 016 EN TIMER 0 1 1 Set to 1 to enable On Off Timers 017 ALARM 0 1 1 Set t...

Page 104: ...cant byte 079 UPN MSB 1 0 255 255 User programmable number most significant byte 1 080 UPN MSB 2 0 255 255 User programmable number most significant byte 2 081 UPN LSB 0 255 255 User programmable number least significant byte 082 CHKSM ERROR 0 1 0 Enforces rigid M P I checksum 083 HANDSHK TIME 0 5 5 Relaxes M P I timing to be compatible with PC based Windows controlled systems 084 PERMANENT BLK 0 ...

Page 105: ...Generally this feature is used in connection with START CHANNEL Installer item 004 where the start channel may for example be set to 3 or 4 If the start channel is 3 then the TV will remain locked on Channel 3 N NO OT TE E F Fo or r I It te em ms s 0 00 07 7 0 00 08 8 a an nd d 0 00 09 9 For legacy reasons the scale used is 0 63 The PTC soft ware will translate this to the 0 100 scale used by the ...

Page 106: ...r Zenith IR codes remote control operation Set O P LBL for Zenith Private Label IR remote control opera tion Warning Do not set to 0 or remote will not control TV 0 02 21 1 V V C CH HI IP P P Pa ar re en nt ta al l C Co on nt tr ro ol l Set to 1 to activate V Chip Parental Control have it available to end user to filter and control or otherwise restrict programming content that can appear Set to 0...

Page 107: ...em 073 is set to 1 enabled If foreground color and background color are the same background will be transparent 0 07 71 1 B BC CK K C CH H T TI IM ME E T Te ex xt t D Di is sp pl la ay y B Ba ac ck kg gr ro ou un nd d C Co ol lo or r Set according to Color Chart 0 Black 3 Cyan 6 Yellow 1 Blue 4 Red 7 White 2 Green 5 Violet N No ot te es s Applies only to Channel Not Available mes sage if item 073 ...

Page 108: ...pect Ratio Lock is disabled set to 0 Set to 0 Set By System Set to 1 for 4 3 Set to 2 for 16 9 Factory Default Set to 4 for Zoom 1 Set to 5 for Zoom 2 0 09 99 9 B BA AC CK K L LI IG GH HT TI IN NG G Sets the TV screen brightness at power up see set tings below Default setting is 100 1 1 1 10 00 0 S St ta at ti ic c B Ba ac ck kl li ig gh ht ti in ng g 1 Dimmest picture 100 Brightest picture 1 10 0...

Page 109: ...the Installer menu set the Installer menu items to the configuration required of your institution c It is important to set the tuning band at this time set Installer menu item 03 BAND AFC Default is 001 CATV d Set Installer menu item 28 CH OVERIDE to 001 to allow access to Auto Tuning and Channel Edit options in the Channel Menu Exit the Installer menu 2 Access the Master TV menus and set the clon...

Page 110: ...nging Adding Labels or go to the next channel Changing Adding Channel Labels on Master TV 1 Channel Up Down to select the desired channel 2 Press the Right or Left ADJ arrow repeatedly until the numbers 1 to 7 show up The number shows the position of the character that can be changed Number 1 is the first character number 2 the sec ond character and so on 3 With the Up or Down arrow select the des...

Page 111: ...PGA E0F1 PTC V1 00 000 CPU V3 06 00 HOSPITAL PTC INSTALLER MENU N No ot te e End user only has access to features that are available on End user pillow speaker or remote control if provided by the institution M Me en nu u S Su ub b M Me en nu u F Fe ea at tu ur re es s C Ch ha an nn ne el l M Me en nu u Auto Tuning Manual Tuning Channel Edit Channel Label O Op pt ti io on n M Me en nu u Language C...

Page 112: ...099 Backlighting value set as shown below Default value is 200 N No ot te e Values are results of controlled experiments under laboratory conditions Item 099 Backlighting Static Item 099 Backlighting Dynamic Power Savings Rating Power Consumption Watts Brightness 100 90 80 70 60 50 40 30 20 10 1 150 4 133 7 122 107 2 93 63 79 8 65 1 49 01 34 85 22 64 12 56 46 8 44 44 41 7 39 22 36 76 34 33 31 69 2...

Page 113: ...e problem may be with the broadcast Is the power cord inserted into wall power outlet Check your antenna direction and or location Test the wall power outlet plug another product s power cord into the outlet where the product s power cord was plugged in This is normal the image is muted during the product startup process Please contact your service center if the picture has not appeared after five...

Page 114: ...LUME button Sound muted Press the MUTE button Try another channel The problem may be with the broadcast Are the audio cables installed properly Adjust Balance in menu option A change in ambient humidity or temperature may result in an unusual noise when the product is turned on or off and does not indicate a fault with the product Check HDMI cable over version 1 3 Check USB cable over version 2 0 ...

Page 115: ... If the TV does not display a picture on the TV blank screen after a few seconds just change channels Clone Programmer Troubleshooting Warning Do not use LT2002 while any PPV card is installed in TV or clone programmer will be damaged C Cl lo on ne e P Pr ro og gr ra am mm me er r Press Reset on clone programmer redo teach learn Teach Learn should take a minimum of 1 minute OnlyuseanLGInstallerrem...

Page 116: ...e channel in Select Normal Added on the Ch Preview Channel Banks menu TV is set up to display Inactive TV message if all channels are Normal Delete in Channel Bank 4 Select another channel bank Bank 1 2 or 3 which will return TV to normal operation Channel was deleted in currently selected channel bank If banks were set up premium channels may only be available on another channel bank Select the c...

Page 117: ... power is re applied Bad TV Did Analog Board POWER LED Turn On Momentarily No Check to see if TV is in Commercial Mode See Commercial Mode Check chart Did TV Turn On Momentarily No Yes Yes Yes Did TV Turn On Yes No Press POWER or ON OFF key on TV 1 Bad TV Press POWER or ON OFF or VOLUME UP DOWN or MUTE key on Installer Remote Did TV Respond No 1 Bad TV 2 Go to Remote Control Checklist page 5 Yes P...

Page 118: ...erational Did you get a response Bad TV Yes No Did TV stop responding or continue to respond TV is in Commercial Mode Stopped responding TV is not in Commercial Mode Call Technical Support for Assistance Continued to respond Leave the TV set On Go to Installer menu by pressing MENU until the TV stops responding ...

Page 119: ...er video quality D DE EL LE ET TE ED D Lets you remove channels from the list that the end user can scroll through using CH Channel Up Down H HD DM MI I High definition multi media interface H HD DT TV V High definition television Refers to television signals that have higher res olution than ordinary analog TV sig nals H HD DS ST TB B High definition set top box Refers to a tuner device that rece...

Page 120: ...ashing detergent Wring the cloth until it s almost dry and then use it to wipe the screen Make sure the excess water is off the screen and then let it air dry before you turn on your TV G G If you expect to leave your TV dormant for a long time such as a vacation it s a good idea to unplug the power cord to protect against possible damage from lightning or power surges CAUTION 2 1 G G Do not use w...

Page 121: ...With stand Without stand With stand Without stand OperatingTemperature OperatingHumidity StorageTemperature StorageHumidity 26LG3DCH 26LG3DCH UA 26 1 x 1 7 6 x 3 1 inches 663 3 x 449 8 x 80 0 mm 1 8 9 pounds 8 6 kg AC1 20V 50 60Hz 22LG3DCH 22LG3DCH UA 20 7 x 1 5 2 x 3 2 inches 528 x 387 3 x 82 7 mm 1 3 6 pounds 6 2kg AC1 20V 50 60Hz 31 5 x 21 4 x 4 2 inches 801 8 x 544 4 x 109 mm 26 2 pounds 1 1 9...

Page 122: ... C4 C5 C6 C7 D0 D1 D2 D3 D4 D5 D6 D7 D0 D1 D2 D3 D4 D5 D6 D7 Lead code Low custom code High custom code Data code Data code Repeat code Tf 4 5 ms 9 ms 2 25 ms 9 ms 0 55 ms 0 56 ms 1 12 ms 0 56 ms 2 24 ms Tf Tf Tf 108ms 455KHz Bit 0 Bit 1 1 How to Connect Connect your wired remote control to the Remote Control port on the TV 2 Remote Control IR Codes Output waveform Single pulse modulated with 37 9...

Page 123: ...ton 09 MUTE Remote control Button CB ADJUST Remote control Button 43 MENU Remote control Button 5B RETURN Remote control Button 40 Remote control Button 41 Remote control Button 07 Remote control Button 06 Remote control Button 44 ENTER Remote control Button Code Function Note Hexa D6 TV Discrete IR Code TV Input Selection 5A AV1 Discrete IR Code AV1 Input Selection BF COMPONENT Discrete IR Code C...

Page 124: ......

Reviews: