124
Using the PC
Connecting to Wireless Display
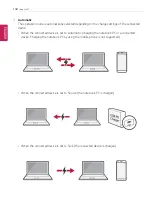
The wireless display feature connects the PC screen and sound to a display (TV, projector, etc.).
OPTION
•
To use the wireless display feature, the display device must support this feature.
•
To connect to the display device that does not support wireless display, you must
separately purchase a wireless display connection device.
•
Once the wireless display connection is established, no additional procedures and searching
are necessary the next time you try to connect.
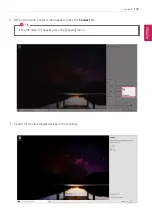
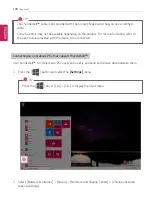
Connecting to Wireless Display
1
Press the Action Center [
] icon on the right side of the taskbar.
ENGLISH
Summary of Contents for 13Z990 Series
Page 22: ...22 Instruction Safety Information Regulatory Notices ENGLISH ...
Page 23: ...Instruction Safety Information 23 ENGLISH ...
Page 24: ...24 Instruction Safety Information ENGLISH ...
Page 25: ...Instruction Safety Information 25 ENGLISH ...
Page 26: ...26 Instruction Safety Information ENGLISH ...
Page 27: ...Instruction Safety Information 27 ENGLISH ...
Page 28: ...28 Instruction Safety Information ENGLISH ...
Page 29: ...Instruction Safety Information 29 ENGLISH ...
Page 30: ...30 Instruction Safety Information ENGLISH ...
Page 31: ...Instruction Safety Information 31 ENGLISH ...
Page 32: ...32 Instruction Safety Information ENGLISH ...
Page 33: ...Instruction Safety Information 33 ENGLISH ...
Page 34: ...34 Instruction Safety Information ENGLISH ...
Page 35: ...Instruction Safety Information 35 ENGLISH ...
Page 36: ...36 Instruction Safety Information ENGLISH ...
Page 37: ...Instruction Safety Information 37 ENGLISH ...
Page 38: ...38 Instruction Safety Information ENGLISH ...
Page 39: ...Instruction Safety Information 39 ENGLISH ...
Page 40: ...40 Instruction Safety Information ENGLISH ...
Page 41: ...Instruction Safety Information 41 ENGLISH ...
Page 42: ...42 Instruction Safety Information ENGLISH ...
Page 43: ...Instruction Safety Information 43 ENGLISH ...
Page 44: ...44 Instruction Safety Information ENGLISH ...
Page 45: ...Instruction Safety Information 45 ENGLISH ...
Page 46: ...46 Instruction Safety Information ENGLISH ...
Page 47: ...Instruction Safety Information 47 ENGLISH ...
Page 48: ...48 Instruction Safety Information ENGLISH ...
Page 49: ...Instruction Safety Information 49 ENGLISH ...
Page 50: ...50 Instruction Safety Information ENGLISH ...
Page 51: ...Instruction Safety Information 51 ENGLISH ...
Page 52: ...52 Instruction Safety Information ENGLISH ...
Page 53: ...Instruction Safety Information 53 ENGLISH ...
Page 54: ...54 Instruction Safety Information ENGLISH ...
Page 55: ...Instruction Safety Information 55 ENGLISH ...
Page 100: ...100 Using the PC 3 Go to Keyboard Backlight and select your desired options ENGLISH ...
Page 136: ...136 Using the PC 2 When the Settings screen appears select Devices ENGLISH ...
Page 140: ...140 Using the PC 2 Connect the wired LAN cable to the LAN port ENGLISH ...
Page 142: ...142 Using the PC 4 Select Network Internet Status Change adapter options ENGLISH ...
Page 143: ...Using the PC 143 5 Right click Ethernet and select the Properties menu ENGLISH ...
Page 148: ...148 Using the PC 3 Select the Access Point you want to connect to and press Connect ENGLISH ...
Page 163: ...Using Software 163 1 Select the All List Update needed menu item ENGLISH ...
Page 168: ...168 Using Software 1 Press the icon on the taskbar ENGLISH ...
Page 178: ...178 Restoring the System 1 Select Keep my files ENGLISH ...
Page 179: ...Restoring the System 179 2 Check the current settings ENGLISH ...
Page 182: ...182 Restoring the System 1 Select Remove everything ENGLISH ...
Page 183: ...Restoring the System 183 2 Check the current settings ENGLISH ...
Page 185: ...Restoring the System 185 4 Press Next to proceed with installation as guided ENGLISH ...
Page 210: ...210 Setup and Upgrade 3 Boots using the selected device ENGLISH ...
Page 212: ...212 Setup and Upgrade 2 Select System Display ENGLISH ...
Page 217: ...FAQ 217 2 Select System Display ENGLISH ...
Page 222: ...222 FAQ 1 Select Keep my files ENGLISH ...
Page 223: ...FAQ 223 2 Check the current settings ENGLISH ...
Page 226: ...226 FAQ 1 Select Remove everything ENGLISH ...
Page 227: ...FAQ 227 2 Check the current settings ENGLISH ...
Page 229: ...FAQ 229 4 Press Next to proceed with installation as guided ENGLISH ...
Page 235: ...FAQ 235 3 Select the Access Point you want to connect to and press Connect ENGLISH ...


