background image

Resolvendo problemas de Rede

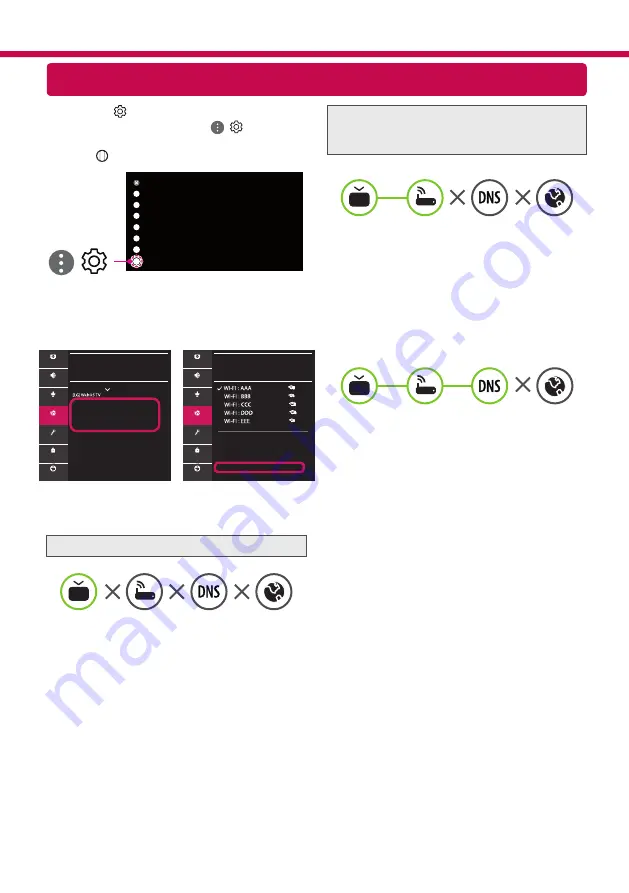
1  Pressione   no controle remoto para acessar 

o menu. Aponte para o ícone   ( ) [Todas as 

Configurações] e selecione-o pressionando o 

botão 

 Scroll (OK)

 no controle remoto.

Todas as Configurações

( )

2  Selecione [Conexão] 

 [Conexão com fio (Ether-

net) ou Conexão da rede Wi-Fi] 

 [Configura-

ções avançadas de Wi-Fi].

CONEXÃO

Nome da TV 

Conexão com fio (Ethernet)

Não conectado

Conexão da rede Wi-Fi

Não conectado

Conector de Dispositivos
TV Mobile ativada
Configurações do Screen Share
Configurações do dispositivo HDMI

CONEXÃO DA REDE WI-FI

Conexão /


Adicionar uma rede sem fio oculta
Conectar através de WPS PBC
Conectar através de WPS PIN
Configurações avançadas de Wi-Fi 

Imagem

Imagem

Som

Som

Canais

Canais

Conexão

Conexão

Geral

Geral

Segurança

Segurança

Acessibilidade

Acessibilidade

Verifique abaixo as instruções relacionadas com o 

status da conexão.

Verifique a TV ou o Roteador

Quando 

X

 for exibido próximo da 

TV

:

1

 Verifique o status da conexão na TV e Roteador.

2

 Desligue e ligue a TV e o Roteador.

3

 Se estiver usando endereço IP estático, será ne-

cessário inseri-lo nas configurações avançadas.

4

 Contate o Provedor de Internet ou o fabricante 

do Roteador.

Verifique o Roteador ou o seu Provedor de 

Internet

Quando 

X

 for exibido próximo do 

Gateway

:

1

 Desconecte o cabo de força do Roteador por 5 

segundos e conecte-o novamente.

2

 Reinicialize o Roteador.

3

 Contate o Provedor de Internet ou o fabricante 

do Roteador.

Quando 

X

 for exibido próximo do 

DNS

:

1

Desconecte o cabo de força do Roteador por 5 

segundos e conecte-o novamente.

2

 Reinicialize o Roteador.

3

 Verifique se o endereço MAC da TV/Roteador 

está registrado com seu Provedor de Internet. 

Este endereço é exibido no lado direito da 

janela de status quando for efetuado o registro 

junto ao Provedor de Internet.

4

 Verifique o site do fabricante do Roteador para 

confirmar se o mesmo tem a última versão de 

firmware instalado.

Summary of Contents for OLED65W9PDA

Page 1: ...carefully before operating your TV and retain it for future reference Safety and Reference Copyright 2019 LG Electronics Inc All Rights Reserved MFL71182452 1906 REV02 www lg com OLED65W9PSA OLED65W9PDA OLED77W9PSA OLED77W9PDA ...

Page 2: ... into your outlet consult an electrician for replacement of the obsolete outlet Protect the power cord from being walked on or pinched particularly at plugs convenience receptacles and the point where they exit from the apparatus Only use attachments accessories specified by the manufacturer Use only with the cart stand tripod bracket or table specified by the manufacturer or sold with the apparat...

Page 3: ...U S A provides information with respect to proper grounding of the mast and supporting structure grounding of the lead in wire to an antenna discharge unit size of grounding conductors location of antenna discharge unit connection to grounding electrodes and requirements for the grounding electrode Antenna grounding according to the National Electrical Code ANSI NFPA 70 Warning Safety Instructions...

Page 4: ... only an authorized attachments accessories approved by LG Electronics Otherwise this may result in fire electric shock malfunction or product damage Never disassemble the AC adapter or power cord This may result in fire or electric shock Handle the adapter carefully to avoid dropping or striking it An impact could damage the adapter To reduce the risk of fire or electrical shock do not touch theT...

Page 5: ...SB flash drive does not fit into yourTV s USB port Use a certified cable with the HDMI logo attached If you do not use a certified HDMI cable the screen may not display or a connection error may occur Recommended HDMI cable types 3 m or less Ultra High Speed HDMI cable A B A B A 10 mm B 18 mm Make sure to wring any excess water or cleaner from the cloth Do not spray water or cleaner directly onto ...

Page 6: ...ns Avoid touching the screen at all times as this may result in damage to the screen Do not place the product on the floor with its front facing down without padding Failure to do so may result in damage to the screen When supported cable doesn t have enough length to connect theTV set with the Companion Box AV Box you should use the extension cable Please do not pile stuff up on or press down str...

Page 7: ...e wall Plasterboard Plywood 30 mm When installing on a gypsum board or medium density fiberboard MDF wall fasten the screws to the studs that support the wall If there are no studs check the distance from the inner wall before installing 30 mm or below Install directly on the inner wall using a 65 mm screw 30 mm or above Install using a separate hanger Wall When installing the wall mount check the...

Page 8: ... securely When installing the product first check that the wall is strong enough Use the anchors and screws provided If you use anchors and screws that are not specified by the manufacturer they may not hold the weight of the product causing safety issues Be sure to use the accessory cable provided Otherwise friction between the product and the wall may cause damage to the connector When drilling ...

Page 9: ...dio quality connect the external device and theTV with the HDMI cable HDMI When connecting the HDMI cable the product and external devices should be turned off and unplugged Supported HDMI Audio format Depending upon model DTS 44 1 kHz 48 kHz 88 2 kHz 96 kHz DTS HD 44 1 kHz 48 kHz 88 2 kHz 96 kHz 176 4 kHz 192 kHz True HD 48 kHz Dolby Digital Dolby Digital Plus 32 kHz 44 1 kHz 48 kHz PCM 32 kHz 44...

Page 10: ...a USB device connected through a USB Hub is not detected connect it directly to the USB port on theTV When connecting via a wired LAN it is recommended to use a CAT 7 cable Using Button You can simply operate theTV functions using the button Basic functions Power On Press Power Off 1 Press and hold Volume Control Channels Control 1 All running apps will close and any recording in progress will sto...

Page 11: ...you to enter a specified app or LiveTV directly by pressing and holding the number buttons SAP Secondary Audio Program Feature can be enabled by pressing the key Adjusts the volume level MUTE Mutes all sounds MUTE Accesses the Accessibility menu Scrolls through the saved channels Voice recognition Network connection is required to use the voice recognition function Once the voice display bar is ac...

Page 12: ...ntact an authorized service center An orange light blinks on the front of the Companion Box AV Box The cable from panel may not be properly connected to the Companion Box AV Box Unplug the power cord and reconnect the cable from the panel Then plug the power cord in and press the power button If it still doesn t work after the steps above contact an authorized service center Registering Magic Remo...

Page 13: ... large amount of current to operate a product It varies depending upon the product This generated sound does not affect the performance and reliability of the product Make sure to wring any excess water or cleaner from the cloth Do not spray water or cleaner directly onto theTV screen Make sure to spray just enough of water or cleaner onto a dry cloth to wipe the screen To clean the top of the Com...

Page 14: ...nge Output power Max 2400 to 2483 5 MHz 8 dBm As band channels can vary per country the user cannot change or adjust the operating frequency This product is configured for the regional frequency table For consideration of the user this device should be installed and operated with a minimum distance of 20 cm 7 8 inches between the device and the body FCC ID BEJLGSBWAC92 IC 2703H LGSBWAC92 Environme...

Page 15: ...claimers and copyright notices are available for download LG Electronics will also provide open source code to you on CD ROM for a charge covering the cost of performing such distribution such as the cost of media shipping and handling upon email request to opensource lge com This offer is valid for a period of three years after our last shipment of this product This offer is valid to anyone in re...

Page 16: ...e Mode Eco Picture Picture Mode Settings OLED LIGHT Adjust to lower value Picture Additional Settings OLED Panel Settings Logo Luminance Adjustment High Turn off the menu bar of an external device such as a set top box to prevent long term display of the menu bar of such device Please refer to the manual of the applicable external device for instructions Adjust the settings as below when watching ...

Page 17: ...acing the television set on tall furniture for example cupboards or bookcases without anchoring both the furniture and the television set to a suitable support Not placing the television set on cloth or other materials that may be located between the television set and supporting furniture Educating children about the dangers of climbing on furniture to reach the television set or its controls If ...

Page 18: ...The model and serial numbers of the Product are located on the back and on one side of the Product Record them below in case you ever need service Model Serial No ...

Page 19: ...WPS PIN Advanced Wi Fi Settings Picture Sound Channels Connection General Safety Accessibility For wireless AP Router that have the symbol you need to enter the security key 4 If the connection is successful the Connected to Internet is displayed CONNECTION TV Name Wired Connection Ethernet Not Connected Wi Fi Connection Connected to Internet Device Connector Mobile TV on Screen Share Settings HDM...

Page 20: ... or the AP Router When X appears next to TV 1 Check the connection status of the TV AP Router 2 Power off and power on the TV AP Router 3 If you are using a static IP enter the IP directly 4 Contact internet service provider or AP Router company Check the AP Router or consult your Internet service provider When X appears next to Gateway 1 Unplug the power cord of the AP Router and try to connect a...

Page 21: ...ection General Safety Accessibility ABOUTTHISTV General Software Version Allow Automatic Updates CHECK FOR UPDATES TV Information Notifications User Guide Quick Help Picture Sound Channels Connection General Safety Accessibility 1 Check that Wi Fi is enabled on your smartphone To use SmartShare both devices must on the same local network 2 Install run the app for sharing content on your smartphone...

Page 22: ...ncés Image Son Chaînes Connexion Général Sécurité Accessibilité Pour les points d accès sans fil routeur affichant le symbole vous devez saisir le code de sécurité 4 Lorsque la connexion est établie la mention Connecté à Internet est affichée CONNEXION NOM DE LA TV Connexion filaire Ethernet Non connecté Connexion Wi Fi Connecté à Internet Connecteur de périphérique Télé mobile active Paramètres d...

Page 23: ...ur 2 Éteignez et rallumez le téléviseur ou le point d accès routeur 3 Si vous utilisez une adresse IP statique saisissez la directement 4 Communiquez avec le fournisseur d accès à Internet ou avec le fabricant du point d accès routeur Vérifiez le point d accès routeur ou consultez votre fournisseur d accès à Internet Lorsqu un X s affiche à côté du point d accès routeur 1 Débranchez le cordon d al...

Page 24: ...ersion du logiciel Autoriser les mises à jour automatiques RECHERCHER DES MISES À JOUR Renseignements sur le téléviseur Notifications Guide d utilisation Aide rapide Image Son Chaînes Connexion Général Sécurité Accessibilité 1 Vérifiez que l option Wi Fi est activée sur votre téléphone intelligent Pour utiliser SmartShare les deux appareils doivent être connectés sur le même réseau local 2 Install...

Page 25: ...Fi Imagen Audio Canales Conexión General Seguridad Accesibilidad Para el AP inalámbrico enrutador que tiene el símbolo debe ingresar la clave de seguridad 4 Si la conexión es exitosa se muestra Conectado a Internet CONEXIÓN Nombre de la TV Conexión cableada Ethernet No conectado Conexión Wi Fi Conectado a Internet Conector de Dispositivo TV móvil activo Configuraciones de Screen Share Configuració...

Page 26: ...or 1 Revise el estado de conexión del televisor AP enrutador 2 Apague y encienda el televisor AP enrutador 3 Si está utilizando una IP estática ingrese la IP directamente 4 Comuníquese con el proveedor de servicios de Internet o la empresa de AP enrutador Revise el AP enrutador o consulte a su proveedor de servicios de Internet Cuando aparece X junto a la puerta de enlace 1 Desenchufe el cable de ...

Page 27: ...General Versión de software Permitir Actualizaciones Automáticas BUSCAR ACTUALIZACIONES Información del TV Notificaciones Guía del usuario Ayuda rápida Imagen Audio Canales Conexión General Seguridad Accesibilidad 1 Verifique que la conexión Wi Fi esté activada en su teléfono inteligente Para utilizar SmartShare ambos dispositivos deben estar en la misma red local 2 Instale y ejecute la aplicación...

Page 28: ...ções avançadas de Wi Fi Imagem Som Canais Conexão Geral Segurança Acessibilidade Para roteadores sem fio o símbolo indica a necessidade de acesso com senha 4 Se a conexão for conectada corretamente a informação Conectado à internet é exibida CONEXÃO Nome da TV Conexão com fio Ethernet Não conectado Conexão da rede Wi Fi Conectado à Internet Conector de Dispositivos TV Mobile ativada Configurações ...

Page 29: ... da conexão Verifique a TV ou o Roteador Quando X for exibido próximo da TV 1 Verifique o status da conexão na TV e Roteador 2 Desligue e ligue a TV e o Roteador 3 Se estiver usando endereço IP estático será ne cessário inseri lo nas configurações avançadas 4 Contate o Provedor de Internet ou o fabricante do Roteador Verifique o Roteador ou o seu Provedor de Internet Quando X for exibido próximo d...

Page 30: ...Canais Conexão Geral Segurança Acessibilidade SOBRE ESTATV Geral Versão do software Permitir Atualizações Automáticas VERIFICAR POR ATUALIZAÇÕES Informações da TV Notificações Guia do usuário Ajuda rápida Imagem Som Canais Conexão Geral Segurança Acessibilidade 1 Verifique se a rede Wi Fi está ativada no smartphone Para uso do SmartShare use a mesma rede para conexão 2 Instale execute o aplicativo...

Reviews: