background image

Maintaining your printer

29

Printing beyond the basics

Beyond the basics

Maintaining your printer

Troubleshooting

Appendix

Index

Steps to basic printing

Installing or replacing print cartridges

1

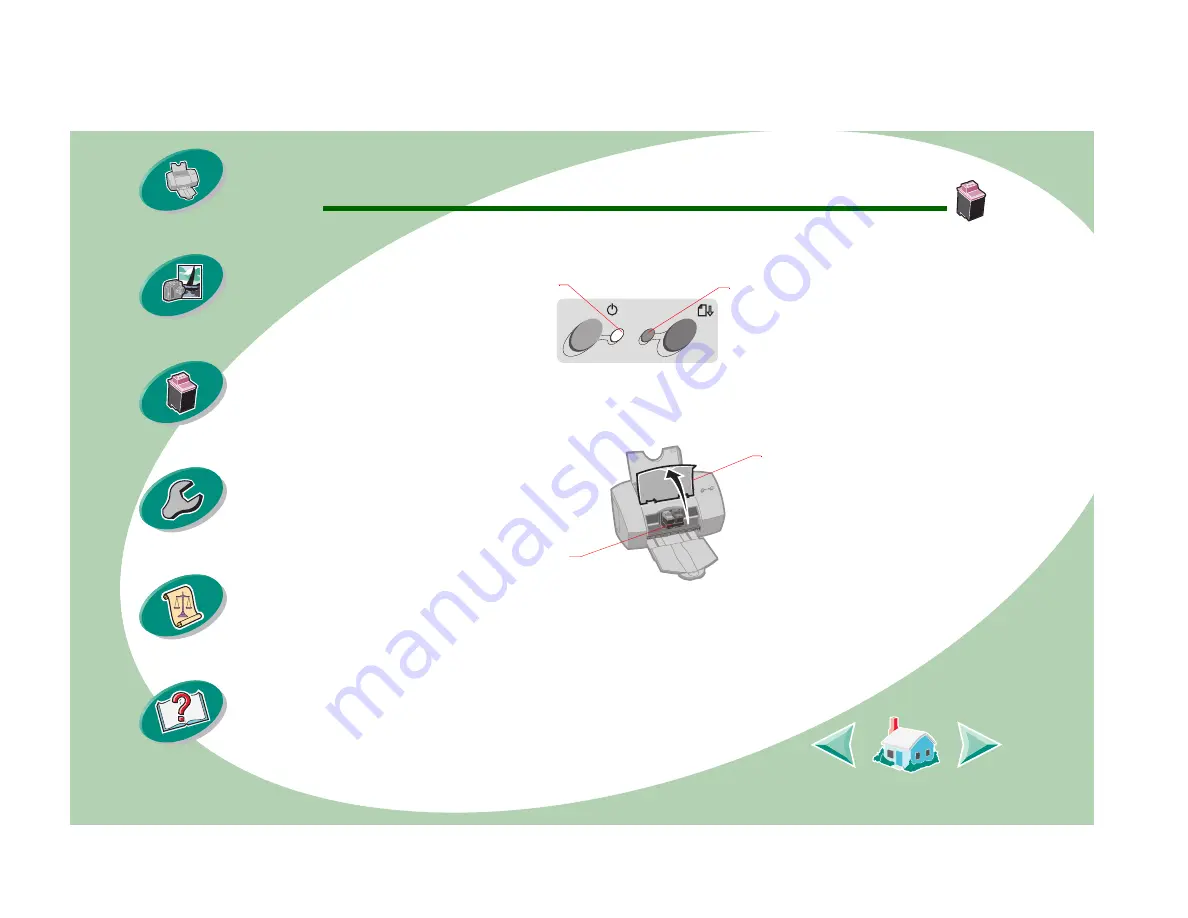
Make sure the Power light is on.

2

Raise the front cover. 
The print cartridge carrier moves to the loading position unless 
the printer is busy.

Power light

Paper Feed 
light

Front 
cover

Print cartridge 
carrier in the 
loading position

Summary of Contents for Z52

Page 1: ...or imply that only that product program or service may be used Any functionally equivalent product program or service that does not infringe any existing intellectual property right may be used instead Evaluation and verification of operation in conjunction with other products programs or services except those expressly designated by the manufacturer are the user s responsibility Lexmark Lexmark w...

Page 2: ... view edition and trademark information To print this guide 1 From the Acrobat Reader File menu select Print 2 Click Setup and make sure Landscape is selected 3 Select the pages you want to print and click OK Steps to basic printing tells you how to load paper and adjust your printer software for printing Printing beyond the basics tells you how to print booklets and two sided documents Troublesho...

Page 3: ...ntaining your printer Troubleshooting Appendix Index Steps to basic printing Steps to basic printing Basic printing is as easy as Step One Load the paper Step Two Customize your printing options Step Three Print your document ...

Page 4: ...rinter Troubleshooting Appendix Index Steps to basic printing Step One Load the paper You can load up to 100 sheets of paper depending on thickness into the printer 1 Place the paper against the right side of the sheet feeder with the print side facing you Sheet feeder Paper alignment marks ...

Page 5: ...nd the basics Beyond the basics Maintaining your printer Troubleshooting Appendix Index Steps to basic printing 2 Squeeze the release tab and the paper guide together and slide the paper guide to the edge of the paper Release tab Paper guide ...

Page 6: ...these guidelines when loading specialty papers Load up to Make sure the 10 envelopes print side is facing you paper guide is against the side of the envelopes stamp location is in the upper left corner 10 greeting cards index cards or postcards print side is facing you cards are loaded vertically against the right side of the sheet feeder paper guide is against the side of the cards ...

Page 7: ...ainst the side of the photo paper 25 iron on transfers print side is facing you and follow the instructions included in the iron on transfer packaging paper guide is against the side of the iron on transfers 100 sheets of custom sized paper paper size fits within these dimensions Width dimensions mm 76 2 215 9 inches 3 0 8 5 Length dimensions mm 127 0 431 8 inches 5 0 17 0 paper guide is against t...

Page 8: ...paper behind the printer Next bring the unattached edge of the first page over the top of the printer and into the sheet feeder paper guide is against the side of the paper NOTE Select the Banner Letter or Banner A4 Paper Size in the Lexmark Z52 Page Setup dialog box 10 transparencies rough sides of the transparencies are facing you smooth side down paper guide is against the side of the transpare...

Page 9: ...o Customize your printing options The printer software for your printer allows you to perform printing tasks with superior printing results The Page Setup dialog box comes with your operating system It includes options such as paper size orientation and watermarks Click this pop up menu to select a paper size Click one of these to select the page orientation ...

Page 10: ...Index Steps to basic printing The Print dialog box comes with your printer software It includes options such as number of copies pages to print paper source print quality booklet printing pages per sheet handouts print last page first print on both sides color matching background printing and print time See the table below ...

Page 11: ...lication 1 Open the application s File menu 2 Choose Page Setup 3 Change options as needed From the pop up menu choose this option When you want to select General the number of copies the pages to print and wait for pages to dry Paper Type Quality paper type and print quality Layout booklet printing pages per sheet print last page first print on both sides and binding Color ColorSync or Built In c...

Page 12: ... change your print settings from an application for example word processing spreadsheet graphics etc open the Print dialog box 1 Open the application s File menu 2 Choose Print 3 Change options as needed Changing your print settings from your desktop To change your print settings from your desktop open the Print dialog box 1 From your desktop open the File menu 2 Choose Print 3 Change options as n...

Page 13: ...ult settings Use the default settings for printing most documents on plain paper However you may need to change your printer options for printing on specialty papers When you are printing on this specialty media Open this dialog box And make these selections Envelopes Page Setup From the Paper Size pop up menu select the appropriate envelope size Cards Page Setup From the Paper Size pop up menu se...

Page 14: ... Paper Type and Normal 600 dpi Print Quality NOTE When printing transparencies remove each transparency as it exits the printer and allow it to dry before stacking Iron On Transfers Print From the Paper Type Quality pop up menu select Iron On Transfer Paper Type Coated Print From the Paper Type Quality pop up menu select Coated Paper Type When you are printing on this specialty media Open this dia...

Page 15: ...Type Quality pop up menu select Glossy Paper Type and High 1200 dpi Print Quality From the Color pop up menu select Built In Color Matching From the Document Color pop up menu select Natural Color NOTE When printing photos remove each photo as it exits the printer and allow it to dry before stacking When you are printing on this specialty media Open this dialog box And make these selections ...

Page 16: ...print To save your settings 1 Open the File menu 2 Choose Print The Print dialog box appears 3 Change settings as needed 4 Select Save Settings Going back to the defaults You may want to change your settings back to the default settings 1 Open the File menu 2 Choose Print The Print dialog box appears 3 Select Revert to Defaults Step Three Print your document 1 Open the File menu 2 Choose Print The...

Page 17: ...r printer software for Printing booklets Printing handouts Printing last page first Printing on both sides of a sheet of paper Printing booklets You can print and bundle your document together to make a booklet Step One Load the paper Load up to 100 sheets of paper against the right side of the sheet feeder For help loading paper see page 4 ...

Page 18: ...Index Steps to basic printing Step Two Customize the Print dialog box for booklets 1 Open the Page Setup dialog box 2 Select the appropriate paper size 3 Select the appropriate page orientation 4 Open the Print dialog box 5 From the General pop up menu select Layout Select Layout Select the number of sheets to bundle ...

Page 19: ...s of paper folded together For help see the next section Building a booklet When printing with a heavier paper stock select a smaller number of sheets to bundle to allow for binding considerations 7 Select Print When the first half of your booklet is finished printing your printer software prompts you to reload the paper 8 Insert the stack of paper and paper reloading instruction page with the pri...

Page 20: ...stack the bundles together and bind your booklet To build a booklet 1 Take the first bundle from the paper exit tray fold it in half and set it aside 2 Take the next bundle fold it in half and stack it on top of the first bundle 3 Stack the rest of your bundles on top of each other until your booklet is complete 4 Bind the bundles together to complete your booklet Five bundles stacked to form a bo...

Page 21: ...p One Load the paper Load up to 100 sheets of paper against the right side of the sheet feeder For help loading paper see page 4 Step Two Customize the Print dialog box for Pages per Sheet handouts You can print your handouts on one side of the paper or on both sides of the paper 1 Open the Page Setup dialog box 2 Select the appropriate paper size 3 Select the appropriate page orientation 4 Open t...

Page 22: ...ur handout on both sides of the paper select Print on Both Sides 9 Select the appropriate graphic for the binding edge you want 10 Select Print If you formatted your handouts to print on one side of each page you are finished If you formatted your handouts to print on both sides of each page continue with printing the second side of our handouts 11 When the first half of your handouts is finished ...

Page 23: ...t page page prints last Step One Load the paper Load up to 100 sheets of paper against the right side of the sheet feeder For help loading paper see page 4 Step Two Customize the Print dialog box to print the last page first 1 Open the Page Setup dialog box 2 Select the appropriate paper size 3 Select the appropriate page orientation 4 Open the Print dialog box 5 From the General pop up menu selec...

Page 24: ...er this feature is helpful when you want to print tablets Step One Load the paper Load up to 100 sheets of paper against the right side of the sheet feeder For help loading paper see page 4 Step Two Customize the Print dialog box to print on both sides of the paper 1 Open the Page Setup dialog box 2 Select the appropriate paper size 3 Select the appropriate page orientation 4 Open the Print dialog...

Page 25: ...u want You can either bind on the left edge or on the top edge of the paper 8 Select Print The odd numbered pages print first When the odd numbered pages finish printing your printer software prompts you to reload the paper 9 Insert the stack of paper and instruction page with the printed side facing away from you and the arrows pointing down 10 Click OK The even numbered pages print on the other ...

Page 26: ...cribes how to install replace and care for your print cartridges You can use the Control Panel one of your printer s software programs to help you with these tasks Using the Control Panel Installing or replacing print cartridges Improving print quality Aligning the print cartridges Wiping print nozzles and contacts Preserving print cartridges ...

Page 27: ...ng your printer Troubleshooting Appendix Index Steps to basic printing Using the Control Panel The Control Panel includes two tabs Cartridge and About Opening the Control Panel To open the Control Panel 1 Open the Apple menu 2 Choose Control Panels 3 Choose Lexmark Z52 Control Panel ...

Page 28: ...ntaining your printer Troubleshooting Appendix Index Steps to basic printing Select the Cartridge tab to Install or replace a print cartridge Align the cartridges Clean the print nozzles Print a test page the About tab to find printer software version and copyright information ...

Page 29: ...g Appendix Index Steps to basic printing Installing or replacing print cartridges 1 Make sure the Power light is on 2 Raise the front cover The print cartridge carrier moves to the loading position unless the printer is busy Power light Paper Feed light Front cover Print cartridge carrier in the loading position ...

Page 30: ...l the replacement cartridge in the printer 5 From the Lexmark Z52 Control Panel select the Cartridges tab If you are installing a new cartridge remove only the sticker and transparent tape from the bottom of the print cartridge Insert the replacement print cartridge into the print cartridge carrier Push back firmly on the cartridge until it snaps securely into place Warning Do Not touch the gold c...

Page 31: ...nd the basics Beyond the basics Maintaining your printer Troubleshooting Appendix Index Steps to basic printing 6 Select the appropriate button for your cartridge Click the Cartridges tab Click the button for the cartridge you want to install ...

Page 32: ...aining your printer 32 Printing beyond the basics Beyond the basics Maintaining your printer Troubleshooting Appendix Index Steps to basic printing 7 Follow the steps on your screen to install the cartridges ...

Page 33: ...your printer Troubleshooting Appendix Index Steps to basic printing 8 Select Yes to align the cartridges Follow the instructions on the screen to complete cartridge alignment For additional help see page 34 9 To see how the cartridges print select Print Test Page Select Print Test Page ...

Page 34: ...your print nozzles Aligning the print cartridges Normally you only align the print cartridges after installing a new print cartridge However you may also need to align the print cartridges when The black portions of a graphic or text do not align properly with the color portions Characters are not aligned correctly at left margin Vertical lines appear wavy To align your print cartridges 1 Load pla...

Page 35: ... Cartridges Your printer prints an alignment test page with several alignment patterns The test page looks similar to the one shown 4 From each alignment group on the test page find the number under the alignment pattern that comes closest to forming a perfectly straight line For example in sample group A the arrow points to the pattern that comes closest to forming a straight line 8 7 9 10 ...

Page 36: ...ng your printer Troubleshooting Appendix Index Steps to basic printing 5 In the Align Cartridges dialog box enter the pattern numbers from the printed test page that come closest to forming a perfectly straight line 6 After you have entered a number for each of the patterns select OK ...

Page 37: ...cartridge by forcing ink through the nozzles to clear any clogged nozzles A test line prints so you can see if the cleaning process was successful Note Run the nozzle test when Characters are not printing completely White dashes appear in graphics or printed characters Print is too dark or smudged Colors do not print correctly To run the nozzle test 1 Load plain paper in the printer 2 Open the Con...

Page 38: ... sheet of paper and prints a nozzle test pat tern similar to the one shown Broken lines at the top of the page indicate clogged nozzles Unbroken lines at the bottom of the page indicate the nozzles were cleaned These cyan magenta yellow and black purge lines print when ink is forced through the nozzles to unclog them If any of these colors are missing on your printed test page your cartridge may b...

Page 39: ...e print quality is satisfactory the print nozzles are clean You do not need to complete the remaining steps If the print quality of both sets of lines is not satisfactory continue with the next step 5 Remove and reinstall the print cartridge 6 Repeat the nozzle test 7 If the lines are still broken see the next section Wiping print nozzles and contacts Wiping print nozzles and contacts If print qua...

Page 40: ...help see page 37 If the print quality has not improved after this cleaning process replace your print cartridge If print quality still does not improve your printer may require service a Hold the damp cloth against the nozzles for about three seconds Gently blot and wipe dry b Use another clean section of cloth to gently wipe the contacts Hold the damp lint free cloth against the contacts for abou...

Page 41: ...n or store it in an air tight container The print cartridge does not print correctly if removed from the printer and left exposed for an extended period of time If a print cartridge runs out of ink leave the empty cartridge in the printer until you are ready to replace it Printing with one of the print cartridge carriers empty may cause printer problems Lexmark s printer warranty does not cover re...

Page 42: ... them From the list of printing problems below select a category that describes your printing problem Then search for the solution to your problem General printing problems Printer prints slowly or doesn t print Paper misfeeds or jams Document prints with mistakes or poor quality Problems with transparencies photos or envelopes Error messages and flashing lights Macintosh locks up while printing ...

Page 43: ...rints slowly or doesn t print If your printer does not print your printer and your computer may not be able to communicate properly The following events also indicate two way communications problems A message displays on your computer screen indicating an error has occurred while printing a document and suggests you try printing again Print cartridge ink level indicators on the Cartridges tab of t...

Page 44: ...a hub or peripheral such as a scanner or fax you may need to disconnect your printer from those devices and connect the printer directly to your computer Printer is plugged in but doesn t print Make sure The printer is turned on Paper is loaded correctly The USB cable is completely plugged into the printer The printer is not being held or paused in the print queue To check the printer status 1 Dou...

Page 45: ...Printer ejects a blank page after appearing to print Make sure your Lexmark printer is set as the default printer Make sure you have removed the sticker and transparent tape on the bottom of the print cartridges For help see page 29 Printer prints very slowly Close any open applications not in use Decrease your print quality setting Check the document you are printing Photos and graphics may take ...

Page 46: ...ecommended paper for inkjet printers You do not force the paper down into the printer when you load it You do not load too much paper in the sheet feeder Depending on the thickness of your paper the sheet feeder can hold up to 100 sheets of paper The left paper guide does not cause the paper to bow in the sheet feeder The left paper guide is against the side of the paper Printer does not feed enve...

Page 47: ...Print dialog box Make sure you are using a paper or envelope size supported by your printer Your application may not be designed to print envelopes For help check your application s documentation Printer has a paper jam If the paper is lodged too far into the printer and can t be removed 1 Press the Power button to turn the printer off 2 Pull firmly on the paper to remove it If you cannot reach th...

Page 48: ...before handling the paper Make sure the Paper Type or Paper Size setting in the printer software matches the type of paper loaded in the printer Change the print quality setting to Quick Print Clean the print nozzles For help see page 37 Vertical straight lines are not smooth To improve the print quality of vertical straight lines in tables borders and graphs Select a higher print quality Align th...

Page 49: ...page exiting the printer may be smearing the ink Remove the pages as they exit the printer and allow them to dry before stacking The print nozzles may need cleaning For help see page 37 Printed pages have alternating bands of light and dark print intermittent printing Select the print quality setting High 1200 dpi You may have two way communication problems For help see page 43 ...

Page 50: ...me left right top or bottom edges of a page Use these minimum settings Left and Right minimum margins 6 35 mm 0 25 in each for all paper sizes except A4 For A4 size paper 3 37 mm 0 133 in each Top and Bottom minimum margins Top 1 7 mm 0 067 in Bottom 12 7 mm 0 5 in Printed characters are improperly formed or misaligned Cancel all print jobs if any and resend your job to print Align the print cartr...

Page 51: ... Printer Profile you want 5 Select the Rendering Intent you want For Built In color matching select Natural Color as the Document Color 1 From the File menu choose Print 2 From the General pop up menu select Color 3 Select Built In Color Matching 4 From Document Color select Natural Color A print cartridge may be out of ink or low on ink For help changing the print cartridge see page 29 Try using ...

Page 52: ...ded Try the suggestions listed in the previous section Colors on the printout differ from the colors on the screen If the colors still seem faded run the nozzle test For help see page 37 Characters are missing or unexpected Make sure your Lexmark Z52 printer driver is selected as the default printer Your printer may have two way communication problems For help see page 43 ...

Page 53: ...ssy photo papers or transparencies stick together Use a photo paper or transparency designed for an inkjet printer Remove each page as it exits the printer and allow it to dry before stacking Transparencies or photos contain white lines Select a higher print quality Your print nozzles may need cleaning For help see page 37 Printer does not feed envelopes or specialty papers For help see page 46 ...

Page 54: ...dge is running out of ink Purchase a new print cartridge The Power light is on and the Paper Feed light is blinking If the printer is out of paper 1 Load paper 2 Press the Paper Feed button If the printer has a paper jam see page 47 The Power light blinks twice The print cartridge carrier has stalled Check your screen for any error messages 1 Turn the printer off 2 After waiting a few seconds turn...

Page 55: ...he job that was in the queue before the computer locked up This could cause your system to lock up again To recover from this problem 1 Turn off the printer and the computer 2 Hold down the Shift key and turn on the Macintosh 3 Press and hold this key until you see the Mac OS screen with the words Extensions Off 4 Release the Shift key 5 Locate the Lexmark Z52 printer icon on your desktop The inac...

Page 56: ...duct does not function as warranted during the warranty period contact a Remarketer or Lexmark for repair without charge If this product is a feature or option this statement applies only when that feature or option is used with the product for which it was designed To obtain warranty service you may be required to present the feature or option with the product If you transfer this product to anot...

Page 57: ...duct throughout its warranty period For products no longer covered by a Lexmark warranty technical support may only be available for a fee Extent of Warranty We do not warrant uninterrupted or error free operation of a product Warranty service does not include repair of failures caused by modification or attachments accidents or misuse unsuitable physical or operating environment maintenance by an...

Page 58: ... long an implied warranty lasts or do not allow the exclusion or limitation of incidental or consequential damages If such laws apply the limitations or exclusions contained in this statement may not apply to you This warranty gives you specific legal rights You may also have other rights which vary from state to state Electronic Emission Notices Federal Communications Commission FCC Compliance In...

Page 59: ...and grounded may result in a violation of FCC regulations Any questions regarding this compliance information statement should be directed to Director of Lab Operations Lexmark International Inc 740 West New Circle Road Lexington KY 40550 606 232 3000 Industry Canada Compliance Statement This Class B digital apparatus meets all requirements of the Canadian Interference Causing Equipment Regulation...

Page 60: ...mark is proud to be a participant in this program As an Energy Star Partner Lexmark International Inc has determined that this product meets the Energy Star guidelines for energy efficiency Power Supply If your power supply fails replace it with the Lexmark replacement part or other UL LISTED Direct Plug In Power Unit marked Class 2 and rated 30 Vdc at 1A Safety Information If your product is NOT ...

Page 61: ... print set tings 24 loading paper 24 printing 24 building a booklet 20 Built In color matching 51 C cards loading 6 cartridges print aligning 34 installing 29 preserving 41 removing 30 replacing 29 characters misformed 50 characters missing 52 color options 11 colors missing 52 ColorSync color matching 51 contacts print wiping 39 Control Panel opening 27 tabs 28 using 27 customizing page setup 11 ...

Page 62: ... Commision FCC State ment 58 flashing lights Paper Feed 54 Power 54 foils loading 8 G general option 11 general printing problems 43 glossy paper 15 greeting cards loading 6 H handouts customizing print set tings 21 loading paper 21 printing 21 I improving print quality 34 index cards loading 6 Industry Canada Compli ance Statement 59 Ink Low message 54 installing print cartridges 29 intermittent ...

Page 63: ...es error Ink Low 54 Paper Jam 54 missing characters 52 N notices 58 Energy Star 60 European Community Directives Conformity 59 Industry Canada Compli ance Statement 59 Japanese VCCI Notice 60 safety information 60 The United Kingdom Telecommunications Act 1984 60 nozzle test 37 nozzles print cleaning 37 wiping 39 P page settings changing 11 Page Setup 9 pages per sheet customizing print set tings ...

Page 64: ... print nozzles cleaning 37 wiping 39 print quality improving 34 troubleshooting 48 print settings introduction 10 printer software introduction 9 printing booklets 17 documents 16 from an application 16 handouts 21 last page first 23 Macintosh locks up 55 on both sides of the pa per 24 pages per sheet 21 printing on both sides of the paper loading paper 24 printing options customizing 9 printing p...

Page 65: ...pers loading 6 settings 13 Statement of Limited War ranty 56 T test page alignment 35 cleaning nozzles 38 does not print 43 45 printing 33 transparencies loading 8 troubleshooting error messages 54 flashing lights 54 poor print quality 48 specialty print jobs 53 two sided printing 24 loading paper 24 two way communications problems indicators 43 U unexpected characters 52 United Kingdom Telecom mu...

Reviews: