background image

Lexmark™ T65x

Quick Reference

Loading paper and

specialty media

Loading the 250-sheet or

550-sheet tray

1

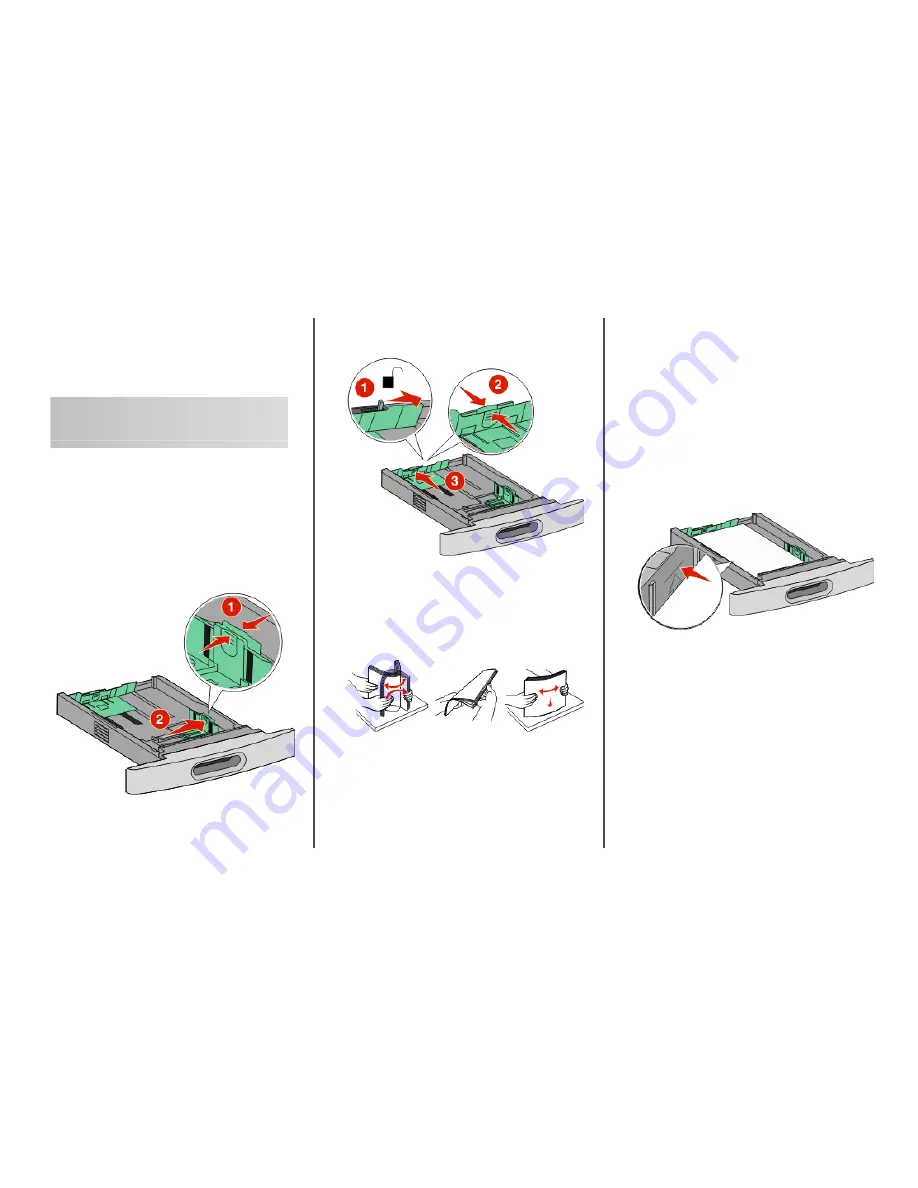
Pull the tray out.

Note: Do not remove trays while a job prints or while 

Busy

appears on the display. Doing so may cause a jam.

2

Squeeze the width guide tab inward as shown, and move the

width guide to the correct position for the paper size being

loaded.

3

Unlock the length guide, squeeze the length guide tab inward

as shown, and slide the guide to the correct position for the

paper size being loaded.

Notes:

Use the size indicators on the bottom of the tray to help

position the guides.

For standard paper sizes, lock the length guide.

4

Flex the sheets back and forth to loosen them, and then fan

them. Do not fold or crease the paper. Straighten the edges on

a level surface.

5

Load the paper.

For single-sided printing, load the paper print side

facedown with the leading edge of the paper toward the

front of the tray.

Note: For print jobs using an optional StapleSmart

TM

 II

Finisher, place the leading edge of the paper toward the

back of the tray.

For two-sided or duplex printing, load the paper faceup

with the leading edge of the paper toward the back of the

tray.

Note: For print jobs using an optional StapleSmart II

Finisher, place the leading edge of the paper toward the

front of the tray.

Note: Notice the maximum fill line on the side of the tray

which indicates the maximum height for loading paper. Do

not overload the tray.

6

If necessary, adjust the paper guides to lightly touch the sides

of the stack, and lock the length guide for the paper sizes

indicated on the tray.

7

Insert the tray.

8

If a different type of paper was loaded than the type previously

loaded in the tray, then change the Paper Type setting for the

tray from the printer control panel.


1

Summary of Contents for T650dtn

Page 1: ... 5 Load the paper For single sided printing load the paper print side facedown with the leading edge of the paper toward the front of the tray Note For print jobs using an optional StapleSmartTM II Finisher place the leading edge of the paper toward the back of the tray For two sided or duplex printing load the paper faceup with the leading edge of the paper toward the back of the tray Note For pr...

Page 2: ... loaded 3 Unlock the length guide 4 Push the length guide release latch to raise the length guide slide the guide to the correct position for the paper size being loaded and then lock the guide 5 Flex the sheets back and forth to loosen them and then fan them Do not fold or crease the paper Straighten the edges on a level surface 2 ...

Page 3: ...rth to loosen them and then fan them Do not fold or crease them Straighten the edges on a level surface 5 Load the paper or specialty media Slide the stack gently into the multipurpose feeder until it comes to a stop Notes Donotexceedthemaximumstackheightbyforcingpaper under the stack height limiter Do not load or close the printer while a job is printing Load only one size and type of media at a ...

Page 4: ...te tray or feeder 3 Click Print Printing confidential and other held jobs Holding jobs in the printer When sending a job to the printer you can specify that you want the printer to hold the job in memory until you start the job from the printer control panel All print jobs that can be initiated by the user at the printer are called held jobs Note Confidential Verify Reserve and Repeat print jobs m...

Page 5: ...in appears and then press To cancel the PIN press the arrow buttons until Cancel appears and then press 9 Press the arrow buttons until appears next to the job you want to print and then press 10 Press the arrow buttons until appears next to the number of copies you want to print and then press Note Use the keypad to enter a number if necessary Printing from a flash drive A USB port is located on ...

Page 6: ...hat the printer is turned off and unplugged from the wall outlet CAUTION SHOCK HAZARD To avoid the risk of electric shock when cleaning the exterior of the printer unplug the power cord from the wall outlet and disconnect all cables to the printer before proceeding 2 Remove paper from the standard exit bin 3 Dampen a clean lint free cloth with water Warning Potential Damage Do not use household cl...

Reviews: