


Using the Windows printer software
Software installed during printer installation
When you set up the printer using the installation software CD, all the necessary software was installed.
You may have chosen to install some additional programs. The following table provides an overview of
various software programs and what they can help you do.
If you did not install these additional programs during initial installation, then reinsert the installation
software CD, run the installation software, and then click
Advanced Options
>
Install Additional Software
.
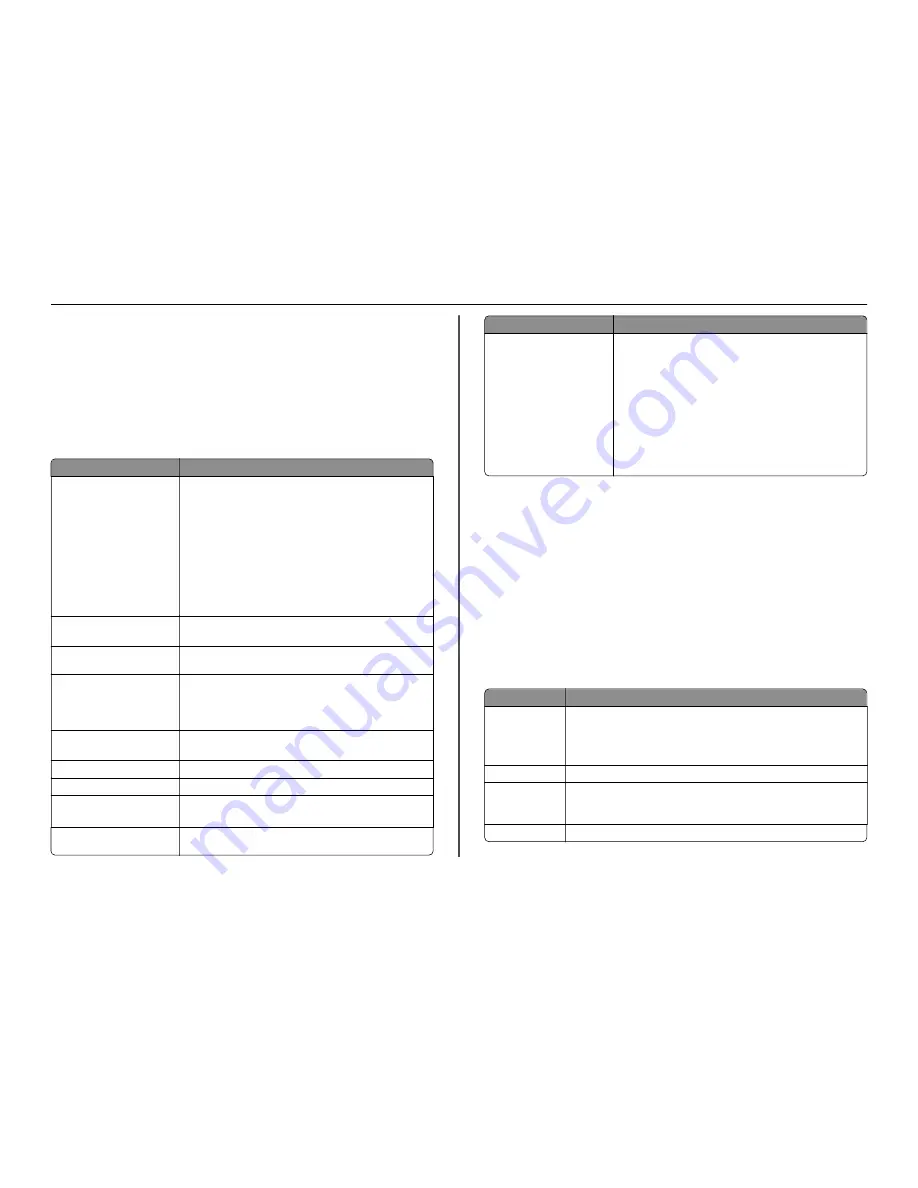
Printer software
Use the
To
Lexmark
TM
Printer Home
(referred to as Printer Home)
•
Launch applications or programs.
•
Scan or e
‑
mail a photo or document.
•
Edit scanned documents.
•
Scan documents to PDF.
•
Adjust settings for the printer.
•
Order supplies.
•
Maintain ink cartridges.
•
Register the printer.
•
Contact technical support.
•
Access the
User's Guide
.
Lexmark Phone Book
(referred to as Phone Book)
Manage your fax contacts.
Abbyy Sprint OCR
Scan a document and produce text that you can edit with a
word
‑
processing program.
Lexmark Wireless Setup Utility
(referred to as Wireless Setup
Utility)
•
Set up the wireless printer on a wireless network.
•
Change the wireless settings of the printer.
Note:
This program is installed automatically with the printer software
if the printer has wireless capability.
Lexmark Tools for Office
(referred to as Tools for Office)
Access your favorite settings in Microsoft Office 2007.
Printer Setup Utility
Configure the fax and e
‑
mail settings of your printer.
Status Messenger
Learn more about the printing problems encountered.
Status Monitor Center
•
Check the supplies status of your printer.
•
Order supplies online.
Product Update
Receive automatic notifications of updates to your printer software
when new updates are available.
Use the
To
Printing Preferences
When you click
File
>
>
Properties
with a document open, a Printing
Preferences dialog appears. The dialog lets you select options for the
print job, such as the following:
•
Select the number of copies to print.
•
Print two
‑
sided copies.
•
Select the paper type.
•
Add a watermark.
•
Enhance images.
•
Save settings.
Note:
Printing Preferences is installed automatically with the printer
software.
Note:
Your printer may not come with some of these programs or some of the functions of these
programs, depending on the features of the printer that you purchased.
Using the Macintosh printer software
Launching the Print dialog
Use the Print dialog to adjust the print settings and schedule print jobs.
With a document or photo open, choose
File
>
.
Launching an application
1
From the Finder, navigate to:
Applications
> select your printer folder
2
Double
‑
click the application that you want to use.
Use the
To
Printer Settings
•
Customize settings for fax jobs.
•
Create and edit the Contacts list.
•
Configure e
‑
mail connectivity settings.
•
Configure the language, country, date, and time.
Shortcuts
Speed up usual tasks with your printer.
Wireless Setup
Assistant
Set up the printer on a wireless network.
Note:
This application is automatically installed with the printer software if the
printer has wireless capability.
Uninstaller
Remove the printer software from your computer.
Using the printer software
18


