background image

Quick Reference

Learning about the printer

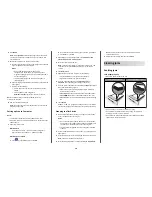
Using the printer control panel

Use the

To

1

Display

View printing, copying, e-mailing,
faxing, and scanning options.

View printer status and error messages.

2

Home button

Go to the home screen.

3

Sleep button

Enable Sleep mode or Hibernate mode.

4

Keypad

Enter numbers, letters, or symbols.

5

Indicator light

Check the status of the printer.

6

Start button

Start a job, depending on which mode is
selected.

7

Stop or cancel
button

Cancel all printer activity.

8

Clear all / Reset
button

Reset the default settings of a function,
such as printing, copying, or e

mailing.

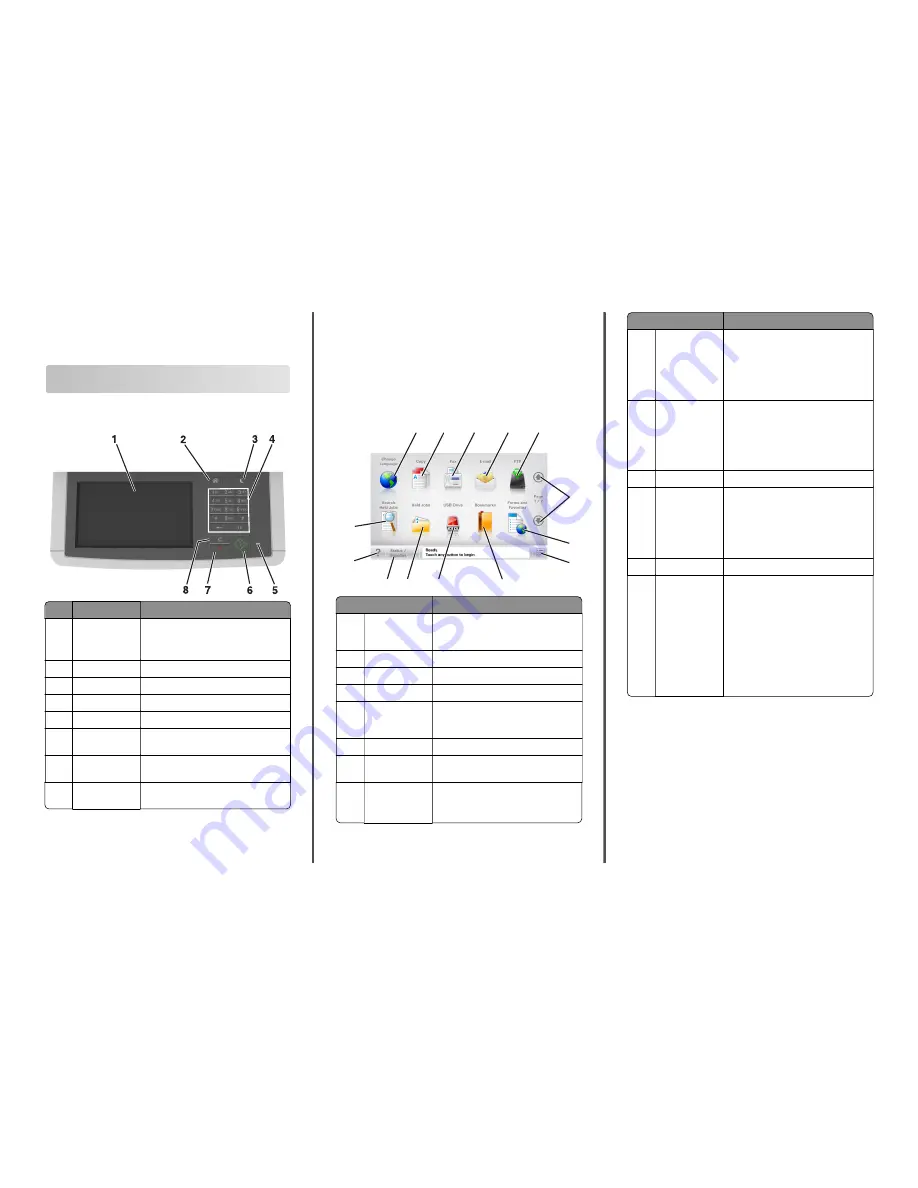
Understanding the home screen

When the printer is turned on, the display shows a basic screen,
referred to as the home screen. Touch the home screen buttons and
icons to initiate an action such as copying, faxing, or scanning; to open
the menu screen; or to respond to messages.

Note: 

Your home screen may vary depending on your home screen

customization settings, administrative setup, and active embedded
solutions.

6

1

12 11

10

7

8

2

3

4

5

9

13

14

Touch

To

1

Change Language

Launch the Change Language pop

up

window that lets you change the primary
language of the printer.

2

Copy

Access the Copy menus and make copies.

3

Fax

Access the Fax menus and send fax.

4

E-mail

Access the E-mail menus and send e

mails.

5

FTP

Access the File Transfer Protocol (FTP)
menus and scan documents directly to an
FTP server.

6

Arrows

Scroll up or down.

7

Forms and
Favorites

Quickly find and print frequently used
online forms.

8

Menu icon

Access the printer menus.

Note: 

The menus are available only when

the printer is in Ready state.

Touch

To

9

Bookmarks

Create, organize, and save a set of
bookmarks (URL) into a tree view of folders
and file links.

Note: 

The tree view supports only

bookmarks created from this function,
and not from any other application.

10

USB Drive

View, select, print, scan, or e

mail photos

and documents from a flash drive.

Note: 

This icon appears only when you

return to the home screen while a
memory card or flash drive is connected
to the printer.

11

Held Jobs

Display all current held jobs.

12

Status/Supplies

Show a warning or error message
whenever the printer requires
intervention to continue processing.

Access the messages screen for more
information on the message, and how
to clear it.

13

Tips

Open a context-sensitive Help dialog.

14

Search Held Jobs

Search for one or more of the following
items:

User name for held or confidential print
jobs

Job names for held jobs, excluding
confidential print jobs

Profile names

Bookmark container or print job names

USB container or print job names for
supported file types


1

Summary of Contents for All

Page 1: ... copies 3 Fax Access the Fax menus and send fax 4 E mail Access the E mail menus and send e mails 5 FTP Access the File Transfer Protocol FTP menus and scan documents directly to an FTP server 6 Arrows Scroll up or down 7 Forms and Favorites Quickly find and print frequently used online forms 8 Menu icon Access the printer menus Note The menus are available only when the printer is in Ready state ...

Page 2: ...een icons and buttons may vary depending on your home screen customization settings administrative setup and active embedded solutions 7 6 3 4 1 5 2 Touch To 1 Arrows View a list of options 2 Copy It Print a copy 3 Advanced Options Select a copy option 4 Home Go to the home screen 5 Increase Select a higher value 6 Decrease Select a lower value 7 Tips Open a context sensitive Help dialog Other tou...

Page 3: ...n application For more information see Finding information about the home screen applications on page 3 or see the documentation that came with the application Understanding the different applications Use To Card Copy Scan and print both sides of a card on a single page For more information see Setting up Card Copy on page 4 Fax Scan a document and then send it to a fax number For more information...

Page 4: ...e scanned card is printed Select Best for Content if you want the printer to adjust the contrast automatically Default scale setting Set the size of the scanned card when printed The default setting is 100 full size Resolution setting Adjust the quality of the scanned card Notes When scanning a card make sure the scan resolution is not more than 200 dpi for color and 400 dpi for black and white Wh...

Page 5: ...ting a configuration You can export configuration settings into a text file and then import the file to apply the settings to other printers 1 Open a Web browser and then type the printer IP address in the address field Note View the printer IP address on the printer home screen The IP address appears as four sets of numbers separated by periods such as 123 123 123 123 2 To export or import a conf...

Page 6: ...Do not remove trays while a job is printing or while Busy appears on the display Doing so may cause a jam 2 If the paper is longer than letter size paper then squeeze and then slide the length guide at the back of the tray to extend it 3 Squeeze and then slide the length guide tab to the correct position for the size of the paper being loaded Note Use the paper size indicators on the bottom of the...

Page 7: ...inting using a letterhead Load envelope with the flap side up and against the right side of the paper guide 2 Feed paper into the manual feeder only to the point where its leading edge can contact the paper guides Note To achieve the best possible print quality use only high quality media designed for laser printers 3 Adjust the paper guides to the width of the paper loaded Warning Potential Damag...

Page 8: ...forth to loosen them and then fan them Do not fold or crease the paper Straighten the edges on a level surface Hold transparencies by the edges and then fan them Straighten the edges on a level surface Note Avoid touching the printable side of transparencies Be careful not to scratch them Flex a stack of envelopes back and forth to loosen them and then fan them Straighten the edges on a level surf...

Page 9: ... sets of numbers separated by periods such as 123 123 123 123 If you are using a proxy server then temporarily disable it to load the Web page correctly 2 Click Settings Paper Menu 3 Changethepapersizeandtypesettingsforthetraysyouarelinking To link trays make sure the paper size and type for the tray match that of the other tray To unlink trays make sure the paper size or type for the tray does no...

Page 10: ...printed Before you can use this application first set it up on the printer For more information see Setting up Forms and Favorites on page 3 1 From the printer home screen navigate to Forms and Favorites select the form from the list enter the number of copies adjust other settings 2 Depending on your printer model touch or Submit Printing a document Printing a document 1 Fromtheprintercontrolpane...

Page 11: ... appears on the printer home screen when a flash drive is inserted If you insert the flash drive when the printer requires attention such as when a jam has occurred then the printer ignores the flash drive If you insert the flash drive while the printer is processing other print jobs then Busy appears on the printer display After these print jobs are processed you may need to view the held jobs li...

Page 12: ...r are the same 3 From the printer control panel press Copying using the ADF 1 Load an original document faceup short edge first into the ADF tray Notes Do not load postcards photos small items transparencies photo paper or thin media such as magazine clippings into the ADF tray Place these items on the scanner glass The ADF indicator light comes on when the paper is loaded properly 2 Adjust the pa...

Page 13: ...dress To create a group of recipients touch Next address and then type the next recipient s e mail address 2 Touch Subject then type the e mail subject and then touch Done 3 Touch Message then type your message and then touch Done 4 Adjust the e mail settings Note If you change the settings after the e mail shortcut has been created then the settings are not saved 5 Touch 6 Type a unique name for ...

Page 14: ...nd network directory servers For more information on enabling the address book feature contact your system support person 1 Load an original document faceup short edge first into the ADF tray or facedown on the scanner glass Notes Do not load postcards photos small items transparencies photo paper or thin media such as magazine clippings into the ADF tray Place these items on the scanner glass The...

Page 15: ... FTP FTP type the FTP address Done Send It Scanning to an FTP address using a shortcut number 1 Load an original document faceup short edge first into the ADF tray or facedown on the scanner glass Notes Do not load postcards photos small items transparencies photo paper or thin media such as magazine clippings into the ADF tray Place these items on the scanner glass The ADF indicator light comes o...

Page 16: ...4 Click Next Close 5 Depending on your device do either of the following Press and hold the printer you want to configure Right click the printer you want to configure 6 From the menu that appears select Scan Properties or Properties and then change the settings as necessary 7 From the printer control panel touch Scan to Computer and then select from the following options Scan Scan and save the do...

Page 17: ...set to On or Auto the printer reprints jammed pages However Auto does not guarantee that the page will print 1 2 3 4 5 6 7 8 Jam location Message on the display What to do 1 Automatic document feeder ADF x page jam open automatic feeder top cover 28y xx Remove all paper from the ADF tray and then remove the jammed paper 2 Standard bin x page jam clear standard bin 203 xx Remove the jammed paper 3 ...

Page 18: ...e hot To reduce the risk of injury from a hot component allow the surface to cool before touching a If there is a jammed paper under the fuser then firmly grasp the paper on each side and then gently pull it out Note Make sure all paper fragments are removed b Pull the green lever to open the fuser cover c If there is a jammed paper in the fuser then hold down the fuser cover and then remove the p...

Page 19: ...From the printer control panel touch Done to clear the message and continue printing x page jam open front door to clear fuser 20y xx 1 Open the front door CAUTION HOT SURFACE The inside of the printer might be hot To reduce the risk of injury from a hot component allow the surface to cool before touching 2 Open the top door 19 ...

Page 20: ... top door 6 Close the front door 7 From the printer control panel touch Done to clear the message and continue printing x page jam open front door 20y xx 1 Open the front door CAUTION HOT SURFACE The inside of the printer might be hot To reduce the risk of injury from a hot component allow the surface to cool before touching 2 Firmly grasp the jammed paper on each side and then gently pull it out ...

Page 21: ...before touching 2 Firmly grasp the jammed paper on each side and then gently pull it out Note Make sure all paper fragments are removed 3 Close the front door 4 From the printer control panel touch Done to clear the message and continue printing x page jam open tray x 24y xx 1 Pull out the tray completely Note The message on the printer display determines in which tray the paper jam is located 2 F...

Page 22: ...e removed 3 Insert the tray 4 From the printer control panel touch Done to clear the message and continue printing x page jam clear multipurpose feeder 250 xx 1 Push the paper release lever in the multipurpose feeder to access the jammed paper and then gently pull out the paper Note Make sure all paper fragments are removed 2 Flex the sheets of paper back and forth to loosen them and then fan them...

Page 23: ...om the ADF tray Note The message is cleared when the pages are removed from the ADF tray 2 Open the ADF cover 3 Firmly grasp the jammed paper on each side and then gently pull it out Note Make sure all paper fragments are removed 4 Close the ADF cover 5 Straighten the edges of the original documents then load the documents into the ADF and then adjust the paper guide 6 From the printer control pan...

Reviews: