background image

42

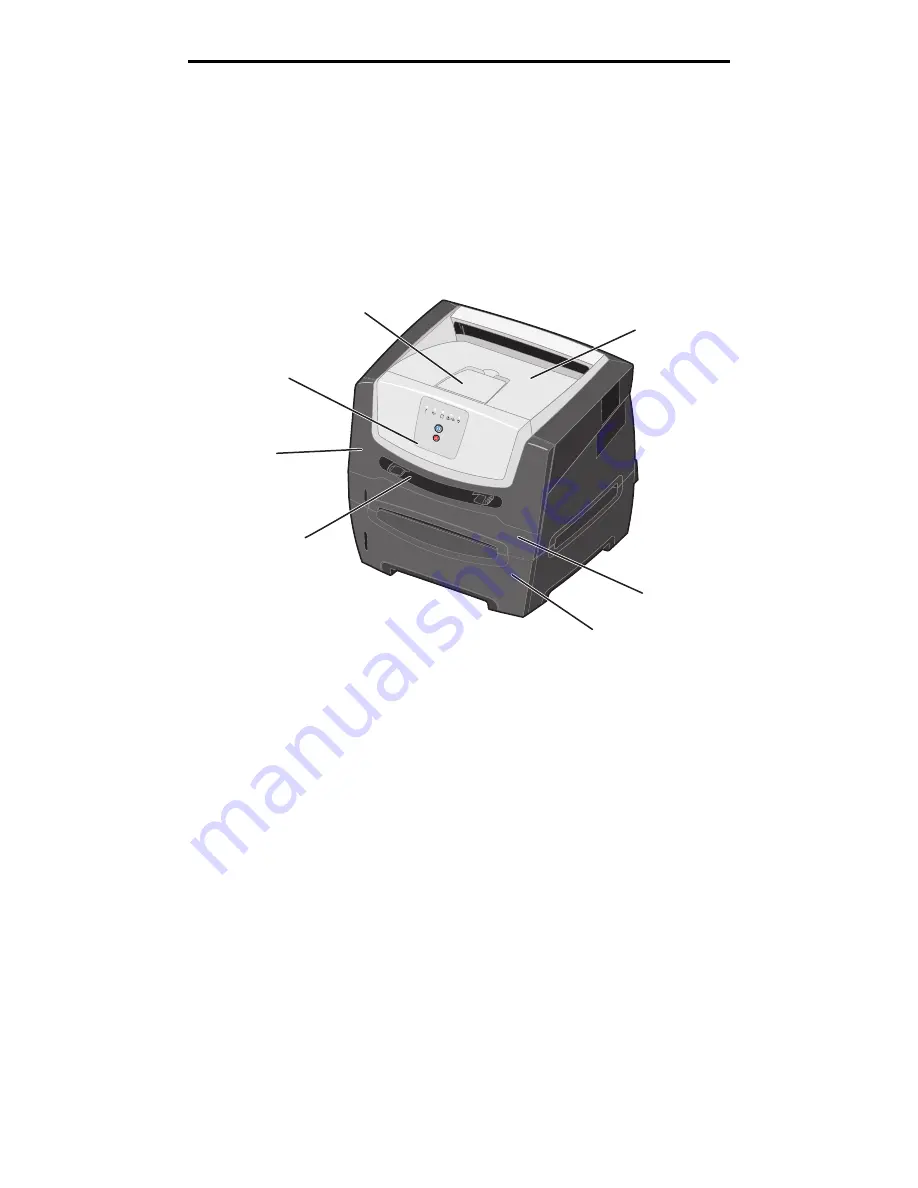
Where can print media be loaded in the printer?

Where can print media be loaded in the printer?

Your printer has two standard paper sources: a 250-sheet tray and a single-sheet manual feeder. Use the 250-sheet tray for 
most print jobs. Use the manual feeder for a single piece of paper, transparency, envelope, paper label, card stock, or index 
card. 

The output bin on top of the printer holds up to 150 sheets. The single-sheet rear exit provides a straight-through path to 
help reduce curling and potential jams. This is especially useful for specialty media, such as transparencies, envelopes, 
paper labels, card stock, or index cards.

1

150-sheet output bin

5

Front door

2

250-sheet tray

6

Control panel

3

550-sheet drawer (optional)

7

Paper support

4

Manual feeder

1

2

3

4

5

6

7

Summary of Contents for 250d - E B/W Laser Printer

Page 1: ...and Lexmark with diamond design are trademarks of Lexmark International Inc registered in the United States and or other countries 2006 Lexmark International Inc All rights reserved 740 West New Circle Road Lexington Kentucky 40550 E250d and E250dn ...

Page 2: ... does not infringe any existing intellectual property right may be used instead Evaluation and verification of operation in conjunction with other products programs or services except those expressly designated by the manufacturer are the user s responsibility Trademarks Lexmark and Lexmark with diamond design are trademarks of Lexmark International Inc Details relating to compatibility are includ...

Page 3: ...a can be loaded 41 Where can print media be loaded in the printer 42 Selecting print media 43 Paper 43 Preprinted forms and letterhead 45 Transparencies 46 Envelopes 46 Labels 46 Card stock 47 Tips on storing print media and supplies 47 Storing paper 47 Storing supplies 47 Tips on preventing jams 48 Loading the 250 sheet tray 49 Extending the tray for legal or folio size paper 52 Loading the manua...

Page 4: ...when you need new supplies 78 Checking the toner and photoconductor levels 78 Ordering a maintenance kit 78 Recognizing the control panel light sequences 79 Changing the toner cartridge 80 Changing the photoconductor kit 82 Print your printer menu settings pages See Printing the menu settings and network setup pages on page 74 If Photoconductor is listed under Warnings the photoconductor counter h...

Page 5: ...5 1 Printer overview 1 2 3 4 5 6 7 1 150 sheet output bin 5 Front door 2 250 sheet tray 6 Control panel 3 550 sheet drawer optional 7 Paper support 4 Manual feeder ...

Page 6: ...6 Printer overview 1 2 3 6 7 5 4 1 Rear exit 5 USB connect 2 Power button 6 Parallel connect 3 Power connect 7 Ethernet connect 4 Dust cover not available for some models ...

Page 7: ...t sequence Press and release Continue to resume printing Press and release Continue twice quickly to display a secondary error code Press and release Cancel to cancel the job currently printing Press and hold Cancel until all of the lights come on to reset the printer 1 2 3 4 5 6 7 1 Error 5 Ready 2 Paper Jam 6 Cancel button 3 Load Paper 7 Continue button 4 Toner Low Replace PC Kit ...

Page 8: ... service The following table shows the most common light sequences Click the indicated page for more information on what it means Common light sequences Printer Condition Page Continue Error Toner Low Replace PC Kit Load Paper Paper Jam Ready Ready Power Saver 11 Busy 11 Hex Trace Ready 12 Waiting 12 Flushing Resolution reduced 13 Not ready printer is offline 13 Close door 14 Insufficient collatio...

Page 9: ...idge region mismatch 17 Photoconductor kit life warning 17 Replace photoconductor printer hard stop 18 Programming engine code Programming system code 18 Invalid engine code Invalid network code 19 Common light sequences continued Printer Condition Page Continue Error Toner Low Replace PC Kit Load Paper Paper Jam Ready On Blinking Slow blink Empty Off ...

Page 10: ...work interface errors Host interface disabled 19 Service error 19 Printer error 20 Paper jam printer error 20 Short paper 21 Output bin full 21 See Secondary error codes on page 25 for more information Common light sequences continued Printer Condition Page Continue Error Toner Low Replace PC Kit Load Paper Paper Jam Ready On Blinking Slow blink Empty Off ...

Page 11: ...printing The printer is printing a directory font list menu settings pages or Print Quality Test Pages What you can do Busy Wait for the message to clear Press and release Cancel to cancel the print job Press and hold Cancel to reset the printer Printing a directory a font list menu settings pages or Print Quality Test Pages Wait for the pages to print The Busy message is displayed as the pages pr...

Page 12: ...shoot printing problems After resolving the problem turn off the printer to exit Hex Trace Press and hold Cancel to reset the printer Light sequence Continue On Ready On What this light sequence means The printer is waiting until a print timeout occurs or until it receives additional data What you can do Press Continue to print the contents of the print buffer Press and release Cancel to cancel th...

Page 13: ...ed from 600 dots per inch dpi to 300 dpi to prevent a memory full error What you can do Wait until the control panel returns to Ready to print other jobs Press and release Cancel to cancel the print job Press and hold Cancel to reset the printer Light sequence Continue On What this light sequence means The printer is not ready to receive or process data or the printer ports are offline What you ca...

Page 14: ...you can do Press and release Continue to clear the message and continue printing the job The job may not print correctly Press and release Cancel to cancel the print job Press Cancel to reset the printer Light sequence Continue On Error On What this light sequence means The page may not print correctly because the print information on the page is too complex that is too large for the printer memor...

Page 15: ... the user default settings Any active print jobs are canceled A user default setting remains in effect until you change it or until you restore the factory default settings What you can do Wait for the message to clear Light sequence Continue On Load Paper On What this light sequence means The printer is out of print media at the indicated source What you can do Load print media into the indicated...

Page 16: ...d Cancel to reset the printer Light sequence Continue On Toner Low Replace PC Kit On What this light sequence means The printer is ready to receive and process data In addition the toner in the toner cartridge is getting low What you can do Press and release Continue to clear the light sequence and continue processing the print job Turn the printer off Remove the toner cartridge and shake it to ex...

Page 17: ...r cartridge that matches the region of the printer see What supplies do I need and how do I order them on page 76 Light sequence Continue On Toner Low Replace PC Kit Blinking What this light sequence means The photoconductor is almost full and should be replaced soon Note The Toner Alarm see Secondary error codes on page 25 must be turned on for this message to appear What you can do Press and rel...

Page 18: ...any more pages until the photoconductor kit is replaced What you can do Press and release Continue to print a photoconductor kit instruction page Replace the photoconductor kit See Changing the photoconductor kit on page 82 for help Light sequence Ready On Toner Low Replace PC Kit On Load Paper On What this light sequence means New code is being programmed into the engine or firmware code flash Wh...

Page 19: ...Toner Low Replace PC Kit On Error On What this light sequence means The printer cannot establish communication with the network What you can do Press Continue to clear the message and continue printing The current print job may not print correctly Light sequence Continue Blinking Ready Blinking Toner Low Replace PC Kit Blinking Load Paper Blinking Paper Jam Blinking Error Blinking What this light ...

Page 20: ...t error occurred Communication with the host computer is lost Short paper What you can do Press Continue twice quickly to see the secondary error code See Secondary error codes on page 25 for more information Press Continue to clear the secondary message Light sequence Continue On Paper Jam On What this light sequence means The printer has a paper jam What you can do Press Continue twice quickly t...

Page 21: ...a problem feeding the print media What you can do Make sure the print media you loaded is large enough Open the front door clear the paper path and close the door to resume printing see Clearing jams on page 56 Press Continue to clear the light sequence and continue printing Press Cancel to cancel the print job Light sequence Load Paper Blinking What this light sequence means The output bin is ful...

Page 22: ...ence The following table shows what these light sequences mean and where to go for help Secondary light sequences Printer Condition Page Continue Error Toner Low Replace PC Kit Load Paper Paper Jam Ready Paper jam at the input sensor 26 Paper jam in the manual feeder 26 Paper jam between the input and exit sensor 26 Paper jams at the exit sensor 26 Paper jam in the 250 sheet tray 27 Paper jam in t...

Page 23: ...area 32 Network interface errors 32 Font error 32 Insufficient printer memory 31 ENA connection lost 32 Host interface disabled 32 Memory full 33 Short paper 33 Secondary light sequences continued Printer Condition Page Continue Error Toner Low Replace PC Kit Load Paper Paper Jam Ready On Blinking Slow blink Empty Off ...

Page 24: ...fill 35 Missing Defective toner cartridge 35 Unsupported toner cartridge 36 Paper jams at the input sensor can be either after the paper leaves the tray and enters the printer or in the manual feeder Secondary light sequences continued Printer Condition Page Continue Error Toner Low Replace PC Kit Load Paper Paper Jam Ready On Blinking Slow blink Empty Off ...

Page 25: ...lear them Paper jam at the input sensor Light sequence Continue On Ready On Paper Jam On What this light sequence means A paper jam has occurred at the input sensor which can be either after the print media leaves the tray and enters the printer or in the manual feeder What you can do Clear the paper jam See Clearing jams on page 56 for more information ...

Page 26: ...age 56 for more information Light sequence Continue On Toner Low Replace PC Kit On Paper Jam On What this light sequence means A paper jam has occurred The jammed paper is most likely in the fuser area under the print cartridge assembly What you can do Clear the paper jam See Clearing jams on page 56 for more information Light sequence Continue On Load Paper On Paper Jam On What this light sequenc...

Page 27: ...per jam See Clearing jams on page 56 for more information Light sequence Continue On Ready On Load Paper On Paper Jam On What this light sequence means A paper jam has occurred in the 550 sheet drawer What you can do Clear the paper jam See Clearing jams on page 56 for more information Light sequence Continue On Load Paper Blinking Paper Jam On What this light sequence means A paper jam has occurr...

Page 28: ...jam has occurred somewhere in the duplex unit What you can do Clear the paper jam See Clearing jams on page 56 for more information Light sequence Continue On Paper Jam On Ready Blinking Load Paper Blinking What this light sequence means A paper jam has occurred in the duplex unit due to an unsupported print media size What you can do Clear the paper jam See Clearing jams on page 56 for more infor...

Page 29: ...e printer memory What you can do Press Continue to clear the error code and continue processing the print job some of the print data may be lost To avoid this error in the future Reduce the complexity of the page by reducing the amount of text or graphics on the page and deleting unnecessary downloaded fonts or macros Set Page Protect to On in the Local Printer Setup Utility Install additional pri...

Page 30: ...ar the message and continue printing the job The job may not print correctly Press and release Cancel to cancel the print job Press and hold Cancel to reset the printer To avoid this error in the future Simplify the print job Reduce the complexity of the page by reducing the amount of text or graphics on the page and deleting unnecessary downloaded fonts or macros Install additional printer memory...

Page 31: ... do Press and release Cancel to cancel the print job Press and hold Cancel to reset the printer Press Continue to clear the message and continue printing Light sequence Continue On Load Paper Blinking Error On What this light sequence means The printer does not have enough memory to save the data in the buffer What you can do Install additional memory see Adding a memory card on page 72 Press Cont...

Page 32: ...revious print job may not print correctly Light sequence Continue On Load Paper Blinking Paper Jam Blinking Error On What this light sequence means The printer USB or parallel port has been disabled What you can do Press Continue to clear the code The printer discards any print jobs previously sent Enable the USB or parallel port by selecting a value other than Disabled for the USB Buffer or Paral...

Page 33: ... page by reducing the amount of text or graphics on the page and deleting unnecessary downloaded fonts or macros Install additional printer memory see Adding a memory card on page 72 Light sequence Continue On Ready On Load Paper On Error On What this light sequence means The paper length is too short to print the formatted data This occurs when the printer does not know the print media size loade...

Page 34: ...On What this light sequence means The code in an internal print server has not been programmed or the programmed code is not valid What you can do Download valid network code to the internal print server Light sequence Toner Low Replace PC Kit On Load Paper Blinking Error On What this light sequence means The geographic region of the printer does not match the geographic region of the installed to...

Page 35: ...o extend the life or replace the toner cartridge with a valid toner cartridge Replace the toner cartridge See Changing the toner cartridge on page 80 for help Turn the printer back on Light sequence Toner Low Replace PC Kit On Paper Jam On Error On What this light sequence means The toner in the toner cartridge is getting low or a defective toner cartridge has been detected What you can do Press a...

Page 36: ...idge is not supported by your printer What you can do Press and release Continue to clear the light sequence and continue processing the print job Turn the printer off Remove the toner cartridge and replace it with a supported toner cartridge See What supplies do I need and how do I order them on page 76 and Changing the toner cartridge on page 80 for help Turn the printer back on ...

Page 37: ... instructions on advancing through the configuration menus to select and save new settings To print the Printer Settings Configuration sheet 1 Turn off the printer 2 Open the front door 3 Press and hold Continue as you turn the printer back on 4 Release Continue All of the lights cycle 5 Close the door The Ready light appears 6 To print the Printer Settings Configuration sheet press and hold Conti...

Page 38: ...e printer to exit the menus Network menu Use the Network menu to change printer settings on jobs sent through a network port Setting Use this setting to Values NPA Mode Send print jobs to the printer and query printer status information simultaneously Off On Auto Mac Binary PS Configure the printer to process Macintosh binary PostScript print jobs Off The printer filters PostScript print jobs usin...

Page 39: ...hether the parallel port data is sampled on the leading On or trailing Off edge of strobe Off On Mac Binary PS Configure the printer to process Macintosh binary PostScript print jobs Off The printer filters PostScript print jobs using standard protocol On The printer processes raw binary PostScript print jobs from computers using the Macintosh operating system This setting often causes Windows pri...

Page 40: ...g Use this setting to Values Reset Factory Defaults Return your printer settings to the factory default values Sometimes resetting the printer to the original settings solves formatting problems All downloaded resources fonts macros and symbol sets in printer memory RAM are deleted Off On Reset Maint Cnt Press and hold Continue to initiate this operation and reset the maintenance counter Reset Pho...

Page 41: ... labels 50 transparencies 550 sheet drawer A4 A5 JIS B5 letter legal executive folio statement Plain paper bond letterhead transparencies paper labels single sided only 60 90 g m2 16 24 lb 550 paper 50 labels 50 transparencies Manual feeder A4 A5 A6 grain long only JIS B5 letter legal executive folio statement Universal Plain paper transparencies paper labels single sided only 60 163 g m2 16 43 lb...

Page 42: ...r transparency envelope paper label card stock or index card The output bin on top of the printer holds up to 150 sheets The single sheet rear exit provides a straight through path to help reduce curling and potential jams This is especially useful for specialty media such as transparencies envelopes paper labels card stock or index cards 1 150 sheet output bin 5 Front door 2 250 sheet tray 6 Cont...

Page 43: ...eliability use 75 g m2 20 lb xerographic grain long paper Business papers designed for general business use may also provide acceptable print quality Note Certain paper types will not print at maximum speed Always print several samples before buying large quantities of any type of print media When choosing print media consider the weight fiber content and color 1 2 3 6 7 5 4 1 Rear exit 5 USB conn...

Page 44: ...l is the tendency of media to curve at its edges Excessive curl can cause paper feeding problems Curl can occur after the paper passes through the printer where it is exposed to high temperatures Storing paper unwrapped in hot humid cold and dry conditions even in the trays can contribute to paper curling prior to printing and can cause feeding problems Smoothness The degree of smoothness of paper...

Page 45: ...temperature in the printer fuser Preprinted papers that require a registration the precise print location on the page greater than 0 09 in such as optical character recognition OCR forms In some cases you can adjust registration with your program to successfully print on these forms Coated papers erasable bond synthetic papers thermal papers Rough edged rough or heavily textured surface papers or ...

Page 46: ...al clasps string ties or metal folding bars Have postage stamps attached Have any exposed adhesive when the flap is in the sealed position Use envelopes that can withstand temperatures of 210 C 410 F without sealing excessive curling wrinkling releasing hazardous emissions If you have any doubts about the envelopes you are considering check with the envelope supplier Adjust the paper guides to fit...

Page 47: ...g print media and supplies Storing paper Use the following guidelines to avoid paper feeding problems and uneven print quality Store paper in an environment where the temperature is approximately 21 C 70 F and the relative humidity is 40 Store cartons of paper on a pallet or shelf rather than directly on the floor If you store individual packages of paper out of the original carton make sure they ...

Page 48: ...le a job is printing Wait for a Load Paper light sequence see Load print media on page 15 before removing the tray Before loading transparencies fan the stack to prevent sheets from sticking together Do not use envelopes that Have excessive curl Are stuck together Are damaged in any way Contain windows holes perforations cutouts or embossments Have metal clasps string ties or metal folding bars Ha...

Page 49: ... sheet tray Note To load legal or folio size paper extend the length of the tray See Extending the tray for legal or folio size paper on page 52 for instructions 2 Prepare a paper stack for loading by flexing and fanning it back and forth Straighten the edges on a level surface maximum paper fill indicator maximum paper fill indicator ...

Page 50: ...ck with the print side facing down Note Make sure the paper stack is laying flat in the tray and is not above the maximum paper fill indicators Improper loading may cause jams Note For simplex printing load letterhead paper with the design side facing down The top edge of the sheet with the logo should be placed at the front of the tray For duplex printing load letterhead paper with the design sid...

Page 51: ...51 Loading the 250 sheet tray 5 Adjust the side paper guides to fit lightly against the paper stack 6 Insert the 250 sheet paper tray ...

Page 52: ...folio size paper To load legal or folio size paper extend the tray You may also attach a dust cover if available on your printer model on the back of the printer to protect the tray while it is extended 1 Press down on the latch at the back of the tray and expand the tray until the extender locks into place ...

Page 53: ...m the environment It also keeps the tray from being knocked out of position while it is extended Attach the dust cover to the back of the printer by aligning the tabs on the cover to the holes on the printer then snap the cover into place Note This feature may not be available for some models 6 5 ...

Page 54: ... sheet of the selected print media print side facing up at the center of the manual feeder but only to the point where its leading edge can contact the paper guides Otherwise the printer will engage the print media too soon and likely skew the print job 2 Adjust the paper guides to the print media width 3 Hold both sides of the print media close to the manual feeder and push it into the printer un...

Page 55: ...ly useful for specialty media such as transparencies labels card stock or index cards To use the rear exit open the rear exit door When the rear exit door is open all print media comes out the rear exit When closed all media is sent to the output bin on top of the printer Note If you print a multiple page job with the rear exit door open the print speed may slow down ...

Page 56: ...ontinue twice quickly to display the specific secondary error paper jam light sequence See Secondary error codes on page 25 for more information We recommend clearing the entire paper path when a paper jam occurs 1 Remove all paper from the 150 sheet output bin 2 If you are feeding paper from the 250 sheet tray remove the tray 3 Remove the jammed pages ...

Page 57: ...57 Clearing jams 4 With the tray removed press down on the green duplex flap to remove the jammed pages from the duplex area 5 Install the 250 sheet paper tray ...

Page 58: ...jams 6 Open the front door and remove the print cartridge assembly 7 Lift the green flap at the front of the printer and remove the jammed pages from behind the flap 1 2 3 CAUTION The fuser or fuser area may be hot ...

Page 59: ...s 10 Press Continue to resume printing Note Jam recovery is set to Auto by default When jam recovery is set to Auto the memory that holds the image of a page may be reused after the page is printed but before it has successfully exited the printer if that memory is needed for another use Therefore a jammed page may or may not be reprinted depending on the overall memory usage of the printer ...

Page 60: ...epending on the application to view the printer driver settings 3 Click the Paper tab 4 Select Manual paper from the Paper tray drop down list 5 Select the appropriate Paper size and type See Using the Local Printer Settings Utility on page 75 for more information 6 Click OK 7 Click OK on the Print window to send the job to print The printer displays the Load Manual Feeder light sequence 8 Place a...

Page 61: ... of the print media close to the manual feeder and push it into the printer until it automatically engages There is a brief pause between the time the printer engages the print media and when it feeds into the printer Note Do not force the print media into the feeder Forcing the print media causes jams ...

Page 62: ...nting on letterhead Use the following table for help when loading letterhead in the media sources for duplex printing You can choose how you want your job duplexed Long Edge or Short Edge Long Edge means pages are bound along the long edge of the page left edge for portrait top edge for landscape Media source or process Print side Top of page Duplex two sided printing from trays Printed letterhead...

Page 63: ...rint 2 Click Properties or Options Printer or Setup depending on the application to view the printer driver settings 3 From the Page Layout tab select 2 sided printing 4 Select either Long Edge or Short Edge 5 Select 2 sided printing 6 Click the Paper tab 7 Select the appropriate Input options for your print job 8 Click OK Back of sheet Front of sheet Back of sheet Front of sheet Landscape Portrai...

Page 64: ...mputer software application select File Æ Print 2 Click Properties or Options Printer or Setup depending on the application to view the printer driver settings 3 From the Page Layout tab select the number of images per sheet from the Multipage printing section and the orientation you would like the paper to have The positioning depends on the number of images and whether the images are portrait or...

Page 65: ...f the pages line up more evenly You must specify whether or not you want to print using any Duplex printing options before you select to print using the booklet function Once you choose Print Using Booklet the controls for the Duplex options are unavailable and remain at the last setting used 1 From the computer software application select File Æ Print 2 Click Properties or Options Printer or Setu...

Page 66: ...clude text graphics or images Watermarks are simple text You can create overlays and watermarks and then download them directly to the printer or you can create an overlay or watermark file on your system and then download it to the printer Note To create and download overlays you must have flash memory installed For information about how to create save or download an overlay or watermark see the ...

Page 67: ... Select the watermark to use 7 Select whether to place the watermark on top of or underneath the page image in the Watermark placement area 8 Click OK Canceling a print job A print job can be canceled from the control panel or from your computer The Cancel job light sequence is displayed on the control panel while the job is being canceled From the printer control panel Press and release Cancel to...

Page 68: ...ist of print jobs appears in the printer window 2 Select the print job you want to cancel 3 Click the trash can button Canceling a job from a computer running Mac OS X When you send a job to print the printer icon for your selected printer appears in the dock 1 Open Applications Æ Utilities and then double click Print Center or Printer Setup 2 Double click the printer you are printing to 3 In the ...

Page 69: ... options Accessing the system board To install memory you must access the printer system board 1 Remove the 250 sheet tray CAUTION Turn the printer off and unplug the power cord from the wall outlet before continuing ...

Page 70: ...70 Accessing the system board 2 Press the button on the left side of the printer to release and lower the front door 3 Open the rear exit door ...

Page 71: ...n the front right side of the machine and swing the side door back 5 Loosen the four screws on the cover but do not remove them completely 6 Slide the cover to the left until the screws fit into the keyholes on the cover 7 Remove the cover and set it aside ...

Page 72: ...h as the printer frame before you touch a memory card Avoid touching the connection points along the edge of the card 4 Align the notches on the bottom of the card with the notches on the connector 5 Push the memory card firmly into the connector until the latches on either end of the connector snap into place Some force may be required to fully seat the card 6 Make sure each latch fits over the n...

Page 73: ...opriate instructions under Software tasks on page 74 After you have installed a printer driver return here to complete these instructions 1 Click Start Æ Settings Æ Printers 2 Select the printer icon 3 Click File Æ Properties 4 Click the Install Options tab 5 Add the appropriate options to your configuration Memory Card Increase the printer memory to the appropriate number 550 sheet drawer Increas...

Page 74: ...led Features If an option is not listed under Installed Features turn off the printer unplug the power cord from the wall outlet and reinstall the option Verify the amount of memory installed is correctly listed under Printer Information Verify that the paper trays are configured for the sizes and types of paper you loaded Printing a test page from the computer 1 Click Start Æ Settings Æ Printers ...

Page 75: ...sing the Local Printer Settings Utility Finishing Settings Paper Settings Parallel Settings PCL Emulation Settings Copies Blank Pages Collation Separator Sheets Separator Source Multipage Print Multipage Order Multipage View Multipage Border Paper Source Paper Size Paper Type Custom Types Substitute Size Paper Texture Paper Weight Paper Loading PCL SmartSwitch PS SmartSwitch Parallel Buffer Advanc...

Page 76: ...your printer The recommended supplies specifically designed for the printer are Part number Description Average cartridge yield World Wide E250X22G Photoconductor kit 30 000 standard pages For the USA and Canada1 E250A21A Toner Cartridge 3 500 standard pages1 E250A11A Return Program Toner Cartridge 3 500 standard pages1 For Europe the Middle East and Africa2 E250A21E Toner Cartridge 3 500 standard...

Page 77: ...light Temperatures above 35 C 95 F High humidity above 80 Salty air Corrosive gases Heavy dust Conserving supplies Conserving supplies lowers printing costs When printing drafts conserve toner by changing the Toner Darkness setting in your printer driver The settings range from 1 very light to 10 very dark with 8 being the default Setting the Toner Darkness to 1 conserves the most toner Reduce pap...

Page 78: ...a maximum of 110 of its life See Replace photoconductor printer hard stop on page 9 for the light sequence associated with this stop The printer automatically notifies you before the photoconductor reaches this point When you first receive the Replace photoconductor kit light sequence you should immediately order a new photoconductor kit While the printer may continue to function properly after th...

Page 79: ... may also display other light sequences in conjunction with the Toner low and Replace photoconductor lights Printer Condition Page Continue Error Toner Low Replace PC Kit Load Paper Paper Jam Ready Toner low 16 Photoconductor kit life warning 17 Replace photoconductor printer hard stop 18 If the control panel lights display this sequence the printer will not print any more jobs until the photocond...

Page 80: ...e printer off 2 Press the button on the left side of the printer to release and lower the front door 3 Remove the toner cartridge a Press the release button on the base of the print cartridge assembly b Grasp the handle pulling up and out to remove the toner cartridge 2 1 ...

Page 81: ... kit on page 82 for more information 5 Firmly shake the toner cartridge in all directions to distribute the toner 6 Install the new toner cartridge by aligning the white rollers on the toner cartridge with the white arrows on the tracks of the photoconductor and pushing the toner cartridge in as far as it will go The toner cartridge clicks into place when correctly installed 7 Close the front door...

Page 82: ...time Extended light exposure can cause print quality problems 1 Turn the printer off 2 Remove the print cartridge assembly a Press the button on the left side of the printer to release the front door b Lower the front door c Grasp the toner cartridge handle and pull up and out Note Do not press the button on the print cartridge assembly Place the print cartridge assembly on a flat clean surface 1 ...

Page 83: ...andle and pull up and out 4 Unpack the new photoconductor kit 5 Install the toner cartridge into the new print cartridge assembly by aligning the white rollers on the toner cartridge with the white arrows on the tracks of the photoconductor and pushing the toner cartridge in as far as it will go The cartridge clicks into place when correctly installed 1 2 ...

Page 84: ...e the front door 8 Turn the printer back on 9 Reset the photoconductor counter see the instruction sheet that shipped with the new photoconductor kit Print your printer menu settings pages See Printing the menu settings and network setup pages on page 74 If Photoconductor is listed under Warnings the photoconductor counter has not been properly reset Recycling Lexmark products To return Lexmark pr...

Page 85: ...w Replace PC Kit Ready and Continue lights appear 8 Release the Continue button 9 Turn the printer off and back on Factory defaults have been reset The paper is curled once it exits the printer Use paper that is sealed in its original packaging Turn the paper over Rotate the paper 180 degrees If you are printing a multiple page job try printing it duplex When printing on heavy print media open the...

Page 86: ...l all the lights cycle The Continue Ready Data Toner Low and Load Remove Paper light sequence will appear 8 Release the Continue button The Ready Data light will blink while the page is being formatted and printed The Continue and Error lights appear 9 Follow the instructions on the printed page 10 Turn the printer off to exit the menus Print job takes longer than expected to print The job is too ...

Page 87: ...r worn Replace the toner cartridge or fuser as needed Streaked vertical lines Toner is smeared before fusing to the paper The toner cartridge is defective If paper is stiff try feeding from another tray or the manual feeder Replace the toner cartridge Print irregularities Paper has absorbed moisture due to high humidity Paper that does not meet the printer specifications is being used The fuser is...

Page 88: ...ype setting to transparency Toner specks The toner cartridge is defective The fuser is worn or defective Toner is in the paper path Replace the toner cartridge Replace the fuser Call for service Toner rubs off the paper easily when sheets are handled The Paper Texture setting is wrong for the type of print media being used The Paper Weight setting is wrong for the type of print media being used Th...

Page 89: ...ng was not changed to A4 Set the Form Size to match the paper size that is loaded in the tray Skewed print Print is inappropriately slanted The guides in the selected tray are not in the correct position for the paper size loaded in the tray The manual feeder guides are not in the correct position for the paper size loaded in the feeder Adjust the guides in the tray so that there is a slight gap b...

Page 90: ...t media that is sealed in its original packaging Turn the print media over Rotate the print media 180 degrees If you are printing a multiple page job try duplexing it When printing on heavy print media open the rear exit door for a straight through path Try another kind or brand of print media such as a xerographic paper for laser printers If possible try printing in a less humid environment Sympt...

Page 91: ...d lens 1 Turn the printer off 2 Press the button on the left side of the printer to release and lower the front door 3 Remove the print cartridge assembly by pulling on the toner cartridge handle Note Do not press the button on the print cartridge assembly Place the print cartridge assembly on a flat clean surface 1 2 3 ...

Page 92: ...loth Warning Not using a clean dry lint free cloth may result in damage to the printhead lens 6 Install the print cartridge assembly into the printer by aligning the arrows on the guides of the print cartridge assembly with the arrows on the tracks in the printer and pushing the print cartridge assembly in as far as it will go 7 Close the front door 8 Turn the printer on ...

Page 93: ...adio or television interference caused by using other than recommended cables or by unauthorized changes or modifications to this equipment Unauthorized changes or modifications could void the user s authority to operate this equipment Note To assure compliance with FCC regulations on electromagnetic interference for a Class B computing device use a properly shielded and grounded cable such as Lex...

Page 94: ...on notice Warning Electrical surges can be very destructive to equipment connected to AC power sources If you plan to operate your printer at a voltage exceeding the voltage range s in the following table you must attach a suitably rated and certified power regulating device such as a voltage stabilizer or UPS device to the printer power supply Your warranty may not cover damages caused by power s...

Page 95: ...duct power consumption disconnect the power cord from the wall outlet Total energy usage It is sometimes helpful to calculate the total product energy usage Since power consumption claims are provided in power units of Watts the power consumption should be multiplied by the time the product spends in each mode in order to calculate energy usage The total product energy usage is the sum of each mod...

Page 96: ...oduct conforming to the requirements of IEC 60825 1 Class I laser products are not considered to be hazardous The printer contains internally a Class IIIb 3b laser that is nominally a 5 milliwatt gallium arsenide laser operating in the wavelength region of 770 795 nanometers The laser system and printer are designed so there is never any human access to laser radiation above a Class I level during...

Page 97: ...rrant uninterrupted or error free operation of any product or the durability or longevity of prints produced by any product Warranty service does not include repair of failures caused by Modification or unauthorized attachments Accidents misuse abuse or use inconsistent with Lexmark user s guides manuals instructions or guidance Unsuitable physical or operating environment Maintenance by anyone ot...

Page 98: ...imitations on how long an implied warranty lasts or do not allow the exclusion or limitation of incidental or consequential damages so the limitations or exclusions contained above may not apply to you This limited warranty gives you specific legal rights You may also have other rights that vary from state to state ...

Page 99: ...1 Error 14 15 17 18 19 20 21 25 26 27 28 34 Flushing data 13 Formatting flash 11 Hex Trace Ready 12 Load manual feeder 16 Load media 15 Not ready 13 Offline 13 Photoconductor kit near full 17 Printer error 20 Programming engine code 18 Programming system code 18 Ready Power Saver 11 Replace photoconductor kit 18 Resetting printer 15 Restoring factory defaults 15 secondary error codes 25 Service er...

Page 100: ... menu 39 multiple page printing 64 N NPA Mode Parallel menu 39 USB menu 38 40 N up printing 64 O Operating modes 86 options memory card 72 overlays 66 P paper choosing 43 jams 56 loading 49 54 recommended types 43 storing 47 unsatisfactory types 45 Parallel menu 39 photoconductor kit changing 82 level 78 light sequences 79 ordering 76 recycling 84 Photoconductor kit near full light 17 ports parall...

Page 101: ...y 26 Paper jams as it exits the tray into the printer 26 PPDS font error 31 Short paper 33 service error lights 19 Setup menu 39 storing paper 47 supplies 47 77 supplies conserving 77 ordering 76 recycling 84 storing 47 77 system board accessing 69 T test page 74 toner cartridge changing 80 light sequences 79 ordering 76 recycling 84 toner level 78 Toner Low light 16 35 36 transparencies 46 tray e...

Reviews: