2
Levenhuk DTX 700
Mobi
Digital Microscope
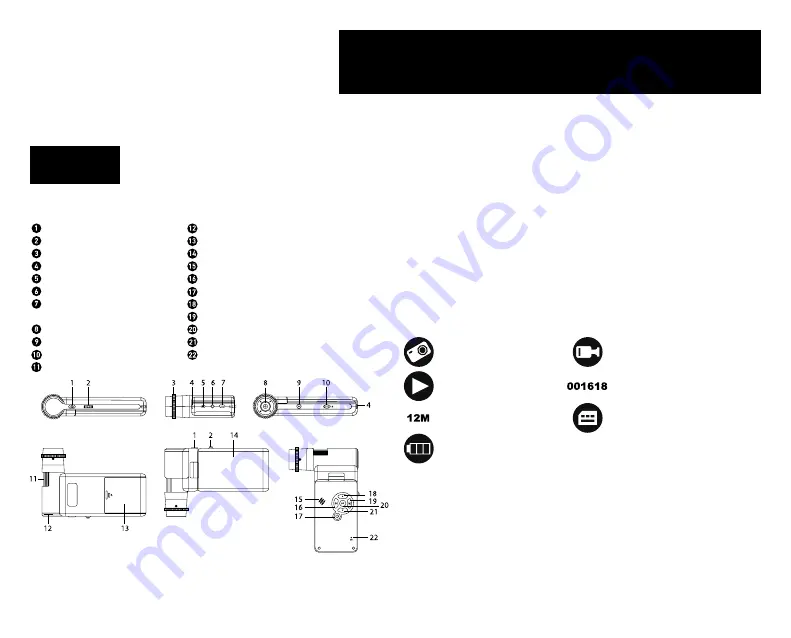
Microscope parts
Capture
Zoom adjustment wheel
Polarizing wheel
Battery status indicator
HDMI out
AV out
DC: charge battery
USB: output to PC
Objective lens
1/4" screw
MicroSD slot
Focus wheel
Brightness adjustment wheel
Battery compartment
4" color LCD display
Speaker
Setup
Power on/off
Up
Photo/Video/Playback
OK (Confirm)
Down
Microphone
The kit includes
: microscope, tripod, rechargeable battery, USB cable, AV cable,
power adapter, software CD, pouch, user manual and lifetime warranty.
Microscope assembly
Open the battery compartment and insert the battery into the battery
compartment matching the indicated polarity. The battery has to be fully charged
before turning the microscope on for the first time. Plug the power cable into the
power cable socket on the microscope body (7) and connect it to a power source.
The battery status indicator (4) will turn red. Once the battery is fully charged,
the indicator will go out. You can now disconnect the microscope from the power
source and turn it on. The fully-charged battery allows you to use the microscope
for 2.5 hours. The illumination will grow dim and the image quality will decrease
to inform you that the battery is low. Charge the battery, as described above.
A microSD card (purchased separately) is required to save captured images and
recorded videos. Turn the microscope off and insert the microSD card into the
corresponding slot on the microscope body until it locks in place with a click. Do
not apply excessive force when inserting the microSD card. Try rotating the card,
if it does not lock in place with ease. Format the card before using it. To turn the
microscope on, open the LCD display or press the power button (17). To turn the
microscope off, fold the LCD display or press the power button (17) again (refer to
Power saving section for more information).
Display icons
Note:
Interface icons will be hidden if no key has been pressed and held for 10 seconds.
Capturing an image
Turn the microscope on and point it at an object. Make sure the LCD display
is fully unfolded. Adjust the illumination brightness, so that the specimen is
evenly lit. Change magnification, then focus your view and press the capture
button (1) to capture an image.
Recording a video
Press the Photo/Video/Playback button (19) to switch to video mode. The icon in
the upper left corner of the screen will change in confirmation. Press the capture
button (1) to start recording and press it again to stop.
EN
Never, under any circumstances, look directly at the Sun, another bright
source of light or at a laser through this device, as this may cause
PERMANENT RETINAL DAMAGE and may lead to BLINDNESS.
Capture an
image
Playback mode
Current image
resolution
Battery status
indicator
Start and stop video
recording
Total number of images that
may be captured (based on the
current resolution)
MicroSD status icon


