background image

11a/b/g Wireless Multi-Client Bridge/AP/WDS  


                         Version 1.0 


 13 


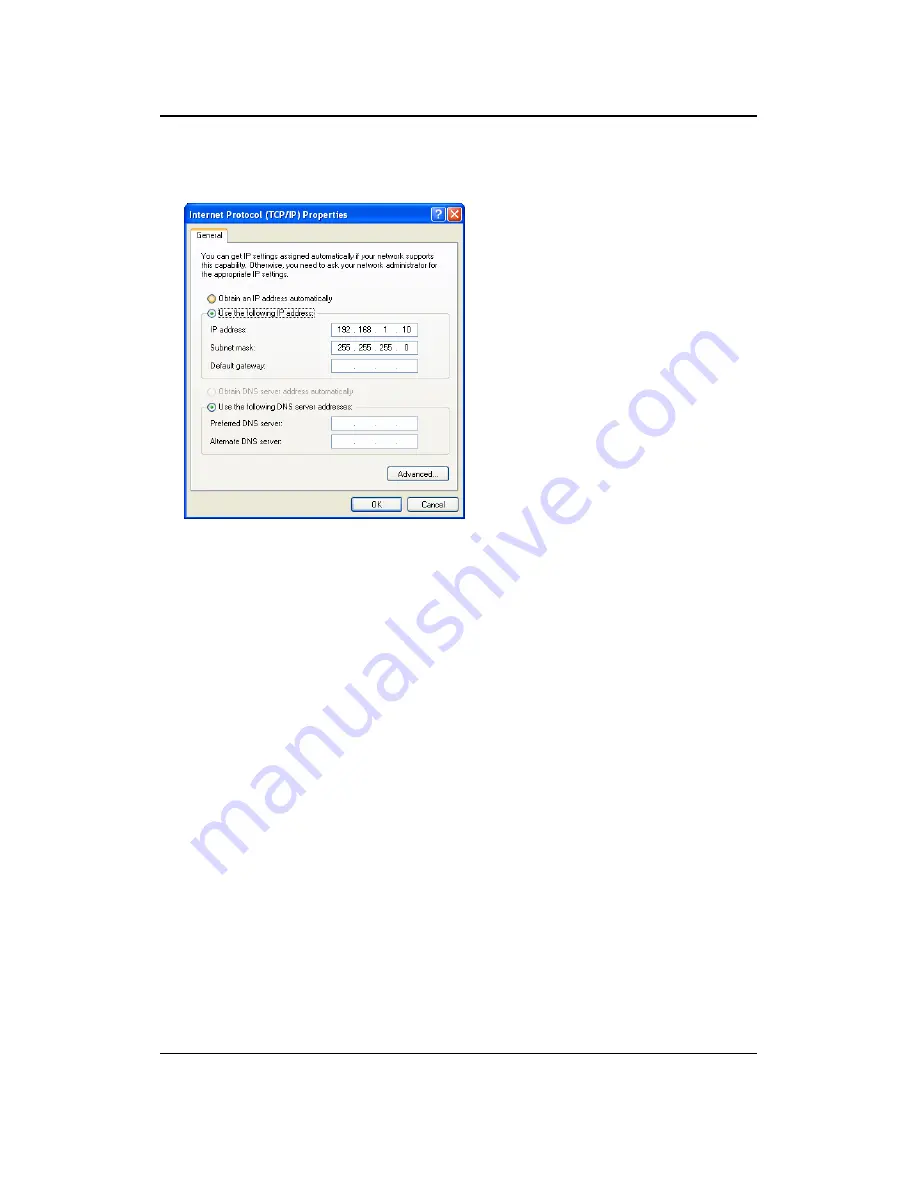
2. Select 

Internet Protocol (TCP/IP)

 and then click on the 

Properties

 button. This 

will allow you to configure the TCP/IP settings of your PC/Notebook. 


3. Select 

Use the following IP Address

 radio button and then enter the IP address 

and subnet mask. Ensure that the IP address and subnet mask are on the same 
subnet as the device.  
For Example:   

Device IP address: 192.168.1.1, 192.168.1.2 

   PC 

IP 

address: 

192.168.1.10 

   PC 

subnet 

mask: 

255.255.255.0 

 
4.  Click on the 

OK

 button to close this window, and once again to close LAN 

properties window.  


Summary of Contents for WAB-7000

Page 1: ...WAB 7000 11a b g Wireless Outdoor Multi Client Bridge AP User s Manual Version 1 0...

Page 2: ...22 3 2 3 1 SYSTEM REBOOT 22 3 2 3 2 RESTORE SETTINGS TO DEFAULT 23 3 2 4 SYSTEM TIME CONFIGURATION 23 3 3 WIRELESS 25 3 3 1 SSID CONFIGURATION 25 3 3 1 1 802 11A INFRASTRUCTURE AD HOC MODE 26 3 3 2 8...

Page 3: ...PRIVACY 47 4 3 4 2 WPA PERSONAL WI FI PROTECTED ACCESS 48 4 3 4 3 WPA ENTERPRISE WI FI PROTECTED ACCESS 802 1X 49 4 3 5 ADVANCED WIRELESS AND WDS 50 4 3 6 SNMP 51 4 4 LAN 52 4 5 DHCP SERVER 53 4 6 MA...

Page 4: ...Revision History Version Date Notes 1 9 8 02 2008 05 29 Initial Version...

Page 5: ...contents applications and network configuration 1 1 Features Benefits Features Benefits High Speed Data Rate Up to 54Mbps Capable of handling heavy data payloads such as MPEG video streaming High Out...

Page 6: ...ng Do not discard the packing materials in case of return the unit must be shipped in its original package h Outdoor Wireless Client Bridge unit h PoI 2000 Power over Ethernet Injector h User s manual...

Page 7: ...11a b g Wireless Multi Client Bridge AP WDS Version 1 0 7 1 4 Ethernet cable water proof kit Install Guide Install the Ethernet cable with the waterproof kits shown as below pictures 1 4...

Page 8: ...Client Bridge AP WDS Version 1 0 8 1 5 Mounting Install Guide a Pole mounting 1 Lock the bracket on device 2 Using hoop to fix on pole and bind with U clamp 3 Adjust degree of device 4 Using washer sc...

Page 9: ...b g Wireless Multi Client Bridge AP WDS Version 1 0 9 b Wall mounting 1 Lock the bracket on device 2 Lock the wall mount bracket on wall 3 Adjust degree of device 4 Using washer screw to lock with dev...

Page 10: ...sale employees and warehouse workers can access real time information while dealing with patients serving customers and processing information d Frequently changed environments Show rooms meeting room...

Page 11: ...does not require an access point This is the easiest and least expensive way for the SOHO to set up a wireless network The image below depicts a network in ad hoc mode b Infrastructure Mode AP Client...

Page 12: ...into the port labeled DC IN and the other end into the power socket on the wall This diagram depicts the hardware configuration 2 2 IP Address Configuration This device can be configured as a Bridge...

Page 13: ...r PC Notebook 3 Select Use the following IP Address radio button and then enter the IP address and subnet mask Ensure that the IP address and subnet mask are on the same subnet as the device For Examp...

Page 14: ...includes the administrator settings firmware upgrade reset to factory defaults and system date time configuration 2 Wireless This menu includes the settings such as network type infrastructure ad hoc...

Page 15: ...ystem date LAN o Displays the MAC address IP address and subnet mask of the LAN interface Wireless LAN o Displays the status MAC address SSID RF channel and security settings of the wireless interface...

Page 16: ...password to access this device from the web browser You can also specify a name for the bridge as well as backup and restore the system settings The first part of this page gives you the option to sav...

Page 17: ...me for this device as well as save or restore a configuration Click on the Save Settings button to store the changes Bridge Name Specify a name for this bridge Web Idle Timeout Specify a time in minut...

Page 18: ...rom a file to the device Click on the Browse button to select the file and then click on Restore Configuration from a File button The system then prompts you to reboot the device Click on the OK butto...

Page 19: ...e the device in Access Point mode 3 2 2 Firmware Upgrade Click on the Firmware link under the System menu This page allows you to upgrade the firmware of the device in order to improve the functionali...

Page 20: ...ich indicates that the upgrade process may take up to one minute After a few seconds the firmware will start to re program the device and you will see a countdown on the Success page Note Do not un pl...

Page 21: ...link under the System menu This page allows you to reboot the device using the current settings or restore all the settings to the factory defaults 3 2 3 1 System Reboot Click on the Reboot the Devic...

Page 22: ...After rebooting device will start on the default CB mode 3 2 4 System Time Configuration Click on the Time link under the System menu This feature allows you to configure update and maintain the corre...

Page 23: ...ct your time zone from the drop down list Set the Date and Time Select a date and time from the drop down list or do to use computer s time and date click on the Copy Your Computer s Time Settings but...

Page 24: ...1 SSID Configuration Click on the SSID link under the Wireless menu This page allows you specify the SSID network name or specify a preferred SSID that you would like the device to connect to Wireles...

Page 25: ...down list The channels available are based on the country s regulation When selecting Infrastructure mode a channel is not required however when selecting Adhoc mode you must select the same channel...

Page 26: ...this button The outdoor AP channel will auto selected Channel Select a channel from the drop down list The channels available are based on the country s regulation When selecting Infrastructure mode a...

Page 27: ...is button The outdoor AP channel will auto selected Channel Select a channel from the drop down list The channels available are based on the country s regulation When selecting Infrastructure mode a c...

Page 28: ...uivalent Privacy and is a security protocol that provides the same level of security for wireless networks as for a wired network WEP is not as secure as WPA encryption To gain access to a WEP network...

Page 29: ...button once you have modified the settings 3 3 4 1 2 WPA WPA2 Personal Wi Fi Protected Access Select the WPA Personal radio button if your wireless network uses WPA encryption WPA Wi Fi Protected Acce...

Page 30: ...threshold RTS threshold and the transmit power Antenna Selection Select Internal Antenna unless you are using an outdoor device Fragment Threshold Packets over the specified size will be fragmented i...

Page 31: ...to use the SNMP feature Read Only Community Name Specify the password for access the SNMP community for read only access Read Write Community Name Specify the password for access to the SNMP community...

Page 32: ...io button you are not required to enter the rest of the fields as the IP address will be provided to the device by the AP or DHCP server If you select the Static radio button you must enter the IP add...

Page 33: ...5 Logs Click on the Logs link on the navigation drop down menu Logs display a list of events that are triggered on the Ethernet and Wireless interface This log can be referred when an unknown error o...

Page 34: ...ld like recorded and place a check in the appropriate box Then click on the Apply Log Settings Now button Log Details The events are logged in this section Click on the Refresh button to refresh the e...

Page 35: ...e to errors collisions or bridge resource limitations RX Packets Dropped The number of packets that were dropped while being received due to errors collisions or bridge resource limitations Collisions...

Page 36: ...After logging in you will graphical user interface GUI of the Access Point The navigation drop down menu on left is divided into seven main sections 1 System This menu includes system related setting...

Page 37: ...istrator Settings link under the System menu This page allows you to configure the password to access this device from the web browser You can also backup and restore the system settings Specify a use...

Page 38: ...Restore Configuration from a File button The system then prompts you to reboot the device Click on the OK button to continue You will then see the Rebooting page Please wait while the system is reboo...

Page 39: ...gure the device in Bridge mode 4 2 2 Firmware Upgrade Click on the Firmware link under the System menu This page allows you to upgrade the firmware of the device in order to improve the functionality...

Page 40: ...o re program the device and you will see a countdown on the Success page Note Do not un plug the device during this process Some firmware upgrades may restore the configuration back to the factory def...

Page 41: ...m the action 4 2 3 2 Restore Settings to Default Click on the Restore all Settings to Factory Defaults button This option restores al configuration settings back to the settings that were in effect at...

Page 42: ...ying the time on the PC that it is wired to Note If the device losses power for any reason it will not be able to keep its clock running and will not display the correct time once the device has been...

Page 43: ...1 SSID Configuration Click on the SSID link under the Wireless menu This page allows you specify the SSID network name or specify a preferred SSID that you would like the device to connect to Wireles...

Page 44: ...the country s regulation Place a check in the Auto Channel Select box if you would like the Access Point to select the cleanest channel Transmission Rate Select a transmission rate from the drop down...

Page 45: ...1b only Do not use this option when configured at Ad Hoc mode Setting ACK_B Timeout You may specify a time out value however it is recommended to use the default setting 48 Click on the Save Settings...

Page 46: ...ryption requires a longer key than 64 bit encryption Keys are defined by entering in a string in HEX hexadecimal using characters 0 9 A F or ASCII American Standard Code for Information Interchange al...

Page 47: ...ed with WPA Mode Select the WPA WPA2 from the drop down list Cipher Type Select TKIP or AES as the cipher suite The encryption algorithm used to secure the data communication TKIP Use TKIP only TKIP T...

Page 48: ...nticate wireless clients Wireless clients should have established the necessary credentials before attempting to authenticate to the Server through this Gateway Furthermore it may be necessary to conf...

Page 49: ...is consulted only when the primary server is not available or not responding Click on the Save Settings button once you have modified the settings 4 3 5 Advanced Wireless and WDS Click on the Advanced...

Page 50: ...is enabled this access point functions as a wireless repeater and is able to wirelessly communicate with other APs via WDS links Note that WDS is incompatible with WPA both features cannot be used at...

Page 51: ...P address to this device In this case you do not need to fill in the following fields Choose Static IP Manual if your router does not support DHCP or if for any other reason you need to assign a fixed...

Page 52: ...utomatically Enable DHCP Server Place a check in this box if you would like this device to function as a DHCP Server DHCP IP Address Range Enter the first and last IP address of the range Make sure th...

Page 53: ...g of DHCP packets Enabling this option will cause the Access Point to always broadcast its responses to all clients thereby working around the problem at the cost of increased broadcast traffic on the...

Page 54: ...ting from the drop down list When only allow listed machines is selected only computers with MAC addresses listed in the MAC Address List are granted network access When only deny listed machines is s...

Page 55: ...system or when a report needs to be sent to the technical support department for debugging purposes Log Options Select the type of warning that you would like recorded and place a check in the approp...

Page 56: ...errors collisions or bridge resource limitations RX Packets Dropped The number of packets that were dropped while being received due to errors collisions or bridge resource limitations Collisions The...

Page 57: ...t have console port just in cast if the operator forget the login ID and Password then cannot access the web this chat is for how to reset to default ID Password Console cable explanation It cannot us...

Page 58: ...11a b g Wireless Multi Client Bridge AP WDS Version 1 0 58 Supper terminal steps Open the terminal software Port Settings...

Page 59: ...11a b g Wireless Multi Client Bridge AP WDS Version 1 0 59 Select the Console Properties settings ASCII setup ASCII Setup...

Page 60: ...11a b g Wireless Multi Client Bridge AP WDS Version 1 0 60 After connected press any key to enter the main page Press Shift W get wlan information...

Page 61: ...11a b g Wireless Multi Client Bridge AP WDS Version 1 0 61 Press Shift L get lan information Press Shift R Reset to default system Press Shift S Reboot system...

Page 62: ...Sensitivity Typical 5 15 5 85G IEEE802 11a 6Mbps 88dBm 54Mbps 70dBm 2 412 2 472G IEEE802 1 1g 6Mbps 91dBm 54Mbps 74dBm 2 412 2 472G IEEE802 1 1b 11Mbps 90dBm 1Mbps 95dBm Available transmit power Typi...

Page 63: ...n outlet on a circuit different from that to which the receiver is connected z Consult the dealer or an experienced radio TV technician for help This device complies with Part 15 of the FCC Rules Oper...

Page 64: ...ANT NOTE IC Radiation Exposure Statement This equipment complies with IC radiation exposure limits set forth for an uncontrolled environment End users must follow the specific operating instructions f...

Reviews: