


51
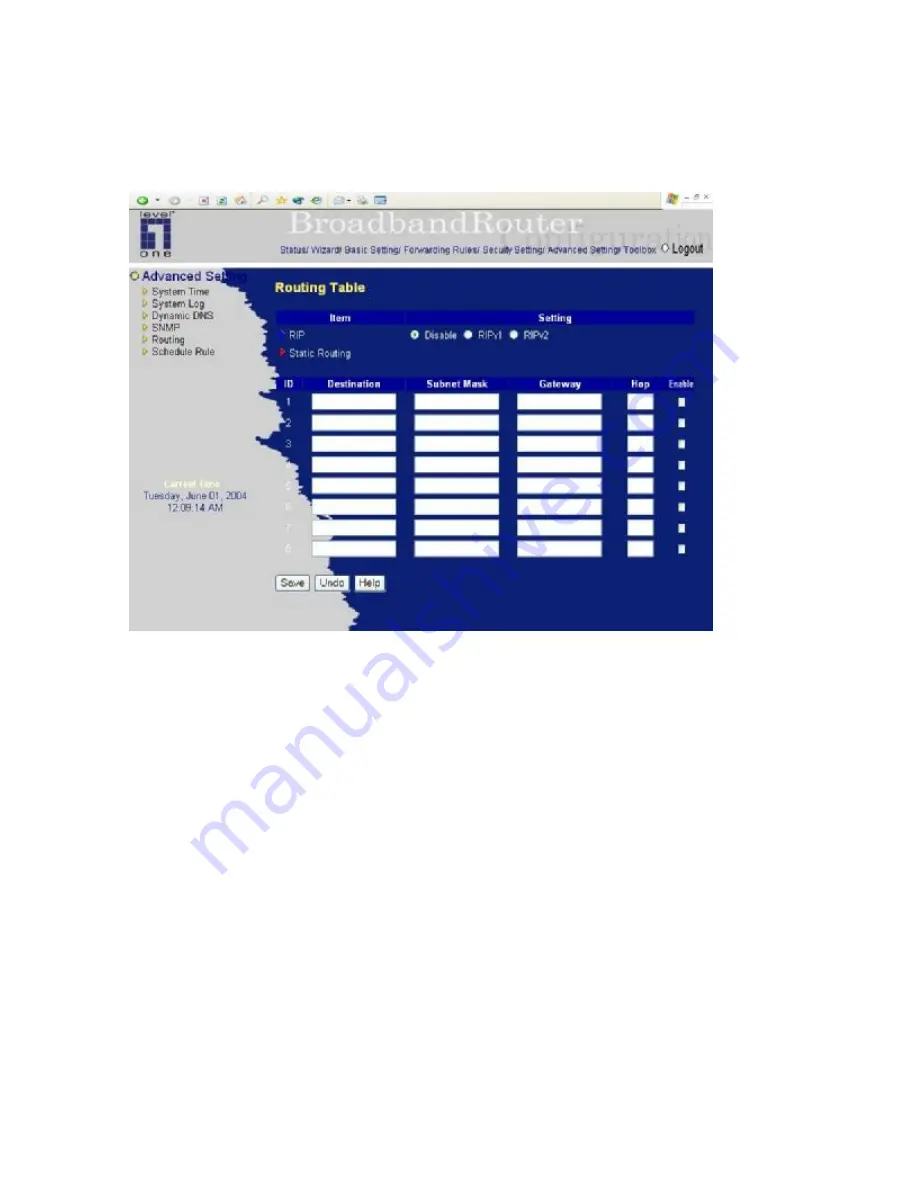
4.7.5 Routing Table
Routing Tables
allow you to determine which physical interface address to use for outgoing IP data
grams. If you have more than one routers and subnets, you will need to enable routing table to allow
packets to find proper routing path and allow different subnets to communicate with each other.
Routing Table settings are settings used to setup the functions of static and dynamic routing.
RIP
Routing Information Protocol (RIP) will exchange information about destinations for computing routes
throughout the network. Please select RIPv2 only if you have different subnet in your network.
Otherwise, please select RIPv1 if you need this protocol.
Static Routing
: For static routing, you can specify up to 8 routing rules. You can enter the destination
IP address, subnet mask, gateway, hop for each routing rule, and then enable or disable the rule by
checking or unchecking the Enable checkbox.
Summary of Contents for NetCon FBR-1415TX
Page 1: ...1 LevelOne FBR 1415TX Broadband Router w 1USB 1 Parallel Printer Server User s Manual...
Page 18: ...18 Setup Wizard Select WAN Type For detail settings please refer to 4 4 1 primary setup...
Page 19: ...19 4 4 Basic Setting 4 4 1 Primary Setup WAN Type Virtual Computers Press Change...
Page 25: ...25 4 5 Forwarding Rules...
Page 29: ...29 4 6 Security Settings...
Page 43: ...43 4 7 Advanced Settings...
Page 46: ...46 E mail Subject The subject of email alert This setting is optional...
Page 56: ...56...
Page 57: ...57 4 8 Toolbox 4 8 1 System Log You can View system log by clicking the View Log button...
Page 58: ...58 4 8 2 Firmware Upgrade You can upgrade firmware by clicking Firmware Upgrade button...
Page 66: ...66 2 Select Ports page Click Add Port 3 Select Standard TCP IP Port and then click New Port...
Page 68: ...68 6 Select LPR type lp lowercase letter in Queue Name And enable LPR Byte Counting Enabled...
Page 69: ...69 7 Apply your settings...
Page 71: ...71 1 Enter the Pinter Name Comments then forward 4 Select LPD protocol and then forward...
Page 72: ...72 5 Enter Router LAN IP Address and the queue name lp Then forward...


