background image

4

Hardware Installation

3

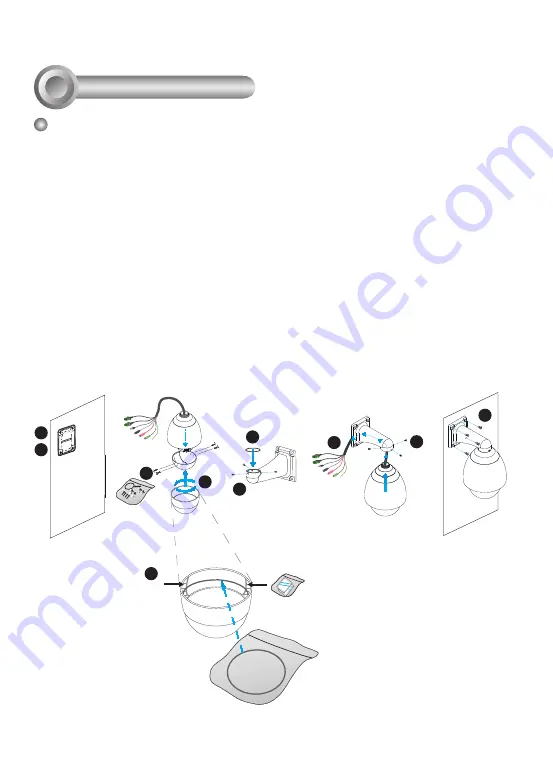
Mounting the Network Camera

1. Attach the alignment sticker to the wall.
2. Drill four pilot holes into the wall.
3. Attach the black cover to the Network Camera using the supplied four black 

screws.

4. Stick the supplied two pieces of silica gel symmetrically to the inner side of the 

dome cover. Then place the metal ring into the dome cover to fix the silica gel.

5. Fix the dome cover to the Network Camera and secure it by rotating it clockwise.

6. Loosen the three screws on the front opening of the wall mount bracket.
7. Place the O-ring on the front opening of the wall mount bracket.
8. Feed the cables through the front opening of the wall mount bracket and pull them 

from wall outlet.

9. Attach the Network Camera to the wall mount bracket by tightening the three 

screws on the front opening of the wall mount bracket.

10. Fasten the wall mount bracket to the wall.

1

2

3

5

6

7

8

9

10

Silica gel

Silica gel

4

Summary of Contents for CamCon FCS-4020

Page 1: ...LevelOne Installation Guide FCS 4020 Day Night Speed Dome Network Camera Ver 1 0...

Page 2: ...ture Power off the Network Camera as soon as smoke or unusual odors are detected Do not touch the Network Camera during a lightning storm Do not disassemble the Network Camera Do not drop the Network...

Page 3: ...wer Adapter or Software CD FCS 4020 Warranty Card Black Cover Dome Cover Wall Mount Bracket RJ45 Female Female Coupler Quick Installation Guide O ring and Screws Alignment Sticker Silica Gel Metal Rin...

Page 4: ...ner View Reset Button Lens Outer View Physical Description 2 Status LED Ethernet 10 100 RJ45 Plug Audio Out green Microphone In pink Power Cord Socket black General I O Terminal Block Ground SD Card S...

Page 5: ...o fix the silica gel 5 Fix the dome cover to the Network Camera and secure it by rotating it clockwise 6 Loosen the three screws on the front opening of the wall mount bracket 7 Place the O ring on th...

Page 6: ...se the supplied RJ45 female female coupler to connect the Network Camera to a switch Use Category 5 Cross Cable when Network Camera is directly connected to PC 3 Connect the power cable from the Netwo...

Page 7: ...XXXXX This device complies with part 15 of the FCC Rules Operation is subject to the following two conditions 1 this device may not cause harmful interference and 2 this device must accept any interfe...

Page 8: ...7 For further setup please refer to the user s manual on the software CD Ready to Use 6 1 Access the Network Camera from the Internet 2 Retrieve live video through web browsers or recording software...

Reviews: