background image

5

Network Deployment

4

POWER

COLLISION

LINK

RECEIVE

PARTITION

1

2

3

4

5

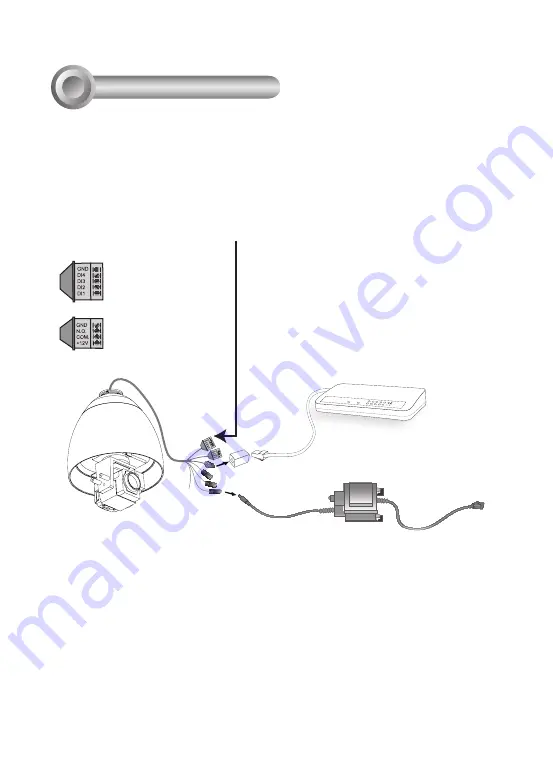
1. If you have external devices such as 

sensors and alarms, connect them to 

the general I/O terminal block.

2. Use the supplied RJ45 female/female 

coupler to connect the Network Camera 

to a switch.

    Use Category 5 Cross Cable when 

Network Camera is directly connected 

to PC.

3. Connect the power cable from the 

Network Camera to a power outlet. 

G N D :  Ground

D I 4 :  Digital Input

D I 3 :  Digital Input

D I 2 :  Digital Input

D I 1 :  Digital Input
G N D :  Ground

N.O.  : RELAY_NO

COM. : RELAY_COM

+ 1 2 V   :  Power, 12V DC

 (AC 24V 2A)

Summary of Contents for CamCon FCS-4020

Page 1: ...LevelOne Installation Guide FCS 4020 Day Night Speed Dome Network Camera Ver 1 0...

Page 2: ...ture Power off the Network Camera as soon as smoke or unusual odors are detected Do not touch the Network Camera during a lightning storm Do not disassemble the Network Camera Do not drop the Network...

Page 3: ...wer Adapter or Software CD FCS 4020 Warranty Card Black Cover Dome Cover Wall Mount Bracket RJ45 Female Female Coupler Quick Installation Guide O ring and Screws Alignment Sticker Silica Gel Metal Rin...

Page 4: ...ner View Reset Button Lens Outer View Physical Description 2 Status LED Ethernet 10 100 RJ45 Plug Audio Out green Microphone In pink Power Cord Socket black General I O Terminal Block Ground SD Card S...

Page 5: ...o fix the silica gel 5 Fix the dome cover to the Network Camera and secure it by rotating it clockwise 6 Loosen the three screws on the front opening of the wall mount bracket 7 Place the O ring on th...

Page 6: ...se the supplied RJ45 female female coupler to connect the Network Camera to a switch Use Category 5 Cross Cable when Network Camera is directly connected to PC 3 Connect the power cable from the Netwo...

Page 7: ...XXXXX This device complies with part 15 of the FCC Rules Operation is subject to the following two conditions 1 this device may not cause harmful interference and 2 this device must accept any interfe...

Page 8: ...7 For further setup please refer to the user s manual on the software CD Ready to Use 6 1 Access the Network Camera from the Internet 2 Retrieve live video through web browsers or recording software...

Reviews: