background image

REMOTE CONTROL  PREPARATION

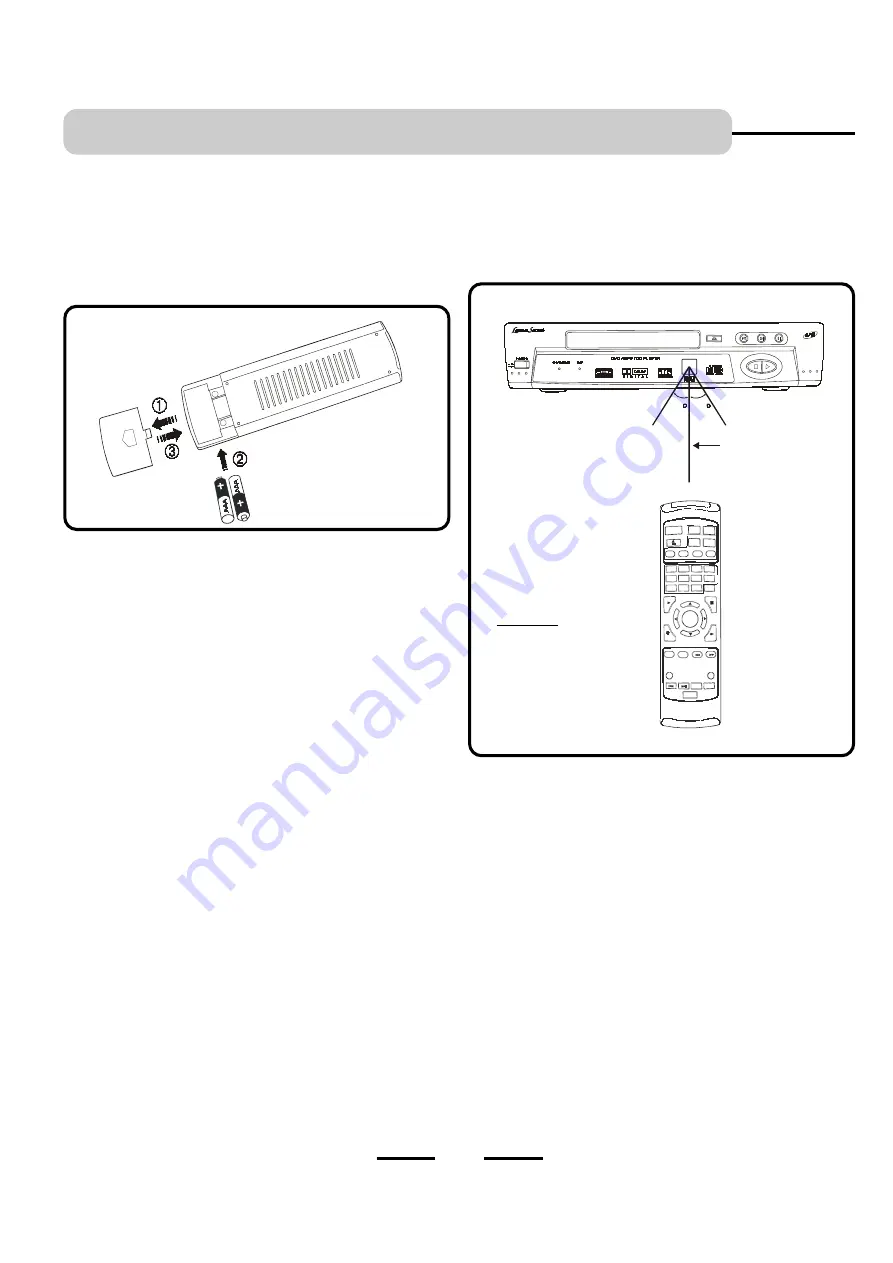
Remove the BATTERY COMPARTMENT DOOR of the REMOTE

CONTROL and insert 2 size “AAA” alkaline batteries (included)

according  to  the  +  and  -  markings  inside  the  BATTERY

COMPARTMENT of the REMOTE CONTROL unit.

Tips on Battery Use

•

Reversing polarities will damage the batteries and possibly your
REMOTE. Be sure to follow polarity ( + and -) as indicated.

•

Do  not  mix  different  types  together  (Alkaline,  Carbon-Zinc,
Nickel-Cadmium etc.), or old batteries with new ones.

•

When not in use for an extended period of time (over 60 days)
remove  the  batteries  to  prevent  possible  acid  leakage  or

corrosion resulting in damage to your remote.

•

When the batteries have become discharged, they must be
disposed of in a safe manner that complies with all applicable

laws

.

•

Installation  of  batteries  should  only  be  done  by  an  adult
(for safety).

Battery Installation

Remote Control Operation Range

Point the REMOTE CONTROL unit from less than 20 feet from

the remote control sensor and within about 60

of the front of the

DVD player (not your TV set).

Tips on REMOTE CONTROL operation

•

The operating distance may vary according to the brightness of
the room.

•

Do not point bright lights at the remote control sensor.

•

Do not place objects between the remote control unit and the
remote control sensor.

•

Do  not  use  this  remote  control  unit  while  simultaneously
operating the remote control unit of any other equipment.

! !

REMOTE SENSOR RANGE

within 20 feet

®

Remember  to  point  the

REMOTE CONTROL in the

direction of the DVD player,

not the TV.

Point  the  REMOTE  CONTROL  in  the

Right Direction

When you want the remote to operate the DVD player, point the

remote at the DVD player, not the TV. The Remote has to be

pointed in the correct direction and toward the correct component

(DVD  player)  in  order  for  the  remote  control’s  signal  to

communicate with the remote sensor on the DVD player. Make

sure there is a clear path between the remote control and the DVD

player so the signal is not blocked.

11

IB-DVD-2002-WC-ZR-E-V1

All manuals and user guides at all-guides.com

Summary of Contents for DVD-2002

Page 1: ...C ZR E V1 DVD VIDEO PLAYER INSTRUCTION MANUAL MODEL DVD 2OO2 FULL ON SCREEN DISPLAY PLAYS DVD VIDEOS PLAYS ALL AUDIO CDS COMPATIBLE WITH CD R CDRW DISCS PLAYS MP3 RECORDED DISCS All manuals and user guides at all guides com a l l g u i d e s c o m ...

Page 2: ... cleaned only as recommended by the manufacturer 13 Nonuse periods The power cord of the appliance should be unplugged from the outlet when left unused for a long period of time SEE BACK OF THE SET 14 Object and Liquid Entry Care should be taken so that objects do not fall and liquids are not spilled into the enclosure through openings 15 Damage Requiring Service The appliance should be serviced b...

Page 3: ...g Soundtrack Output 17 Setting Parental Controls Rating Level 17 Basic Operation 1 Basic Play 18 19 2 Using the Search Skip Functions 20 3 Pause or Step Play 20 4 Repeat Play 21 5 Programmed Play 22 6 Search for Preferred Play 22 7 Zoom Play 23 8 Slow Motion Play 23 9 Viewing from a Desired Angle 24 10 Selecting Audio Soundtrack Language 24 11 Changing Subtitle Language 25 12 MP3 CD Operation 25 2...

Page 4: ...e usually sold as a bundled set but the connection pictures in this booklet show each cable separately for better visibility Audio Video included Coaxial optional S Video optional Audio Video included Coaxial optional S Video optional Audio Video included Coaxial optional S Video needed but not included Audio Video included Coaxial optional S Video optional TV DVD TV DVD VCR TV DVD Dolby Digital T...

Page 5: ...oy standard quality images 3 The SPARE OUTPUTS are same as AUDIO OUT R AUDIO OUT L they can provide more connection possibilities to other equipment you have 4 Insert the AC power cord into an AC outlet 5 Go to Page 18 for playing DVDs discs NOTE Your cable or antenna connection to the television should not be affected by this connection Connect your antenna cable to your television as you normall...

Page 6: ...y images If your TV doesn t have S VIDEO use the basic video connection listed above yellow plugs VIDEO IN or OUT are not needed for S Video 3 Insert the AC power cord into an AC outlet 4 Go to Page 18 for playing DVDs discs NOTE Your cable or antenna connection to the television should not be affected by this connection Connect your antenna cable to your television as you normally would You may n...

Page 7: ...r TV has an S Video Input jack connect the S Video cable to the S VIDEO OUT jack on the back of your DVD player and to the S Video jack on your TV If your TV doesn t have S Video use the basic video connection listed above yellow plugs VIDEO IN or OUT are not needed for S Video 3 Connections of your antenna cables are not changed when you add your DVD player 4 Insert the AC power cord into an AC o...

Page 8: ...er You must also set the Digital Output setting in the Soundtrack menu see page 17 3 Connect the video cable Basic video connection Connect the video cable yellow to the VIDEO OUT jack on the back of your DVD Player and to the Video Input jack on your TV OR S Video optional If your TV has an S Video Input jack connect the S Video cable to the S VIDEO OUT jack on the back of your DVD player and to ...

Page 9: ...S Video cable to the S VIDEO OUT jack on the back of your DVD player and to the S Video jack on your TV If your TV doesn t have S Video use the basic video connection listed above yellow plugs VIDEO IN or OUT are not needed for S Video 3 Use an antenna cable to connect the antenna output on the satellite receiver to the antenna input on the VCR This DVD player does not change any antenna connectio...

Page 10: ...h the set on or off 2 STANDBY indicator This lamp has 2 colors red and green green is STANDBY red is ON When the player is off standby press the POWER button on the REMOTE the indicator lights up in RED which turns the set on 3 PLAY indicator During play this indicator lights up also when you press any button on the REMOTE this lamp flashes rapidly to show you the remote s signal was received FRON...

Page 11: ...y turns off the sound press again to restore sound 19 ANGLE button Uses to access various camera angles on a DVD 20 AUDIO button Displays and changes the audio menu and language of a DVD if present on the disc or selects stereo left or right audio channel of a music disc 21 CLEAR button Use this to erase any wrong number you input 22 STOP button Stops play 23 SELECT button Used to confirm your sel...

Page 12: ...han 20 feet from the remote control sensor and within about 600 of the front of the DVD player not your TV set Tips on REMOTE CONTROL operation The operating distance may vary according to the brightness of the room Do not point bright lights at the remote control sensor Do not place objects between the remote control unit and the remote control sensor Do not use this remote control unit while sim...

Page 13: ...cm 20 minutes 74 minutes 85 minutes 85 minutes Approx 12 hours Approx 3 hours VARIES VARIES NOTE may appear on the TV screen during operation A means that the operation is not permitted by the DVD video player of the disc in that mode or at that time This DVD player can not play the following discs CD Is CD ROMs including PHOTO CDs or computer software discs Data part of CD Extras DVD ROMs DVD Aud...

Page 14: ... to operate properly and prolong the life of its components If the player or discs will be left in a car parked in the sun put the player in the trunk or where the player will not be subjected to the direct rays and heat of the sun Cleaning the Cabinet Clean the cabinet panel and controls with a soft cloth slightly moistened with a mild detergent solution Do not use any type of abrasive pad scouri...

Page 15: ...utton on the TV s remote see this chart Select it from the TV s menu system Tune directly to the DVD input channel by pressing a specific number see this chart Go through all the channels in the channel list by pressing the channel up down buttons on the TV Some common scenarios are listed in the table to the right How to Move Around the DVD Player s Menu System This booklet tells you how to selec...

Page 16: ...BUTTON Setting LANGUAGE OSD MENU SUBTITLE AUDIO AND DVD MENU 1After entering the initial setting move the DIRECTION buttons to select the Language 2Press the SELECT button to open language menu 3Move the DIRECTION buttons again to select OSD MENU then press SELECT button to open submenu of OSD 4Select the language you want for your OSD using the UP DOWN buttons press SELECT button to confirm 5Foll...

Page 17: ... format can t be cropped in this fashion This means the black bars will appear at the top and the bottom of the screen 16 X 9 Widescreen 16 9 Choose this setting if your DVD Player is connected to a widescreen TV If you choose this setting and you don t have a widescreen TV the images on the screen may appear distorted due to vertical compression faces may seem long and thin If you play a disc rec...

Page 18: ...sword to lock the set the screen will show stars in place of the 4 digit password press SELECT button the open lock icon will change to closed lock 6To exit the rating level setting menu press the UP button to return back to the initial setting menu or press SETUP button to close the menu and exit the initial setting directly NOTE When playing a movie with a higher rating you will be asked to inpu...

Page 19: ...reen One of the options will be Start Disc Play Highlight that option and press the SELECT button or PLAY button The DVD Player s main menu appears on the screen Highlight the Play option and press SELECT button 5 Press STOP button to stop play 6 After play press OPEN CLOSE or EJECT button to open the tray and take the disc out of the disc tray NOTE When player is stopped the display will show Pre...

Page 20: ...remote NOTE Every DVD is slightly different these are just examples 2 Press the UP and DOWN buttons to highlight the section of the disc menu you want to choose and press SELECT In the example on the left Language has been selected An example of a disc menu The menus on discs vary because the disc menu is created by the disc s author and director 3 Press the UP and DOWN buttons to select a languag...

Page 21: ...the REMOTE CONTROL continuously press it to search backward at a faster speed X2 X4 X8 or X20 press PLAY button to resume normal play Skipping through a Chapter or a track During play press the FORWARD button on the REMOTE CONTROL continuously press it to search forward at a faster speed X2 X4 X8 or X20 press PLAY button to resume normal play 3 PAUSE OR STEP PLAY During DVD play press the PAUSE ST...

Page 22: ...ment point A you want to play repeatedly 2 Press A B REPEAT button again at the end of the segment point B The DVD video player will automatically return to point A and starts repeat playback of the selected segments A to B over and over till you press A B REPEAT button again Each time you press the REPEAT 1 ALL button the repeat mode changes as follows 3 Press A B repeat button again to return to...

Page 23: ...nu will show all numbers use the DIRECTION buttons to select CLEAR ALL then press SELECT button to clear 6Press the PROGRAM button again to exit the programmed play 7The screen returns to the normal DVD screen as shown right S E LE C T To select scene with title number when playing DVD disc NOTE Press PLAY button to start playback after each operation 1 Press SEARCH button during play or in stop m...

Page 24: ...ow motion 1 Press SLOW button during play the playback speed will become 1 2 1 4 1 6 or 1 7 of normal speed every time you press the SLOW button NOTE 1 During the slow motion playback the sound is muted no sound 2 Only DVD discs have this feature 2 3 O FF DIRECTION buttons 3 To return to normal play press ZOOM till icon shows 8 SLOW MOTION PLAY 2 Press PLAY button to resume normal play 1 2 23 DVD ...

Page 25: ...ple audio languages are recorded Also some DVD have the director s narration on them AUDIO 1 Press the AUDIO button during DVD disc play the screen will display the number of current soundtrack languages available 2 Repeat pressing the button to change the language or back to the initial language NOTE When no soundtrack languages are recorded pressing this button will not change the language NOTE ...

Page 26: ... may not play in the recorded order As for multi session disc only the first session can be played If the CD has both audio tracks and MP3 files only audio tracks will be played Limitations on Display The maximum number for display of artists names or song names is 33 letters Available letters for display are the following capital or small alphabets of A through Z numbers of 0 through 9 and _ unde...

Page 27: ...oaded NO DISC appears If this occurs load the MP3 CD correctly or replace the MP3 CD MP3 CD01 1 M0101 2 M0102 3 M0103 4 M0104 5 M0105 6 M0106 7 M0107 4 Select the desired file by pressing the UP or DOWN button The selected file is highlighted 5 Press SELECT button to start playback Selected File PLAY BUTTON DIRECTION BUTTON 26 Track 1 117 00 00 00 8 M0108 9 M0109 10 M0110 11 M0111 12 M0112 13 M011...

Page 28: ...emote control sensor Press the POWER button on the REMOTE to set the player to the standby mode and then press the POWER button again to turn the player to ON Reset the DVD player by discon necting the power plug and then re connecting it the player may not be operating properly due to lightning static electricity damaged or wrong discs or some other external factors No buttons operate on the main...

Page 29: ... reasons Door cannot open from the set Wait a few seconds this function takes a little longer also try the EJECT button on the REMOTE control 28 The subtitle or language is not what you selected Go to page 15 The icon appears in the left top corner The feature or action you selected cannot be done at this time or with this disc Wrong Region Disc shows on left top corner If a button is pressed too ...

Page 30: ... and flutter below measurable level CD audio 1 Frequency response 20 Hz 22 kHz 2 S N ratio 100dB 3 Dynamic range 90 dB 4 Wow and flutter below measurable level Pickup Wave length 655nm Laser power Class 1 SPECIFICATIONS LENOXX reserves the right to make design and specification changes for product improvement PROTECT YOUR FINE FURNITURE WE RECOMMEND A CLOTH OR OTHER PROTECTIVE MATERIAL BE PLACED U...

Reviews: